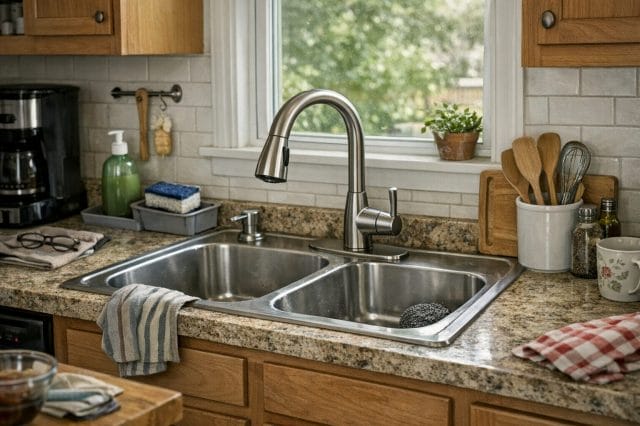
There comes a point with a lot of household items where you stop trying to ignore the little warning signs and just accept that the easiest fix is to replace the thing properly. A kitchen water faucet is one of those items. It gets used every single day, often many times a day, and because it is so familiar it is easy to put up with strange noises, a rough handle, vibration, or a slight feeling that something is not quite right. Then one day the sound becomes impossible to ignore. If your kitchen water faucet starts making a clanging or rattling noise when you turn it on, that is usually the moment when replacing it starts to make far more sense than trying to keep squeezing a bit more life out of the old one.
That was exactly the situation here. The old kitchen faucet had reached the stage where the noise was no longer just a minor annoyance in the background. It sounded tired, loose, and not especially trustworthy anymore. In a kitchen, where you want quick access to clean running water without hassle, that kind of issue gets old very quickly. The good thing is that replacing a faucet is one of those practical jobs that feels much more intimidating before you start than it actually is once you have the new unit in your hands and can see how everything fits together.

What made this replacement even more straightforward was the decision to choose a new faucet that was very similar to the old one. That is often the smartest route if your existing setup already works well in terms of layout, sink compatibility, and how the hot and cold lines are arranged underneath. Rather than treating it as a full kitchen upgrade or trying to redesign the plumbing arrangement, the job becomes a simple swap. Remove the worn out unit, fit the new one through the existing opening, tighten it from below, and reconnect the water supply lines. For anyone who likes practical improvements without turning them into a complicated weekend project, this is the kind of approach that makes a lot of sense.
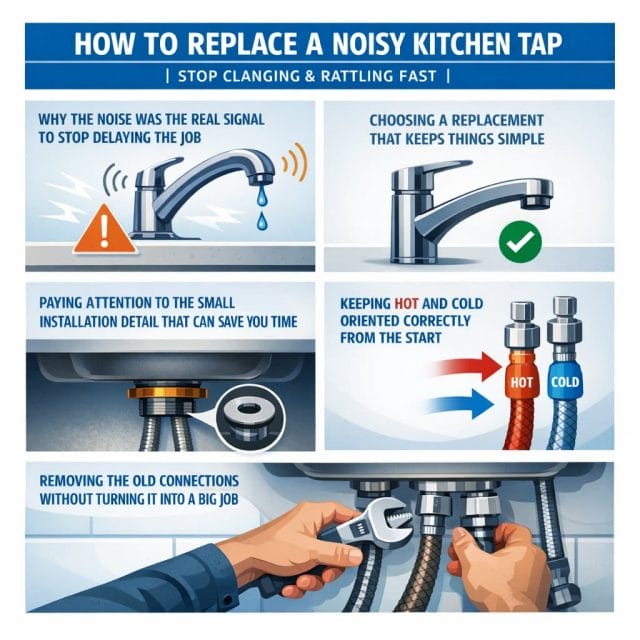
WHY THE NOISE WAS THE REAL SIGNAL TO STOP DELAYING THE JOB
One thing I have noticed with home maintenance is that noise is often the first obvious clue that something mechanical is beginning to fail. A kitchen faucet should feel stable and predictable. You turn the handle, water comes out, and that is really all there should be to it. Once you start hearing knocking, rattling, or a metallic clanging sound, it usually means wear has developed somewhere inside the faucet body or around the way the water pressure is being handled through the fixture. In some cases it can be related to loose internal parts, ageing cartridges, vibration, or mounting points that are no longer holding everything as firmly as they once did.
Even if the faucet still technically works, a noisy unit tends to become increasingly irritating because the kitchen is such a central part of the home. The sound gets repeated every time someone washes their hands, rinses vegetables, fills a kettle, or cleans up after cooking. It can turn a simple task into a reminder that something needs attention. Beyond the annoyance, there is also the practical side. Once a faucet starts sounding wrong, it is worth considering whether it is also moving closer to leaking, becoming harder to control, or failing at an inconvenient time. Replacing it before that happens is usually the more comfortable option.
There is also a mindset shift that happens when you decide to stop patching and start replacing. Instead of wondering how long the old faucet can keep going, you begin focusing on what a better day to day experience will look like once the new one is in place. Quiet operation, smoother control, cleaner appearance, and the confidence that the fixture is fresh and properly secured all make a difference. It is one of those small upgrades that improves the kitchen immediately, even though it is not the sort of flashy improvement people normally talk about first.

CHOOSING A REPLACEMENT THAT KEEPS THINGS SIMPLE
The replacement faucet came from eBay, which is often a practical place to look when you already know roughly what style you want and do not need to spend a fortune for a basic, functional swap. In this case, the new unit was very similar to the old one, which immediately removed a lot of the uncertainty from the process. Matching the general style means you are less likely to run into awkward fitment issues, and it also keeps the visual look of the kitchen consistent. If the previous faucet shape worked well with the sink and surrounding space, there is no need to overcomplicate the decision.
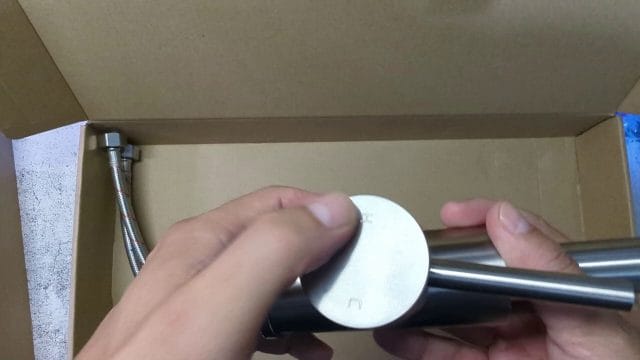
The brushed nickel finish is a good example of this. It is a practical finish for kitchens because it tends to look clean without showing every little mark as aggressively as highly polished surfaces sometimes do. It also fits comfortably into a wide range of kitchen styles, whether the area is modern, simple, or just functional. When you are replacing an existing fixture rather than redesigning the room, choosing a finish that already feels familiar often helps the new faucet settle into the space naturally.
Another positive sign was the weight of the new faucet. It felt pretty heavy, and that can be reassuring when you are evaluating value and build quality straight out of the box. Weight on its own does not guarantee quality, but in many cases a heavier faucet gives the impression of a more solid construction compared with lighter, flimsier alternatives that can feel hollow or less durable. When something is going to be handled every day, a solid feel matters because it contributes to the impression that the faucet will stay stable and perform properly over time.
The supplied pipes were also noticeably long, which is a very useful detail. Longer integrated hot and cold pipes can make installation easier because they reduce the need for extra fittings, adapters, or extension pieces depending on your under sink layout. Simplicity is valuable in plumbing jobs. The fewer extra connectors you need, the fewer possible failure points you introduce, and the easier the whole install tends to be for anyone doing a straightforward replacement at home.
That is one of the things that stands out with many modern faucets. Manufacturers often design them in a way that keeps installation more accessible than people expect. Instead of needing a box full of specialist parts, you often get the faucet body, pre attached supply lines, mounting hardware, and a simple fastening method for securing everything beneath the sink. As long as your sink opening and plumbing arrangement are compatible, the actual process is often more about patience and positioning than technical complexity.
PAYING ATTENTION TO THE SMALL INSTALLATION DETAIL THAT CAN SAVE YOU TIME
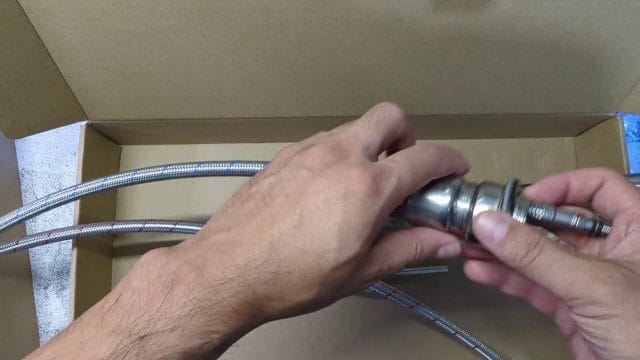
One of the most useful details in this kind of replacement job is the order in which you feed parts through the sink opening and the mounting connector. This is the sort of thing that seems obvious once you have done it, but if you miss it on the first attempt, you can create unnecessary extra work for yourself. The important point here was to make sure the hot and cold pipes were pulled through the bottom connector before everything was fully positioned in place. If you forget to do that, you can end up with the awkward realisation that the connector cannot be fitted properly afterwards without partially undoing the setup and starting again.
This is exactly why even simple home jobs benefit from slowing down for a moment and checking the sequence before tightening anything. It is not always the difficult tasks that cause frustration. More often, it is the small overlooked steps that lead to wasted time under the sink while trying to manoeuvre parts in a cramped space. Kitchens are not especially generous when it comes to working room, and once you are leaning into a cabinet, trying to reach upward with limited visibility, any mistake feels more annoying than it would on an open workbench.
That is why a practical installation mindset helps. Lay out the components, identify which parts go on before others, check which side is hot and which side is cold, and make sure the hoses are routed correctly before final tightening starts. This kind of steady, methodical approach suits the broader style of practical how to work that appears across technology and tool based posts on the site. It is not about making the task sound dramatic. It is about understanding the simple steps that keep the whole thing efficient and frustration free.
KEEPING HOT AND COLD ORIENTED CORRECTLY FROM THE START
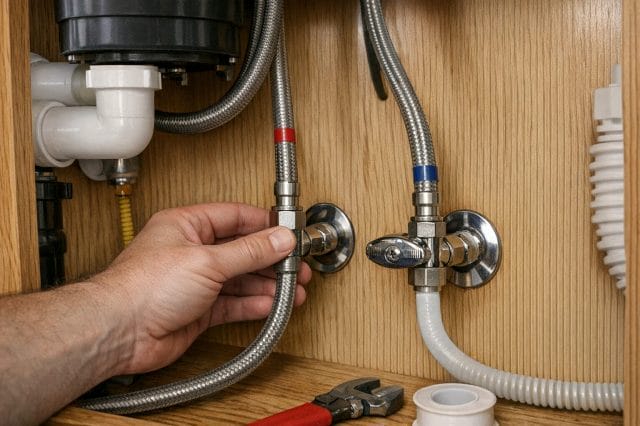
Another straightforward but important point during installation is making sure the cold side is on the right hand side and the hot side is on the left hand side. This is such a standard arrangement that most people expect it without thinking, and it is worth getting right immediately rather than discovering later that the handle direction feels reversed. A faucet can be physically installed and still be functionally annoying if the water directions do not match normal use. That sort of mistake does not usually cause major damage, but it does create a daily irritation that could have been avoided with a few seconds of attention during the setup.
It also matters because routine consistency is part of what makes household fittings feel intuitive. In the same way that people expect light switches, door handles, or appliance controls to behave a certain way, they also expect hot and cold water to follow a familiar pattern. If you are replacing a kitchen faucet for practical reasons, you want the end result to feel immediately normal, not like a compromise that requires explanation every time someone uses it.
With the new faucet, the tightening method also looked simple. The lower connector just needed to be turned to secure everything. That is another reason why this sort of replacement can be less daunting than expected. Once the faucet body is seated correctly in the sink opening, the remaining job underneath is usually just about aligning the fixture and securing it so it does not twist or wobble during use. When the mounting hardware is straightforward, it cuts down both installation time and the chances of overcomplicating the process.
There is a lot to be said for products that are designed around practical use rather than unnecessary complexity. In many tool, technology, and household reviews, what people really want to know is not whether something looks impressive in the box, but whether it does the job with minimal fuss. A kitchen faucet is very much in that category. It does not need to reinvent the idea of a tap. It just needs to be reliable, easy to fit, comfortable to use, and free from the problems that forced the replacement in the first place.
REMOVING THE OLD CONNECTIONS WITHOUT TURNING IT INTO A BIG JOB
To remove the old faucet from the water inlet connections under the sink, the process was described as very easy and straightforward, and that is often true for this type of swap when the existing plumbing has not seized up or corroded badly. In many cases, once the water supply is shut off, disconnecting the two old pipes from the bottom supply points is the main step that separates the old fixture from the new one. If access is reasonable and the fittings are in decent condition, it can be surprisingly quick.
That simplicity is worth highlighting because a lot of people avoid practical jobs around the house not because the jobs are genuinely too difficult, but because they imagine every plumbing task must involve specialist skills or major risk. There are certainly situations where a plumber is the right choice, especially if valves are damaged, fittings are stuck, or there are signs of leaks elsewhere in the system. But for a direct like for like faucet replacement, many setups really are as simple as disconnecting two supply lines, removing the old fixture, feeding the new one through, securing it, and reconnecting the supply.
The useful thing about a job like this is that the visual progress is immediate. You remove the old noisy faucet, place the new brushed nickel one in position, and the kitchen already starts to look fresher before the water is even turned back on. It is the kind of upgrade where practical function and visible improvement arrive at the same time. That tends to make the effort feel worthwhile very quickly.
WHY A LIKE FOR LIKE REPLACEMENT OFTEN MAKES MORE SENSE THAN A FULL UPGRADE
There is a temptation with home improvement to treat every replacement as an opportunity to upgrade everything around it, but that is not always the most practical route. Sometimes the best decision is to identify the failing component, replace it with something very similar, and move on. In this case, that strategy seems entirely sensible. The old faucet was noisy and ready to go. The sink itself was fine. The hot and cold arrangement was already established. The mounting point was already there. So instead of introducing a more complicated design, different dimensions, or extra features that might require adaptation, the replacement focused on restoring proper function quickly.
This kind of decision fits well with an efficient, entrepreneurial mindset. Not every fix needs to become a project. Sometimes the smarter move is to solve the problem with the minimum amount of extra time, cost, and disruption. That does not mean choosing carelessly. It means recognising what actually matters. If the goal is a dependable kitchen faucet that installs easily and stops the rattling noise, then a similar brushed nickel replacement with long supply lines and a simple mounting system is a strong practical choice.
There is also a broader lesson here that applies well beyond plumbing. A lot of day to day tools, devices, and home fixtures are best judged by how frictionless they are in real use. Whether it is a desktop fan, a headset, software update, or a kitchen faucet, the same principle tends to apply. If the item works smoothly, solves the issue, and does not create new complications, then it has done its job well. That is often more valuable than novelty.
WHAT A SUCCESSFUL INSTALLATION ACTUALLY LOOKS LIKE IN DAILY USE
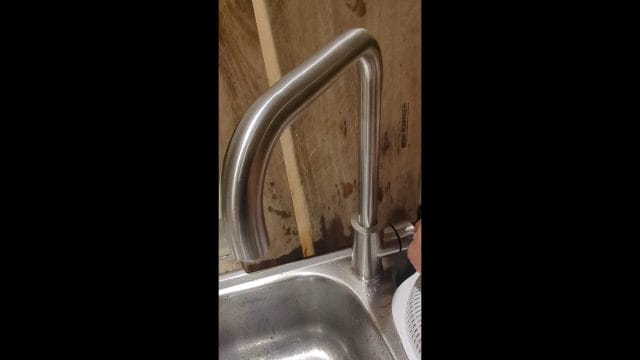
Once the new faucet was installed, the key result was immediate and obvious. It worked really well, and the clanging and rattling noise was gone. That is the most satisfying kind of home improvement outcome because it is measurable in a very practical way. You turn the water on and instead of hearing the old disruptive sound, you just get normal, controlled water flow. The kitchen feels calmer again, and a small but recurring source of irritation disappears from the daily routine.
That kind of improvement is easy to underestimate if you only think in terms of major renovations or expensive upgrades. In reality, quality of life at home is often shaped by much smaller details. A stable faucet, a quiet appliance, software that no longer stutters, an accessory that finally does what it is meant to do without fuss. These are the fixes that make everyday tasks smoother, and over time those small gains add up to a better working and living environment.
It is also a reminder that practical maintenance is worth acting on when the warning signs first appear. Waiting longer rarely makes a noisy fixture become quieter. More often it just extends the period in which you keep putting up with something that has already told you it is wearing out. Once a replacement is fitted and working properly, it becomes clear how much easier it would have been to do the swap earlier rather than tolerate the annoyance for too long.
THE VALUE OF STRAIGHTFORWARD HOME FIXES THAT JUST WORK
There is something especially satisfying about jobs like this because they do not need over explanation to prove their value. An old kitchen faucet starts making bad noises, a new one is ordered, the replacement is fitted, and the problem is gone. That direct cause and effect makes the whole process feel productive in a very grounded way. It is not a decorative change for the sake of appearance alone, although the fresh brushed nickel finish certainly helps the kitchen look cleaner. It is a fix that restores confidence in something basic that should simply work every day without drama.
For anyone dealing with a similar issue, the main takeaway at this stage is that replacing a worn kitchen faucet can be much more approachable than it first appears, especially when the new unit closely matches the old one and comes with long integrated pipes and straightforward mounting hardware. Paying attention to the orientation of hot and cold, threading the lines through the connector in the correct order, and disconnecting the old supply lines carefully from below are the kinds of small practical details that make the whole job go more smoothly. Once those are handled properly, the reward is immediate every time the tap is turned on and all you hear is water flowing the way it should.
HOOKING EVERYTHING BACK UP WITHOUT MAKING THE JOB HARDER THAN IT NEEDS TO BE
Once the new tap body was sitting in place properly, the next stage was really just about slowing down and making sure each connection was done in a sensible order. This is the part where a simple job can suddenly become annoying if you rush, because working underneath a kitchen sink never feels spacious, comfortable, or well lit. Even when the new fitting is straightforward, you still have to deal with awkward angles, limited hand movement, and the temptation to tighten everything quickly just so you can get out from under there. I found that taking an extra few minutes to check the route of each hose and confirm which side was hot and which side was cold made the whole process much cleaner.
The long pre attached supply lines on the new tap helped a lot here. They gave enough reach to line up with the existing shut off valves without needing any strange bending or forcing. That was one of the better things about choosing a replacement that was very close to the original setup, because it meant there was no need to invent a new plumbing layout under the sink. Everything could follow a familiar path, and that removes a lot of uncertainty from a job like this.
Before tightening the supply lines onto the valves, I made sure the hoses were not twisted around each other. That is a small detail, but it matters more than it looks. A twisted hose can put unnecessary stress on the fitting, and even if it does not leak straight away it is not the kind of thing you want hidden under a sink for months. The better approach is to let each line hang naturally, guide it into place, and then thread it on carefully by hand first. If the connection does not start smoothly by hand, something is not lined up properly, and forcing it is usually where trouble starts.
I also think this is where many people start doubting themselves unnecessarily. A kitchen tap replacement sounds more technical than it really is, but for a like for like swap, the logic is simple. One line goes to hot, one line goes to cold, and both need to be secure without being over tightened. Once you step back from the awkward physical position of lying under the sink, the actual sequence is quite manageable. The hardest part is often access, not complexity.
- Check the shut off valves are fully closed before connecting anything
- Confirm the cold line is routed to the right side and the hot line to the left side
- Start every threaded connection by hand before using a spanner
- Keep the hoses untwisted and allow a natural curve rather than a sharp bend
- Tighten until secure, but do not crush or force the fittings
Because the old tap had already been disconnected without too much drama, this stage felt like the real turning point in the job. Up to that point, you are mostly taking things apart and hoping nothing unexpected shows up. Once the new lines are going onto the shut off valves, you can finally see the end of the task. It is one of those practical little home jobs where progress becomes very visible all at once, and that tends to make the whole thing feel much more encouraging.
THE MOMENT OF TRUTH WHEN THE WATER GOES BACK ON
After the connections were in place, the next step was turning the water back on slowly and checking everything carefully. This is the point where you want patience more than confidence, because even if you are fairly sure all the fittings are correct, there is no reason to rush the test. Opening the shut off valves gradually gives you time to watch each connection and spot any sign of moisture before it becomes a proper drip. In my case, I wanted to be especially cautious because the whole reason for replacing the old tap was to get rid of an irritating daily problem, not replace it with a hidden leak under the cabinet.
The first check was simply visual. I looked at both supply line connections underneath the sink, then checked around the base of the tap above the sink, and then ran the tap gently. If there is going to be a problem, you want to narrow down whether it comes from the hose connection, the mounting area, or the tap body itself. Doing this step by step makes troubleshooting easier, although thankfully there was nothing dramatic to deal with here. The new tap behaved exactly as I had hoped.
What stood out immediately was the absence of the old clanging and rattling noise. That noise had become normal simply because it had been there for so long, and I think that is often what happens with small household issues. You adjust to them, tolerate them, and keep telling yourself they are not serious enough to fix yet. Then the moment the problem disappears, you realise how irritating it had actually become in the background of everyday life. Turning the new tap on and hearing normal, uneventful water flow was oddly satisfying.

The water flow itself felt clean and predictable, and the handle movement was smoother than the old one. That is another thing you do not fully appreciate until after a replacement. With worn fixtures, you gradually get used to stiffness, looseness, noise, or slight inconsistency in operation. A new tap does not have to be expensive or premium to feel like a major upgrade if the old one was well past its best. In this case, the change was not about luxury at all. It was just about returning a basic kitchen function to the way it should feel in the first place.
At this stage I let the water run for a bit longer than necessary, partly to flush the lines and partly to keep checking for leaks. A dry tissue or paper towel is useful here because it reveals even a small amount of moisture quickly. Running a hand around the fittings can work too, but a tissue is often clearer, especially in a dark cabinet where tiny drips are easy to miss. If everything stays dry after the first run, then after a few minutes, and then again after another check later on, you can feel much more confident that the installation is solid.
- Turn the water supply back on slowly rather than all at once
- Check underneath first before focusing on the tap above
- Run both hot and cold water to test full operation
- Use tissue or paper towel to detect even very small leaks
- Check again later rather than assuming one quick glance is enough
One of the most reassuring parts of this whole replacement was that the practical result matched the simple plan from the start. I did not try to redesign the sink area, add extra features, or create more work. I just replaced an ageing, noisy tap with another one that fit the same role properly. Sometimes that really is the smartest way to handle these jobs, especially if your actual goal is reliability and less daily annoyance rather than turning the task into a full renovation.
WHY A STRAIGHTFORWARD REPLACEMENT OFTEN MAKES MORE SENSE THAN A BIG UPGRADE
There is a strong temptation with any home improvement task to think a little bigger than necessary. Once you start looking at taps online, you quickly see pull out sprayers, commercial style necks, touch controls, fancy finishes, filtered water functions, and all kinds of design choices that make a basic replacement look like a missed opportunity. There is nothing wrong with those options if they genuinely suit your kitchen and your budget, but I think a lot of people talk themselves into more complexity than they really need.
For me, the value in this replacement came from keeping the job practical. The old tap had reached the point where it was noisy and clearly worn, but the sink layout itself was fine. The existing holes, the plumbing lines, and the general style of the kitchen did not need rethinking. So choosing something similar was not boring, it was efficient. It meant fewer unknowns, less chance of installation trouble, and a much more predictable result. That is exactly what you want from a repair that is supposed to remove stress rather than create it.
There is also something to be said for choosing improvements that fit the reality of your use rather than the fantasy of a showroom. Most of us are not filming a luxury kitchen advert every time we wash dishes or fill a kettle. We just need the tap to work well, feel solid, and not make alarming noises every time it is used. A brushed nickel finish, a decent weight, and straightforward installation hardware already cover a lot of what matters in everyday use. Beyond that, you can end up paying for features you barely notice after a week.
Another advantage of avoiding unnecessary complexity is that future maintenance remains simple as well. A standard style tap with ordinary supply lines and accessible fittings is usually easier to tighten, inspect, or replace later. That might not sound exciting, but practical maintenance rarely is. Still, if you have ever had to work in a cramped cupboard trying to reach a poorly designed fitting, you quickly learn to appreciate products that respect the reality of installation and upkeep.
In that sense, this job felt very similar to a lot of the practical fixes and tests I tend to write about. Whether it is a piece of technology, a tool, or something around the house, the goal is usually not to chase the most glamorous option. It is to solve a real problem effectively, understand how the item performs in normal use, and decide whether it was worth the money and effort. That same mindset applies just as well to a kitchen tap as it does to a gadget review. If it does the job properly, installs without unnecessary drama, and improves day to day life, then it has already succeeded.
SMALL MISTAKES THAT ARE EASY TO MAKE UNDER THE SINK
Although the overall installation was manageable, there are still a few easy mistakes that are worth mentioning because they tend to come from awkward working conditions rather than lack of skill. Under sink work encourages shortcuts. You are crouched, twisted, or half lying down, usually trying to shine a light with one hand while using the other to reach into a narrow gap. In that position it becomes very easy to skip checks that would feel obvious if the same job were done on a workbench in the open.
The first common mistake is getting the part order wrong during assembly. This was already one of the important lessons from fitting the new tap in the first place, because if the hoses and mounting hardware are not passed through in the right sequence, you can end up undoing work you have just done. It sounds minor, but repeating even one step under the sink is enough to make the whole task feel more frustrating than it really is.
The second mistake is misalignment. A tap can look centred at first glance, then turn out to be slightly twisted once everything is tightened. That is why it helps to keep checking the position from above before the final tightening underneath. Since you cannot always see clearly while tightening the mounting nut, there is a real chance that the body shifts a little as pressure is applied. Taking a few extra seconds to correct that before locking everything in place saves a lot of annoyance later.
The third mistake is over tightening. People often worry more about leaks than about damage, so the instinct is to tighten every fitting as much as possible. In reality, forcing threaded connections can create problems of its own, especially with smaller fittings. Secure is the goal, not brute force. If the thread starts cleanly and the connection is seated properly, it usually does not need aggressive tightening to seal well.
- Do not assume the tap is aligned until you check it from above
- Do not force a connection that does not thread smoothly by hand
- Do not trap or sharply bend the hoses inside the cabinet
- Do not forget to test both hot and cold sides fully
- Do not stop checking for leaks after only the first minute
The interesting thing is that none of these are especially technical mistakes. They are just the sort of practical oversights that happen when a simple job is done in an awkward environment. That is why I think many people are capable of handling this kind of replacement themselves if the existing plumbing is in decent condition. It is less about advanced plumbing knowledge and more about being methodical, patient, and willing to check your work properly.
WHAT IMPROVED IMMEDIATELY AFTER THE NEW TAP WENT IN
The obvious improvement was the noise disappearing, but that was not the only change. Once the new tap was installed and working, the whole sink area felt calmer and more solid. The handle movement was smoother, the body felt more firmly anchored, and using the kitchen sink no longer carried that small sense of irritation that had built up with the old fixture. It is funny how much difference that makes when it is something you interact with several times a day without really thinking about it.
I also liked the fact that the new brushed nickel finish gave the area a slightly fresher look without making it feel as though I had tried to change the whole kitchen style. That was exactly the balance I wanted. The result looked cleaner and more up to date, but still natural within the existing space. If you choose a replacement that is too visually different from everything around it, a simple tap swap can sometimes look oddly disconnected from the rest of the kitchen. In this case, it settled in nicely.
Another immediate win was confidence. With the old tap, there was always that low level doubt in the background because the clanging noise suggested wear and possible future trouble. Even if it was still functioning, it never felt fully trustworthy. Once the new one was in and had passed the leak checks, that uncertainty was gone. There is real value in that, especially with anything involving water inside the house. Peace of mind is not a flashy feature, but it matters a lot.
This is probably why these modest household fixes can feel more rewarding than larger projects. The improvement is immediate, practical, and repeated every day afterwards. You do not need to stand back and admire a major renovation to justify the effort. You just turn on the tap, hear normal water flow, and remember that one annoying problem has been removed from your routine. That kind of result is easy to appreciate because it keeps paying you back in small ways over time.
WAS IT WORTH DOING IT THIS WAY
Absolutely, and I think that comes down to three things. First, the old problem was genuine rather than cosmetic. The tap had started making enough noise that it was clearly no longer something to ignore. Second, the replacement choice was sensible. Instead of turning the job into a redesign, I picked a similar style that reduced compatibility issues and kept installation simple. Third, the actual fitting process confirmed that the decision made sense, because it solved the problem without uncovering a chain of new ones.
There is always a bit of satisfaction in fixing something yourself, but I would say the bigger win here was making a good judgement call early on. Recognising that the noisy tap was not worth tolerating any longer, and then resisting the urge to overcomplicate the replacement, probably saved both time and hassle. A lot of practical home maintenance is really about that kind of decision making. You assess what is failing, choose the level of intervention that matches the real problem, and then carry it out as cleanly as you can.
From a cost point of view, this also felt reasonable. Buying a replacement on eBay and fitting it without turning the whole sink area into a bigger project kept the expense under control. That matters, because not every improvement has to be premium to be worthwhile. Sometimes the best value comes from spending modestly on something functional that removes a daily frustration. When the result is a reliable tap that works properly and looks good enough, that is already a solid return.
I also think there is a useful reminder here for anyone putting off similar little jobs around the house. We often delay them because they seem inconvenient, unfamiliar, or slightly messy. Then once they are done, we wonder why we lived with the problem for so long. That does not mean every repair is simple, and there are definitely situations where a professional is the right call, especially if valves are seized, pipework is damaged, or access is particularly bad. But when the job is a straightforward swap and the plumbing is otherwise fine, it can be much more approachable than expected.
WHY THIS KIND OF PRACTICAL FIX MATTERS MORE THAN IT LOOKS
Replacing the kitchen tap was not a dramatic upgrade and it was never meant to be. It was one of those ordinary maintenance tasks that sits in the background until it crosses the line from tolerable to irritating. But that is exactly why it matters. The kitchen is one of the most used areas in the home, and anything that goes wrong there tends to become part of your day very quickly. If the tap is noisy, loose, awkward, or unreliable, you notice it again and again in small doses. Removing that friction improves the routine in a way that is easy to underestimate until after it is done.
What I liked most about this job was how direct the result was. The old tap made a clanging noise and felt like it was on borrowed time. The new tap went in, worked properly, stayed quiet, and immediately made the sink feel normal again. There was no complicated learning curve, no need for extra accessories, and no sense that I had created more work for myself in the process. It was just a practical replacement that solved the actual problem.
That is probably the most useful takeaway from the whole experience. Not every home improvement needs to become an ambitious project in order to feel worthwhile. Sometimes the smartest move is simply to replace the worn out thing with a decent equivalent, fit it carefully, test it properly, and enjoy the fact that one more daily annoyance has disappeared. In this case, that was more than enough, and every quiet, normal turn of the tap now feels like proof that it was time to stop putting it off.

If this article helped you in any way and you want to show your appreciation, I am more than happy to receive donations through PayPal. This will help me maintain and improve this website so I can help more people out there. Thank you for your help.