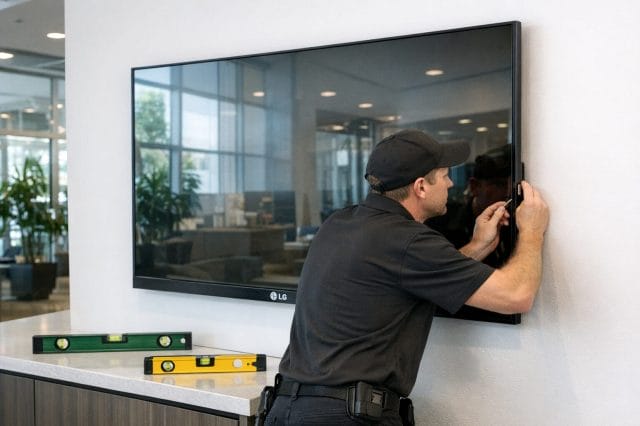
If you work with digital signage screens, even on a small business setup, one of the easiest things to overlook is whether the display is actually sitting perfectly level. It sounds minor at first, but once a screen is mounted on a wall, installed in a shop, placed in an office, or used in a reception area, even a slight tilt can become surprisingly obvious. A screen that is off by a few degrees can make the whole installation look rushed, uneven, or unprofessional, especially when the surrounding walls, shelves, counters, or ceiling lines are straight. What makes this more interesting is that some LG digital signage displays running webOS already include a built in leveler tool, which means you may not even need to grab a separate leveling device just to check the panel alignment.
This is one of those simple but genuinely useful features that can save time during installation and adjustment. It fits nicely into the kind of practical tools that make everyday setup work easier, particularly if you are handling signage, office displays, retail screens, or commercial installations where presentation matters. In this post, I want to walk through where to find the tool, what it looks like, and why it is worth checking before you call the job done.
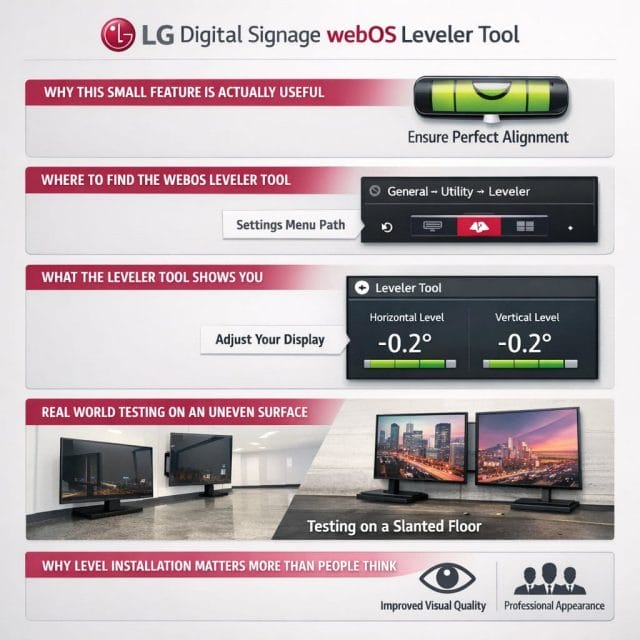
WHY THIS SMALL FEATURE IS ACTUALLY USEFUL
When people think about digital signage features, they usually focus on brightness, scheduling, remote management, content playback, orientation modes, or compatibility with signage software. Those are all important, but physical installation still matters just as much. A high quality screen showing polished content can still look wrong if it is mounted slightly crooked. That visual mismatch stands out more than many people expect, because human eyes are very good at noticing when horizontal and vertical lines do not quite match the rest of the room.
For business owners, installers, and even DIY users setting up their own display, a built in leveler tool is practical because it removes some guesswork. Instead of relying only on visual judgment, you can use the screen itself to confirm whether it is sitting flat. That can be helpful during first installation, when repositioning an existing display, or when testing a unit on a table or temporary surface before wall mounting it permanently. It is especially useful in situations where the display is being placed on a surface that may not be perfectly even, such as foam packaging, a bench, a temporary stand, or an uneven floor.
In other words, this is one of those quiet features that does not get much attention, but once you know it is there, you can actually put it to use right away.
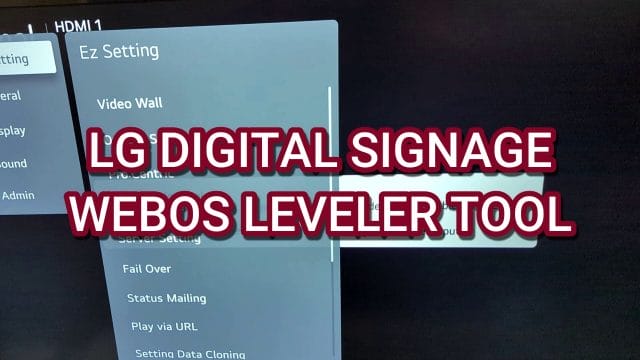
WHERE TO FIND THE WEBOS LEVELER TOOL
The process is straightforward, which is another reason this feature is easy to appreciate. You do not need to go digging through a complicated service menu or an obscure installer section just to access it. According to the walkthrough, you simply go into the Easy Settings area on the LG digital signage webOS screen and scroll down until you reach the leveler tool option.
The first point introduced in the video is the feature itself, with the reminder that webOS digital signage screens have a built in leveler tool.
This is the kind of discovery that feels very on brand for practical business hardware. Many commercial displays include useful setup features, but unless you spend time exploring the menus, it is easy to miss them. If you are already familiar with consumer TVs, you might not expect signage displays to include a tool like this, yet it makes sense in a commercial environment where installation accuracy is important.
The next step is entering Easy Settings.
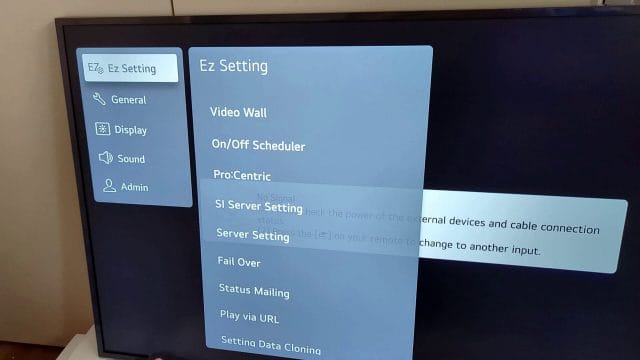
Easy Settings is usually where you would expect to find commonly used options that help with practical setup rather than advanced technical configuration. That makes the placement logical, because leveling a screen is part of the initial install process and should be easy to access without slowing down the job. If you are setting up multiple screens across a business location, being able to quickly jump into this menu can make the workflow more efficient.
After that, you scroll all the way down to the leveler tool.
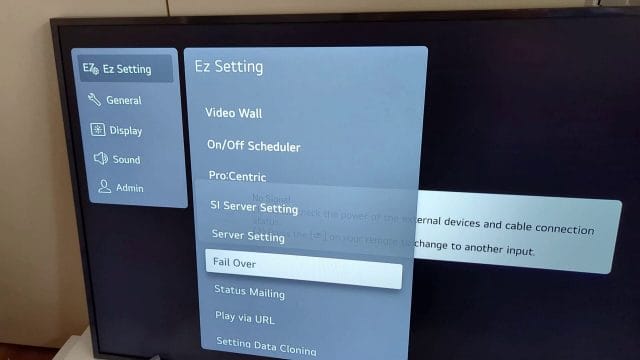
This small navigation detail is useful to know because sometimes menu items are hidden lower down than expected, and if you are moving quickly through the options, you can easily miss them. Once you know it is located near the bottom, it becomes much easier to remember next time. That is the kind of simple tip that saves a bit of frustration later, especially if you are in the middle of a physical installation with tools, brackets, and cables already spread around the workspace.
WHAT THE LEVELER TOOL SHOWS YOU
Once you open the tool, the screen provides a visual indication of the display angle. In the example shown, the panel is not perfectly flat and is slightly tilted by nine degrees. That is quite a useful demonstration because it shows the tool is not just decorative. It gives a direct reading that immediately tells you whether the screen position needs adjustment.
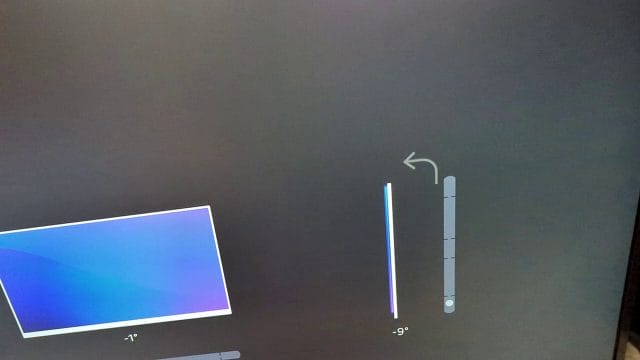
A nine degree tilt is enough to be clearly noticeable in a real world installation, particularly if the screen is mounted against straight architectural lines such as brickwork, tiled walls, shelving, or clean office partitions. If you were trying to align a commercial display in a customer facing environment, that kind of tilt would probably stand out straight away. By checking the built in leveler before final tightening or completion, you can avoid leaving the installation slightly off centre or uneven.
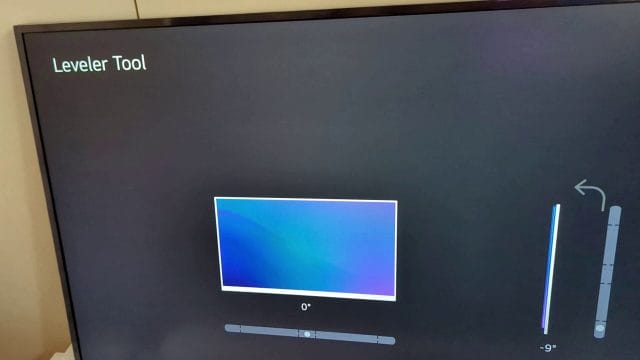
The tool appears to function as a direct orientation reference, allowing you to physically move the display and watch the reading change. In the walkthrough, the screen is adjusted until it reaches zero degrees, showing that the display is now level. That kind of live feedback is useful because it makes the process much more precise than simply standing back and guessing whether it looks right. Even if your eye says the panel seems close enough, the leveler gives you a measurable reference point.
This matters because visual perception can be influenced by the room itself. If the floor is uneven, the nearby furniture is not square, or the wall lines are deceptive, a screen can appear straight when it is not, or appear crooked when it is actually level. Using the display’s own leveler helps remove some of that uncertainty.
REAL WORLD TESTING ON AN UNEVEN SURFACE
One detail that stands out from the transcript is that the screen was sitting on foam, which caused it to remain slightly one degree off even after adjustment. This is actually a very practical observation because it highlights something installers and testers run into all the time. The environment where you test the display may not be as stable or as flat as the final installation point. Packaging foam, temporary benches, soft surfaces, uneven tables, or slightly warped boards can all affect the reading.
That means the leveler tool is not only helpful for confirming a final wall mounted installation, but also for identifying whether your current test surface is influencing the result. If the screen is on foam and shows a one degree offset, that does not necessarily mean the display itself has a fault or that the tool is inaccurate. It may simply reflect the reality that the base underneath is compressing unevenly. In practical terms, this gives you another layer of confidence when troubleshooting setup issues, because you can consider the surface as part of the reading.
This is also a reminder that installation checks should be done in the closest possible conditions to the final mounting position. If you are just testing a display after unboxing, a slight variation may not matter much yet. If you are completing a permanent install, though, you would want to confirm the final angle after the screen is fully secured in place and resting on its actual mount or bracket.
WHY LEVEL INSTALLATION MATTERS MORE THAN PEOPLE THINK
A properly level display is not just about appearance, although appearance is a big part of it. In a retail environment, customer facing screen, menu board setup, meeting room, or office signage installation, alignment contributes to perceived quality. People may not consciously say that the screen is tilted, but they often notice that something feels off. That subtle visual discomfort can affect how polished the whole setup appears.
For businesses, details like this matter because signage is part of presentation. If you are using a digital display to show promotions, welcome messages, information boards, internal dashboards, or branded content, the hardware itself becomes part of the brand image. A clean, straight installation communicates care and professionalism. A slightly crooked screen can suggest the opposite, even if the content on it is well designed.
There are also functional reasons for paying attention to level. If you are installing multiple displays side by side, stacking them, or aligning them with counters and fixtures, even a small angle difference can become more obvious when compared against adjacent screens or straight furniture lines. In those setups, a built in leveler can be very handy during installation because it helps you standardise positioning across the whole arrangement.
USEFUL FOR DIY USERS AND SMALL BUSINESS OWNERS
One reason I like features like this is that they are not only helpful for professional installers. They are also useful for small business owners, solo operators, and anyone handling their own setup without a full AV team. That fits well with a practical, simple entrepreneur mindset, because often you are doing a bit of everything yourself. If you have bought an LG digital signage display for a shop, studio, office, reception space, or workshop, being able to verify the level directly from the screen can make setup less intimidating.
Instead of buying extra tools immediately or relying only on trial and error, you can use what is already built into the device. That does not replace proper mounting tools for a large or permanent installation, but it does give you a quick and accessible reference during setup. For smaller operations trying to get things done efficiently, that is a genuinely helpful advantage.
It also reduces the chances of finishing the installation, stepping back, and then realising later that the display is slightly off. Anyone who has mounted screens, shelves, or brackets knows that going back to readjust something after the job feels complete is annoying. A quick check with the built in leveler tool can help avoid that extra round of tweaking.
GOOD TO CHECK BEFORE AND AFTER MOUNTING
A sensible way to use this feature is in two stages. First, check the screen while preparing the installation, especially if you are testing the unit on a table, stand, or temporary support. This gives you an idea of how the tool works and whether the current resting surface is affecting the reading. Second, check it again after the display is mounted or positioned in its final location. That final check is the one that really matters, because it confirms how the panel sits in the actual environment where it will be used.
If the reading is slightly off after mounting, you still have a chance to make fine adjustments before considering the job complete. Depending on the bracket or mounting system, that may mean shifting one side slightly, adjusting the mount arms, or repositioning the support points. The key point is that the leveler gives you immediate feedback while you are making those changes.
For anyone managing multiple displays, this can also become part of a repeatable installation checklist. Power on the screen, open Easy Settings, scroll to leveler tool, confirm the reading, adjust if needed, and then move on to network setup, content testing, and the rest of the configuration. Simple processes like that can help keep installations more consistent.
A SMALL WEBOS FEATURE WORTH REMEMBERING
There is something satisfying about discovering a feature that is simple, practical, and immediately useful. The LG digital signage webOS leveler tool fits into that category. It is not flashy, and it probably will not be the reason someone buys the display in the first place, but once you know it exists, it becomes one of those little tools that can make setup easier and the final result cleaner.
The walkthrough is short, but it highlights exactly what matters. The tool is built in, it is easy to reach through Easy Settings, it provides a visible angle reading, and it can help confirm when the screen is correctly aligned. It also shows a realistic example where the supporting surface affects the reading slightly, which is a useful reminder to always think about the conditions around the screen and not just the number on the display.
If you are using an LG digital signage screen with webOS, this is definitely worth checking out the next time you install or reposition the display. Features like this are easy to miss, but they can make a real difference in getting a cleaner and more professional result without adding much extra effort to the job.

If this article helped you in any way and you want to show your appreciation, I am more than happy to receive donations through PayPal. This will help me maintain and improve this website so I can help more people out there. Thank you for your help.
HELP OTHERS AND SHARE THIS ARTICLE
LEAVE A COMMENT
I am an entrepreneur based in Sydney Australia. I was born in Vietnam, grew up in Italy and currently residing in Australia. I started my first business venture Advertise Me from a random idea and have never looked back since. My passion is in the digital space, affiliate marketing, fitness and I launched several digital products. You will find these on the portfolio page.
I’ve decided to change from a Vegetarian to a Vegan diet and started a website called Veggie Meals.
I started this blog so I could leave a digital footprint of my random thoughts, ideas and life in general.
If any of the articles helped you in any way, please donate. Thank you for your help.
Affiliate Compensated: there are some articles with links to products or services that I may receive a commission.