There are moments in an edit when a scene feels like it needs just a little more time to breathe. The composition is strong, the mood is right, and the motion is working, yet the timing is too tight to land the emotion you want. In traditional editing you would search for an extra clip, shift the rhythm of the sequence, or rebuild the beat from scratch. The AI Extend feature in Wondershare Filmora opens an entirely different path. It is an invitation to grow your footage beyond its original bounds with generative intelligence that listens to your prompt and carries your scene forward. It feels almost like whispering a direction to an assistant behind the camera, then watching the shot flow onwards with the same visual character, only now shaped by your words.
Working with this feature is not simply pressing a button and hoping for the best. It is a creative collaboration between your judgement and the model that will interpret your description. A thoughtful approach to planning, prompting, camera movement, and review will reward you with extended scenes that feel purposeful rather than arbitrary. This article walks through that process in detail, starting at the point where you add media to the timeline, moving through the settings and the prompt, waiting with patience during generation, and then evaluating the results carefully. Along the way you will see how a simple request can introduce lively elements such as a whale surfacing into view or birds that take flight across the sky, and how camera movement choices shape the presence of those additions. The goal is not a trick for the sake of novelty, but a credible extension that supports the narrative and the sensation you want your audience to carry when the scene concludes.
Preparing your project and choosing stock media
Before you explore the AI Extend tool, it helps to put something concrete in front of it. Filmora includes a stock media library that can be a quick source of clips for testing and for building scenes. The library gives you access to trending selections which often bring dynamic motion and saturated colour, and it also offers quieter settings such as panoramic landscapes that hold stillness and space. The choice matters because the strength of the composition and the clarity of the motion will influence how well the extended segment blends into the original clip. A landscape background is a perfect foundation when you want to see how the model interprets a wide scene with room for movement across the frame.
Navigate to the stock media tab, browse by category, and observe the thumbnail previews with an eye for lines, dominant shapes, and horizon placement. If your plan involves adding creatures or objects to the sky or the water, look for clean regions with enough contrast to make those additions legible. Click a few candidates and watch the quick previews in the media panel. When a clip feels right, select it and add it to the timeline. If the asset needs to be retrieved, Filmora will request the download to store it locally within your project space.
The download is more than a procedural step. It ensures that the footage you are about to extend is present at full resolution, ready for analysis by the AI engine. A fast connection is helpful, yet even with a modest speed you can allow Filmora to complete the fetch and then proceed without interruptions. Once the download completes, drag the clip onto the timeline and place it on the primary video track. It will appear with its default duration, frame rate, and resolution. Check the project settings to confirm that they match your target output. Aligning your sequence settings with the source clip reduces the chance of artefacts when the extension is generated.
At this point you have a canvas. Play the clip to feel its rhythm. Note the beginning and ending frames. Identify whether the scene ends with a soft fade in motion or a strong cadence that might be difficult to continue seamlessly. The AI Extend feature can pick up the thread of a scene and add time, but your starting point still influences how natural the outbound transition will appear. A gentle pan across a beach with small waves and a wide sky invites continuation, just as an unbroken view of rolling hills invites the introduction of new elements. A abrupt cutaway at the end of a clip is less suitable as a base for extension.
Locating and understanding the AI Extend control
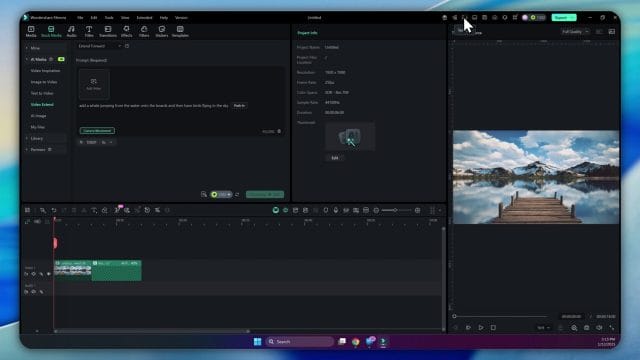
With the clip in the timeline, you can move towards the control that triggers the AI extension. Filmora presents a button dedicated to this function. It sits in the editing interface close to where you manage clip length and effects. The label makes it clear that you are about to use the AI Extend capability. You will click this control to open a panel where you specify how long to extend, what you want to see in the extended portion, and how the virtual camera should move as the new frames are created.
When you engage the AI Extend panel, the first setting you will notice is the duration for the extension. You can ask for a specific number of seconds. Eight seconds is a practical choice for experiments because it is long enough to reveal meaningful motion without becoming a commitment that consumes excessive credits. Think of eight seconds as a short movement in a piece of music. It allows time for a subject to appear, perform a single action, and exit or settle, giving you a complete moment that slots into your edit without overstaying.
It helps to imagine the timing of the extended segment relative to the pace of the original clip. A slow scene benefits from a moderate extension to maintain calm and clarity. A fast scene might require less time to avoid turning the extension into a separate act. With eight seconds selected, you are ready to communicate your creative intent to the model by writing a prompt.
Writing a prompt that the model can perform
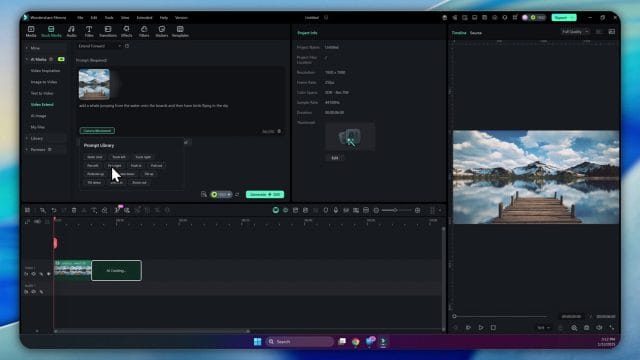
The prompt is where you tell the AI what you want to see in the extended frames. The key is to be concrete and observable. Describe what should be present, what action should occur, and where in the scene it should happen if you have a preference. The example request is direct and vivid. You can write that a whale should jump from the water and onto the boards, then that birds should fly in the sky. This gives the model an object, an action, a location for the action, and a secondary motion in a different part of the frame. It also implies water and sky as environments that can support these motions, which fits a landscape background.
Begin with the main event. State the subject and the action. Then add context. If you want the whale to break the surface with a sense of energy, mention the splash or the way the water reacts. If you want the birds to feel like a flock rather than a single bird, mention multiple birds and let them fly across rather than straight at the camera. You do not need to write an essay for the prompt, but do offer enough detail that the AI can produce coherent motion that fits the scene. If the composition has boards or a pier, mention those boards explicitly so the model knows that is where the landing happens.
Consider the visual language that frames your request. If you want a majestic mood, words like glide and soar are helpful. If you want a sudden burst of energy, words like surge and burst help signal the desired motion quality. Be careful with contradictory requests that could confuse the model. Do not ask for a whale to jump yet also request that the surface remains untouched by ripples. Do not ask birds to fly in the sky while also asking the sky to be empty. Think like a director who is guiding a motion scene.
It is also helpful to think about scale. The size of the whale relative to the boards should make sense in relation to the wide view. The birds should be small enough to feel distant yet large enough to read without strain. If you have a preferred direction for the birds, specify whether they fly left to right or right to left. The goal is not to dictate every particle but to signal the overall choreography.
Filmora gives you a prompt input field where you can write all of this in natural language. It does not require special formatting or code. Keep your sentences clear. You can write the request in one sentence or two. When you are satisfied, move on to the camera movement settings that shape how the scene will feel as these actions occur.
Choosing camera movement to set the mood
The camera is your voice within the scene. Even when the scene is generated, the way the camera moves or holds still contributes as much as the subject actions. Filmora provides a series of camera movement options in the AI Extend panel. You will see choices such as static shots, truck left, truck right, pull out, and push in. Each movement has a different narrative effect. This is not a matter of novelty. It is a core part of how the extended segment will be perceived when it joins your edit.
Static shots
A static shot keeps the camera in place. There is no movement of the framing or position. In practice this means the scene remains steady as the whale jumps and the birds fly. The stability draws attention to the subjects and the environment. It can feel documentary and observational. Use a static shot when you want the extended scene to sit quietly alongside the original clip, adding time and action without changing the visual pace. In landscape settings a static shot emphasises expanse and stability. It is useful when you want viewers to gaze and absorb rather than chase motion.
Truck left and truck right
Trucking is lateral motion of the camera across the scene. Truck left moves the camera to the left. Truck right moves it to the right. The entire frame shifts, giving a sense of traversal through the environment while maintaining a consistent perspective. When you choose truck left, the camera glides left as the whale acts or as the birds pass. The motion can yield a sensation of discovery, as if the frame is seeking an event and catching it as it unfolds. Truck right is similar yet with movement in the opposite direction. Use these options when you want to introduce energy without changing the apparent size of objects relative to the camera. They are very good for scenes where the action moves across the frame and you want the camera to accompany it.
Pull out
Pull out increases distance between the camera and the subject. It brings context into view. If the whale jumps near the boards, a pull out will reveal more of the water and the surrounding environment, making the action feel like part of a wider world. It can signal a change in scale or an opening in mood. Use pull out to conclude a moment or to set a calm tone after an energetic event. It is gentle, often reflective. Be aware that pulling out reduces the apparent size of subjects unless the scene contains strong motion that keeps them prominent.
Push in
Push in narrows the distance to the subject, moving the camera closer as the extended frames play. It is decisive. It invites the viewer to lean into the action, to feel proximity and consequence. In the example, choosing push in will draw the eye towards the whale and the boards as the jump and landing occur. It will also make the birds in the sky feel more present if they cross the field near the centre. Use push in when you want intensity and focus. It can turn a simple event into a dramatic moment without resorting to speed or cuts. The viewer senses intent, as if the camera operator is choosing to witness the event closely.
Camera movement should align with the emotional intent of your prompt. A playful scene with birds might benefit from a gentle truck to follow the flock. A moment of awe as a whale emerges from the water might be best served with a push in that honours the subject. Avoid combining a busy prompt with an aggressive camera movement unless you are seeking a deliberate rush. Balance is important. You are guiding both the behaviour of subjects and the stance of the camera as they perform.
Understanding AI credits and how generation consumes them
The extension process uses AI credits from your Filmora account. Each time you press generate for the AI Extend operation, the system draws a fixed number of credits. The example shows that the extend action will consume five hundred credits. This is not a token cost. Treat it as a budgeted resource. If you experiment frequently, the credits can decline quickly. Plan your moves. Refine your prompt and movement choices before you commit them to generation. Consider working with shorter extensions for early tests, then increasing the duration when you are confident in your direction.
Filmora makes the cost visible. When you select your settings, the panel will indicate the number of credits that will be spent to produce the extended segment. This is a helpful check. If you are about to adjust only a small detail, ask whether it is necessary to generate immediately or whether you can review the plan first. Remember that pressing generate again will consume another set of credits, even if the settings are identical. Patience and focus are virtues here.
If your work will involve frequent use of the AI Extend feature, take a moment to review your account status. Filmora allows you to upgrade your plan and add more AI credits as needed. Navigate to your account settings within the programme. Locate the section that describes AI credits. You can purchase additional credits to ensure uninterrupted work. Treat your credits like paint or film stock in a traditional studio. Stock up before a major session. Keep a record of your consumption so you can forecast your needs for future edits.
Generating the extended segment and waiting well
When your prompt and movement settings are ready, press the generate button. Filmora will begin the process of constructing the new frames that extend your clip. Under the hood, a model is selected to perform the task. The reference indicates a model labelled VO3 in use for the generation. You do not need to control or change the model for this operation. It is the engine that reads your input, observes the existing frames, and creates the extension.
Generation requires time. The programme will show you a progress indicator. You can check the task list within the interface to see where the job stands. It might display a percentage, such as forty percent complete. This gives you feedback about the process without forcing you to guess. While you wait, avoid clicking generate again. Doing so will spend credits for a second job. Instead, let the current job finish. Use the time to think about the review steps you will take when the result is ready. Visualise the extended segment. Consider how you will judge integration with the original clip. Prepare any notes you want to make on timing or motion so you can record them as soon as you see the output.
The task list provides a clean record of active and completed jobs within your project session. It will show your extension job with a label such as video extend. When the job reaches one hundred percent, the status will flip to completed. This is your cue that the extended segment is ready for playback and evaluation. Return to the timeline and position the playhead before the extended region. It is valuable to watch the sequence from before the extension begins so you can feel the continuity.
Playing the result and observing details
Start playback and engage your editor’s eye. The first frames are from the original video. Let them draw you in. When the extended section begins, pay attention to changes in texture, colour, and motion. In the example, the extension introduces a bird with lively movement. The appearance feels striking and wonderfully integrated, a moment that makes you smile. This is the joyous side of generative extension. It can produce results that feel like creative companions, not just mechanical continuations.
Observe the whale action near the boards if your prompt requested it. Look for the shape of the jump, the angle of the body, and the way the water reacts. If the splash feels present, note the realism. If it is missing, consider whether your prompt could encourage the model to emphasise the interaction of water and mass. Observe the birds in the sky. Evaluate their flock behaviour, their path across the frame, and whether they overlap with other features in a credible way. If the sky is a painterly gradient, birds should not distort the mood in an abrupt way. They should feel like natural inhabitants of the space.
Listen to the audio if your clip has sound. Extended frames may not carry audio by default. If your project relies on the ambience of the original clip, add an audio bed that carries through the extended segment. Use careful crossfades to avoid audible seams. When the audio matches the visual calm, the extension reads like part of the original rather than an inserted module.
When you find elements that you love, mark the timecodes for easy reference. When you find elements that need adjustment, consider whether you want to generate again with a refined prompt or handle the issues in the edit. If a bird appears too centrally and distracts, you might choose a camera movement that guides the eye away. If the whale dominates the frame more than you intended, adjust your prompt to reduce emphasis or to move the action slightly. The key is deliberate artistry. The model is capable, but your direction brings coherence.
Blending original and extended regions with attention to craft
A credible extension is more than a new set of frames. It must attach to the original clip smoothly. Think about the cut point where the original ends and the extension begins. Filmora will place the extended frames on the same track, creating a continuous segment. Watch this joint carefully. If there is a tiny shift in colour or grain, apply a subtle colour match across the joint. You might use a gentle grade adjustment to bring cohesion. Avoid heavy effects that call attention to the seam. Aim for consistency and invisibility.
Motion continuity matters. If the original clip contains a light camera ripple or a slow pan, choose a camera movement in the extension that respects this behaviour. A static original leading into a aggressive push in can feel disruptive unless that push in matches the scene’s intent. If you want to introduce new energy, do so with clarity by aligning the new camera motion with the moment of action. For instance, begin the push in as the whale appears, not before, so the motion reads as a response to the subject rather than a random change.
Use sound to knit the sections. If the original clip carries ambient water, add a consistent water bed beneath the extension. If birds appear, introduce a faint distant call for realism. Keep levels restrained so the auditory world feels authentic. If your clip is musical, consider the beats. The extended segment should sit on the beat structure if the song continues. Insert a soft drum pattern or a string pad to sustain mood across the new frames.
Do not neglect subtle environmental continuity. If the original clip has a particular cloud pattern or a slight haze, the extension should respect those cues. The AI model will attempt to mimic the environment, but you are the final judge. If needed, apply fine adjustments with Filmora’s colour tools to maintain the same atmosphere. The goal is for the viewer to remain immersed without detecting the technical join.
Refining prompts through iteration without waste
Prompt refinement is part of the craft. You are teaching the model how to perform for your scene. However, credits are finite. Approach iteration with intention. Before you press generate again, write down what change you want and why. If you want birds to enter later in the extended segment, specify the timing in your prompt. If you want the whale to arc higher or to exit the frame at a certain point, add that detail. If you want the camera movement to be slower, choose an option that produces less velocity rather than rewriting the entire plan. Specific changes reduce the need for multiple generations.
Use the task list as a diary of your generations. It will display completed jobs with labels that help you remember what you did. If you generate twice and the second result is better, note which prompt tweak produced the improvement. Build a habit of naming your clip versions within the project so you can compare without confusion. When credits are valuable, clarity is a form of respect for your resources.
As you iterate, pay attention to the boundary conditions that affect realism. The whale should not overlap with objects in impossible ways. Birds should not occlude the sun if the light source would make them silhouettes. If you observe occasional oddities, write your prompt to discourage them. For instance, you can mention that the birds fly across the sky without blocking the sun. Keep the language positive and clear. The model learns from the content of your request, not from user interface switches for constraints. Your words are the controls.
Using AI Extend as part of a storytelling approach
The most satisfying use of the AI Extend feature is storytelling. Even in a small scene, you can craft a progression of presence, action, and resolution. The whale is not a random spectacle. It can be the subject that brings awe or joy to the scene. The birds are not decorations. They can support a sense of life and freedom that surrounds the main moment. When the camera pushes in, it signals that this is a moment of importance. When the extension concludes, leave the viewer with a feeling that matches your intended narrative, whether that is serenity, wonder, or anticipation.
Third person scenes with natural subjects are fertile grounds for this approach. Landscapes, seascapes, city views, and skies all accommodate motion that the model can generate credibly. Write your prompt to get the subject into the frame smoothly, to act with a clear arc, and to exit or settle with grace. Choose camera movement that supports the arc. Then evaluate with a storyteller’s eye. Does the scene communicate what you wanted? If not, adjust. You do not need to push for spectacle every time. Sometimes a small flock crossing a distant sky is all you need to complete a mood.
Think about what your viewers will notice first and last. The first impression in the extended segment should be gentle. The last impression should cue the transition into whatever comes next in your edit. If the next shot is calm, let the extension quiet itself at the end. If the next shot is lively, consider ending the extension with a touch of motion to carry the energy forward. This is the kind of consideration that distinguishes an edit that feels intentional from an edit that feels stitched together.
Managing accounts and credits with foresight
Since every generation consumes credits, responsible management of your account is part of the professional process. In Filmora you can open your account panel, view your current credits, and choose to upgrade or purchase additional credits if you are running low. Do this before a major session to avoid interruptions. If you are working on a project that requires multiple extended scenes across different clips, calculate your needs. If each extension costs five hundred credits and you plan to run ten generations, you will need five thousand credits. Build a buffer for unexpected iterations. This is no different from budgeting shoots in traditional production. Plan your resources so you can focus on creative work during the session.
Keep an eye on the generate button. The programme is transparent about the cost per click. Treat that display as a reminder of your budget. If you are editing with a partner or a small team, agree on credit usage practices. Designate one person to oversee generation so you do not interface with a risk of accidental double runs. Shared clarity reduces waste.
Filmora aims to make the process smooth, yet your discipline improves efficiency. If a generation does not meet your expectation, pause before running again. Ask whether you can salvage the result by adjusting the edit rather than regenerating. Trim a frame here, adjust colour there, modify sound, then see if the scene improves. If it does not, go back to the prompt and write what is missing. This extra moment of thought saves credits and often yields a stronger second result because your request is clearer.
How to read the task list and progress indicators
The task list is a practical tool that keeps you informed. When you initiate a generation, the job appears in the list with a title that reflects the action such as video extend. Progress is displayed as a percentage. This number climbs as the frames are produced and the segment is assembled. At forty percent, you are halfway through. At one hundred percent, the job completes and the list updates to show completed status. This feedback releases you from uncertainty. You can attend to other parts of your edit knowing that the extension is underway.
It is worth opening the task list occasionally during long sessions. It provides a record that can help diagnose issues. If a job stalls at a percentage, check your connection and the programme status. The list may reveal a pattern if multiple jobs show similar delays. If everything runs smoothly, the list becomes a simple archive. You can use it to remind yourself which clips you have extended and when. It is a neat way to maintain awareness without scouring the timeline for clues.
Filmora keeps this element functional and light. It does not clutter. It serves with a minimal gesture. As an editor, treat it as a companion. In the rush of creative decisions, small operational signals matter. A quick glance at one hundred percent gives you permission to turn attention to review without hesitation.
Evaluating realism and coherence in the extended segment
Realism is never an accident. It arises from coherent motion, appropriate scale, consistent lighting, and respectful integration with the environment. When the extended segment plays, the whale should read as a creature that belongs in water, with weight reflected in the shape of the jump and the splash. The boards should react or at least feel like they have presence in relation to the jump. The birds should follow paths that make sense in the sky. They should not flicker or stretch in ways that break immersion. Colour should sit within the palette of the original clip. Grain, lens characteristics, and vignette should not change abruptly.
Coherence also covers narrative sense. If your scene is a quiet sunrise, an aggressive action might feel out of place. If your scene is a bustling seascape, a sudden calm might feel odd. This is your domain. The AI generates motion based on your prompt and movement settings. You ensure that the motion aligns with the story you are telling. When something feels off, try to define the mismatch in precise terms. Is the timing too quick? Is the action too close to the camera? Is the flock too dense? These questions yield adjustments that can guide the next generation towards better coherence.
Do not overlook micro details. Watch the edges of subjects. Look for unnatural borders or shimmering that indicates tension in the composite. If you spot issues, consider post adjustments. Use Filmora’s tools to soften edges, add a tiny blur to distant subjects to simulate depth of field, or balance brightness. Small repairs can elevate a good result into a convincing one. Always aim for restraint. Heavy correction can draw attention where you want none.
Cinematography sense for AI guided movement
The movement options in the AI Extend panel are an applied form of cinematography. They are not generic toggles. They are compositional decisions. A static shot suggests contemplation. Trucking suggests exploration. Pull out suggests context. Push in suggests significance. Knowing these connotations helps you choose movement that speaks to your audience with subtle cultural cues absorbed over a lifetime of viewing.
Practice by pairing prompts with different movements to see how the feel changes. The same whale jump with a static shot feels like a natural event observed from a respectful distance. The same jump with a push in feels like a dramatic event that demands attention. Birds crossing a sky with truck left feel like a journey. Birds crossing a sky with pull out feel like part of a wider scene that gains space as the flock passes. Take notes about how your viewers react when they watch. These are lessons that translate into future edits even outside the AI Extend context.
Movement is also a pacing device. Eight seconds with a push in can feel more filled than eight seconds with a static shot because the camera is active. When you place the extended segment within a larger sequence, consider how this internal activity affects the overall rhythm. If the shots around it are calm, a busy movement can disrupt. If the shots around it are lively, a busy movement can support momentum. Frame your choice in the context of surrounding shots.
Creative examples built on the whale and birds scenario
Let us imagine variations that push your skills while remaining true to the landscape setup. In one variation, you prompt the whale to break the surface with a low arc, land near the boards with a clear splash, then settle with ripples that continue into the extended seconds. You choose a static shot to emphasise the grandeur of the moment. Birds enter late in the segment, small and serene, crossing gently. The effect is meditative. In another variation, you ask the whale to surge high, land with a dramatic spray, and continue forward out of frame. You choose push in to amplify the rush. Birds appear early, sweeping across as the camera closes, adding to the sense of rising energy. The effect is exciting.
A third variation uses truck left. The camera glides left as the whale acts. The lateral movement works with the action to feel like a walk along the boards, catching the event as if you happen to look at the right moment. Birds align with the movement, flying left to right so the camera and subjects share direction. The mood is observational and involved. A fourth variation uses pull out. The whale acts, then the camera eases back to reveal wider water and more sky. Birds are distant, almost punctuation marks. The moment ends with space and calm, ideal for a transition into a contemplative next shot.
Each variation shows how prompt and movement combine to produce different feelings. You are not limited to the whale and birds. Replace the subjects with objects relevant to your film. Keep the principles. Make requests that are visually concrete, select camera movement that signals intent, and watch the results with a sensitive eye.
Integrating extended segments into a full edit
Once you have a successful extension, treat it as a component in your sequence. Place transitions at the boundaries if needed. Sometimes a tiny dissolve at the start of the extended frames can smooth a micro difference. Sometimes a straight cut is perfect. If the extended segment carries a unique motion, consider its relationship to the shots before and after. Align the beat so the extended segment supports the cut. Use markers in Filmora to mark the start and end of the extension for quick reference while constructing the rest of the timeline.
Balance colour across the sequence. If the extended segment has a slightly cooler sky or warmer water, apply a gentle correction. Maintain a consistent grade so the entire edit reads as one visual world. If you are working with multiple extended segments across different clips, review them together for coherence. The AI can produce subtle differences between jobs. Your eye can harmonise those differences. Use the same contrast and saturation levels across the board unless the story demands variation.
Do not neglect titles or graphics if your edit includes them. Place text outside the extended segment if you want the viewer to focus on the motion. If you do want text during the extension, keep it minimal and stylish. Let the scene breathe. Remember that the extension is a gift of time. Use that time to let the viewer feel rather than decode.
Handling unexpected results with grace
Generative systems are powerful, and they can also surprise you. Sometimes the model introduces an element you did not request, such as a bird appearing earlier than you intended or a ripple behaving oddly. Approach surprises with curiosity and discipline. First, ask whether the surprise improves the scene. If it does, accept the gift and continue. Second, if the surprise distracts, decide whether to correct in the edit or regenerate. If it is minor, editing tools can fix it. If it is major, write a clearer prompt to discourage the behaviour you did not want. Avoid a reactive cycle of repeated generations without analysis. You will spend credits quickly without improving the result.
In rare cases a generation might fail or complete with visible artefacts that you cannot accept. Check your connection, reopen the task list, and verify completion. If the job is marked completed yet the result is flawed, save your project, restart Filmora, and try again with a refined prompt. If the problem persists, consult support resources. Keep a log of your attempt times and prompt content so support can assist effectively. An organised approach keeps stress away during edits.
Respecting creative ethics and viewer trust
AI assisted extension is a synthetic operation. Use it with care. In documentary contexts, avoid presenting generated elements as captured reality. In fiction or art contexts, be transparent in your process if you share behind the scenes information. The trust of your viewers is part of your craft. In many cases, the extension will be used to sustain mood or to support narrative rather than to deceive. Maintain a confident sense of responsibility. Enjoy the power of the tool without losing sight of the ethics of representation.
At a practical level, also respect asset licences within the stock media library. When you pull a clip from Filmora’s stock repository, understand the terms of use for your project. The extension creates new frames based on your prompt and the original scene. That does not alter the licence of the base clip. Keep records of assets, licences, and usage notes. Professional habits free you to focus on artistry while keeping your production clean in legal terms.
Performance and patience in day to day work
Performance during generation depends on your system, your connection, and the current load on the service. Do not be surprised if some jobs take longer than others. A few minutes of waiting can save hours of manual work. Use the waiting time productively. Prepare sound beds. Organise your timeline. Label your tracks. Adjust other parts of the edit. Patience is not a pause. It is a shift to another task while the generation completes.
Experiment within reason. An editor who plays learns what works. Try different prompts. Try different camera movements. Watch the results with care. Keep a notebook with observations. Over time you will discover patterns that save you credits and time. For example, you might observe that push in creates strong engagement in seascapes, while truck left is ideal for city lines. These are personal insights that turn a tool into part of your voice.
Closing reflections on the feature in practice
The AI Extend feature in Filmora is not simply a convenience. It is a structural addition to the art of editing. It allows your clips to grow into moments that did not exist in the original capture, guided by your words and shaped by intelligent interpretation. Add stock media, place it on the timeline, open the AI Extend panel, write a prompt that tells a clear story, choose camera movement that conveys mood, manage your credits wisely, generate, and then watch with a discerning eye. The process is simple to describe, yet rich in practice. The more you engage with it, the more you will learn to coax the model towards results that feel like your own work rather than a generic output.
Consider how this feature will change your planning when you assemble future projects. You might choose base clips more for their potential for extension than for their original length. You might design sequences with breathing spaces that can be filled with extended moments that reinforce theme. You might even write prompts in advance as part of your storyboard. The point is not to rely on the tool for everything, but to weave it into your method so that your edits have the timing and presence they deserve.
When you next open the programme and hover over the stock media options, remember that behind those thumbnails lies a capability to evolve the scene. Select a landscape, invite a whale, watch birds cross a sky, and push in to meet the moment. Then take that moment and fit it like a perfect piece into the story you are telling. This is the promise of AI Extend, realised through your choices, your craft, and your respect for the viewer’s experience.
Advanced builds with AI Extend that carry emotion and intent
Once you have a firm command of the basics, the feature becomes a stage for directing time and presence with more finesse. Think of the extended segment as a miniature shot that obeys cinematography and editorial logic. The tool gives you controllable camera movement across a short duration, the ability to ask for visible actions and the obligation to hold the tone of the clip you chose to develop. When you approach every run with those three obligations in mind, your projects begin to show coherent growth in the texture of motion, the way light feels over time and the way subjects enter and exit the frame.
As your scenes become richer, you will start to notice that the best extensions feel like they were captured in camera even though they are generated. This illusion depends on three pillars. The first is the clarity of your prompt in relation to the environment and the implied physics of the scene. The second is the fit between the camera move and the emotional weight of the moment. The third is the grace of your join between the filmed frames and the newly created frames, which is an editorial craft choice rather than a model decision. If even one of those pillars is weak, the viewer will sense an interruption rather than a continuation.
Directing the environment so the action belongs
Imagine a quiet beach at dawn with soft mist drifting. If you ask for a lively jet ski cutting close to the shore, the request collides with the tone unless you justify it within the prompt. A kinder version is a distant boat gliding gently with a small wake. Notice how the water movement, the distance and the behaviour of the vessel serve the ambience and keep the shot contemplative. The model responds to visible requests and does not guess your emotional intent unless you put it in words. Whisper mood through verbs and through scale. Ask for elements that belong to the weather and light present in the clip.
- Use verbs that imply pace and restraint such as drift, hover, glide, settle, meander.
- Define distance in human terms such as close shore, mid bay, far horizon to guide scale.
- Match textures such as mist, haze, spray, dust to the scene so the effect sits naturally.
- Allow pauses in action rather than constant frenzy to respect the quiet parts of the shot.
Countryside, city, sea and interior scenes each have ambient quirks that deserve language in your prompt. For a city rooftop you may call out a faint breeze moving a banner, light traffic sound drifting up, pigeons wheeling in an irregular pattern, and the low sun catching the edges of windows as the camera pulls out. For a forest you may call out mid distance birds, a deer entering from the left and stopping to listen, dust motes catching the beam of light, and leaves that move in response to a very gentle wind. The more you articulate, the more the output respects the world you are building.
Layering motion without crowding the frame
Many scenes benefit from motion at different scales that do not compete for attention. When planning your AI Extend segment, pick one hero action and one or two supportive motions that do not steal focus. A hero action might be a whale surfacing with a calm breath. Supportive motions might be a few birds crossing the sky at a respectful distance and a slow push in from the camera to honour the moment. Resist the temptation to fill the frame with busy events. The expanded shot looks more expensive when fewer things happen with grace rather than many things happen bluntly.
- Choose one hero action only. Describe it clearly and place it in time within the extension.
- Add one secondary element to provide a sense of place or scale, such as a flock or a sail.
- Let the camera move provide the third layer. The viewer loves that gentle composite of focus, environment and viewpoint.
- Use silence or low ambience as a conscious layer. Quiet is a choice and carries mood.
In practice, this means your prompt might ask for the hero action to occur at the centre of the extension or toward the end depending on your cut. While the model does not read a timeline in absolute terms, it does respond to cues like arrives, passes, appears, fades and settles. Put time words in the prompt. You are not writing code. You are directing the feeling of time.
Audio design that steadies the extension
The visual extension only works as part of your story if the sound supports it. Editors often use a subtle rise or fall in ambience to guide attention. If the camera moves in, the sense of space can tighten a little. If the camera pulls out, the sense of space can open. Consider the pitch of wind or water and the density of texture within the sound bed. Avoid sudden changes unless your story demands them. Most extensions call for continuity with a gentle bloom of sound if a subject emerges.
Building a consistent ambience bed
To maintain coherence across the join, layer at least two ambience sources. One matches the base shot setting such as surf, city air or forest insects. The second adds a subtle motional cue such as a low swell as the camera pushes in, or a slight lift of space as the camera pulls out. Crossfade between your ambience layers with respect to the extended duration. Use automation on volume and width to keep the change felt rather than heard.
- Match the dominant frequency content of the original clip. Do not add crisp highs to a muffled dawn scene.
- Use a long crossfade across the join. Five to ten seconds suits an eight second extension well.
- Add one tiny event sound only if the subject needs it such as a soft whale breath or wing beats.
- Avoid obvious synthetic sweeps unless your project is stylised. Natural scenes deserve restrained sound.
Filmora gives you simple volume automation and easy crossfades. Use them with intent. The extension does not carry sound by itself, so your editorial touch is what preserves the illusion. Keep notes about how you built the sound bed for future consistency across scenes that share a similar environment.
Fitting music across the extended segment
Music placement can either fight or lift the extension. If your score has a phrase ending or a cadence near the join, consider timing the action inside the extension to match. A whale surfacing feels poetic when the phrase blooms. Birds crossing feel graceful if the line breathes. Move the music edit by a beat or two if needed to tuck the join neatly. Use subtle side chain on ambience to let the music pass without overwhelming the environmental sound.
- Listen for natural tension and release within your score and align the visual cue.
- Keep the music mix consistent before and after the extension to avoid an audible seam.
- Use a short automation dip on a strong musical transient if it draws attention away from the action.
- Let silence sit if the moment deserves it. Not every extension needs score.
Colour unity and grain that makes the join invisible
Subtle colour decisions make or break the join. Your task is not to correct every pixel but to encourage the eye to relax across the transition. Most stock clips have a baked look. The extension strives to match that look. Evaluate white balance, contrast curve, saturation and grain density. A gentle correction of the extended segment may be appropriate to knit it into the graded sequence. Avoid the urge to force a complex grade onto the new frames unless necessary. Small cues such as a minor lift in shadows or a tiny reduction in saturation can quiet the new material.
Practical checks that save time
- Toggle between colour off and on to judge what truly helps. If your grade introduces banding or crush, pull back.
- Zoom to fifty percent and one hundred percent to assess grain behaviour. A touch of film grain can hide minor mismatches.
- Care for skin tones if any people appear. The extension should not push skin into unnatural shifts.
- Use vignettes sparingly. If the original clip does not have a vignette, a new one might draw attention.
Light direction and intensity change over time in a real scene. Your extended frames must honour those shifts. If clouds drift, the highlights change. If haze increases, contrast softens. Watch the clip and write those cues into your prompt so the extended frames will anticipate the environment. Colour correction then becomes a small top coat rather than a repair job.
Editing around artefacts with craft and restraint
Artefacts occur when the request pushes the model into a region of uncertainty, when the camera move is too fast relative to the texture or when the underlying clip has edges that the model struggles to read. Treat artefacts as a call to refine rather than a failure. Your corrective tools include editorial trimming, masked soft edges, quick reframing and one more generation with a revised request. Often the best solution is to adjust the start time of your extension so the join happens on a moment of natural change. The viewer accepts more variation during a cut or an implied beat than during a flat passage.
A gentle triage for common artefacts
- Jagged edges on added elements. Address with a small mask feather or hold the extension a frame longer so the motion smooths before the join.
- Wobble in the camera move. Ease the cut into the extension during a point of action or reduce the requested move from push in to static in your next run.
- Colour flicker. Add a brief very low intensity exposure correction across the extension or regenerate with a prompt that calls out stable light.
- Scale mismatch. Regenerate with explicit distance and size words, or pick a different hero action that naturally suits the frame.
Sometimes the fastest path is not another generation but a small editorial shuffle. If the added birds feel too present, let them enter later by trimming the extension head and layering a soft crossfade. If a boat feels abrupt, cover the join with a reaction shot and return to the extended segment once the action has settled. Editors survive by finding small moves that achieve continuity without brute force.
Genres and use cases that love AI Extend
The feature shines in places where time and small motions build feeling. The following scenarios show practical choices that keep the illusion intact while serving different storytelling needs. Use them as templates and adapt the language to your materials and goals.
Travel sequences and destination reels
Travel edits often need a held sense of place before the next beat arrives. That is prime territory for a static or gentle pull out extension with minor environmental motion. Ask for elements that belong to the location and the hour of day. A coastal town at blue hour wants calm water, tiny lights flicking on and relaxed traffic in the distance. A mountain view wants cloud drift, a slow reveal of the valley through mist and a feeling of air moving lightly.
- Hero action. A distant boat glides along the harbour line with a soft wake.
- Support. A few gulls cross mid frame once and do not return.
- Camera. Slow pull out to include more rooftops and sea.
- Audio. Gentle rise of city air and water together.
The result is a held presence that lets your viewers sink into the scene, an elegant bridge to the next location and a pace that is kind to the story.
Product films and reveals
Product work loves controlled focus and sculpted motion. Use a push in to carry attention toward the hero object with micro environmental cues that sell realism. If the setting is a kitchen, ask for steam to drift from a cup, a distant kettle click and a soft light shift along the counter edge. Keep scale correct and refrain from adding busy elements that distract from the product surface.
- Hero action. Steam swirls gently above the cup and a droplet settles on the saucer.
- Support. A faint breeze moves a curtain a touch.
- Camera. Slow push in to the logo on the cup, stopping before it dominates.
- Audio. A tiny warm hum appears as the push completes, then relaxes.
The extension behaves like an extra shot you did not capture, giving you enough time to place titles or a brand mark with dignity.
Event highlights and ceremony films
Events succeed on moments of presence and pauses that feel earned. Use extensions to honour small glances, crowd swells or a room settling before applause. The language of your prompt should respect people. Ask for genuine behaviour such as soft clapping, guests turning, a smile growing and light catching a glass. Keep motion low and camera moves gentle unless the energy clearly calls for a stronger action.
- Hero action. The couple share a quiet glance and a crowd breath lifts.
- Support. Candle flames dance slightly without becoming dramatic.
- Camera. Static or a very slow pull out to include more guests.
- Audio. Room tone gathers softly and fades as the cut arrives.
Such moments add dignity and coherence to highlights, letting the audience feel the space and the people without rushing.
Documentary scenes and slow observing
Non fiction needs honest time. Use AI Extend sparingly and with full awareness of context. The tool can help you hold a shot while a subject settles or an environment speaks. Be transparent in your workflow if the work calls for it, and keep your prompts in tune with observed behaviour rather than invented spectacle. Small actions that belong such as wind over grass, a bird landing on a fence or a person adjusting a scarf can be asked without breaking ethical trust.
- Hero action. A field breathes with wind and a single bird lands, looks, then flies.
- Support. Distant traffic hum balances the quiet.
- Camera. Static to keep the honesty of the take.
- Audio. Slow crossfade to protect continuity.
The extension becomes a respectful craft choice that serves the story and the audience.
Sports highlights and motion emphasis
Sports edits benefit from breath between intense bursts. Use pull outs to give the field context after a big moment, or a push in to emphasise a reaction. Keep added elements plausible within the rules of the sport and the venue. Avoid mythic creatures and extreme weather unless your piece is a stylised opener. Ask for crowd motion that aligns with the clip rhythm such as a wave of arms or a cheer swell.
- Hero action. The player reacts, the bench rises, a cheer builds.
- Support. Confetti drifts gently if the moment allows.
- Camera. Pull out to include scoreboard and crowd.
- Audio. Lift the audience bed and land gently.
This respects the energy while keeping the expanded frames in service of clarity.
Shot timing maps for elegant joins
Your planning benefits from simple maps that indicate where within the extension the action should bloom. Draw a timeline of the eight seconds and mark quarters. Place the hero action at the second or third quarter depending on whether you want to arrive at the action or leave on it. Then write your prompt with words that support that placement. The model does not obey marks, but language that implies timing nudges it toward the behaviour you want.
- Arrive on action. Ask that the subject emerges and completes a motion just before the cut.
- Leave on action. Ask that the subject begins motion and continues as the cut lands.
- Action in the centre. Ask for a moment of presence with gentle build up and release.
- Quiet extension. State clearly that only environmental cues occur and that the view remains calm.
Write exact words such as appears near mid time, settles before the end, begins gently, passes across, holds briefly. You are directing rather than drawing. The prompt is your score for the shot.
Collaborative discipline for teams and clients
When several people work on the same project, clarity saves credits and time. Agree on a naming convention for tasks, a shared document for prompts, and a simple approval flow. One person should own the decision to generate and should document why that run was necessary. Keep screen grabs and notes so you can show the path to the final image. The extension tool is powerful, but it benefits from governance when budgets and deadlines matter.
Roles and responsibilities that prevent drift
- Editor sets duration, decides camera movement and fits the extension in the timeline with audio continuity.
- Assistant gathers stock media, assesses suitability and writes a first draft prompt with environment detail.
- Producer approves prompting intent, checks credit availability and signs off on generation to avoid accidental clicks.
- Colour artist ensures grade unity and grain consistency across the join.
Agree on a short checklist before each generation. It might include prompt clarity, camera movement sanity, duration appropriateness, and ranking of needs against credit cost. Keep meetings short and practical. Communicate early if a scene demands several runs so the budget can absorb them without surprise.
Interface awareness that speeds decisions
The panel gives you a straightforward set of controls and a task list that acts like a diary. Use it as an archive of what you have attempted and what worked. Knowing which run delivered the feeling you wanted helps you avoid repeating missteps. It also helps when clients ask for rationale. You can show that you tested static, truck and push in, that you adjusted duration and that the winning result was the one that served the story.
Watch the progress indicator and do not click again while a run is in flight. Doing so risks spending credits for duplicated tasks. If you suspect a stall, check your connection and wait a little longer. Most runs complete within a predictable range. If you need to move on, work on audio or colour while the generation proceeds. Your schedule survives when you respect the rhythm of the tool rather than fight it.
Export strategy and delivery across platforms
Once your sequence contains extended segments, export decisions matter more because artefacts can appear under aggressive compression. Choose a master codec that preserves colour fidelity and grain. From the master, create platform versions with careful bitrate and resolution choices. If your delivery includes social platforms, remember that aggressive recompression can alter texture. Watch the extended segments in the platform player before sign off. Adjust your export settings if needed to protect the integrity of the join.
Practical export choices
- Export a high quality master to archive and to use for graded versions. Pick settings that keep fine detail intact.
- Use a slightly higher bitrate for shots with smooth gradients or haze to avoid banding around extended frames.
- Control loudness across the extension and the cut. Mix to a sensible target so platform transcoders do not squash dynamics abruptly.
- Do a platform proof. Upload a private version and watch both the extension and the join on a phone and a desktop.

Clients rarely appreciate technical explanations after delivery. Prevent issues by testing early. If you notice banding or a shift in colour around the extended frames on a platform, add a gentle noise floor or grain and retry the upload. Small changes in texture can stabilise compression algorithms and reduce visible steps in gradients.
Case study one a coastal sequence with a calm whale
Consider a forty second travel edit along a rugged coast. The source clip shows calm swells under pastel light. You want a moment near the end of the shot where a whale surfaces gracefully to provide a sense of scale and quiet awe. You decide on an eight second extension with a static camera to keep contemplation. The prompt calls for a single whale surfacing far from the shore, a soft breath and a gentle ripple of water, with a few birds crossing mid distance in respectful spacing.
Plan and prompt
- Duration. Eight seconds to allow a complete breath and ripple.
- Camera. Static to preserve the meditative feel.
- Prompt. A single distant whale surfaces and exhales softly. Water ripples gently. A few birds cross mid distance without crowding the frame. Light remains pastel and calm.
- Audio. Ambience with water and air, with a faint breath sound tucked into the middle.
Generation delivers a believable surfacing with restrained birds and no aggressive motion at the horizon. The join needs a small colour tweak to keep shadows consistent and a soft crossfade over three seconds for audio. You watch the sequence and feel the extension hold the mood, giving you a graceful exit to the next shot. Credit cost remains acceptable because the prompt was clear on scale, action and tone.
Review and polish
- Colour. Lift shadows slightly on the extension to match the original clip.
- Edges. The whale edges look natural. No masks required.
- Motion. Birds glide in a credible path and exit the frame without drawing attention.
- Sound. A soft breath complements the moment without sounding staged.
The sequence benefits from richer presence and a clear sense of place. You document the prompt and settings in your notes so you can reuse the approach for similar coastal moments.
Case study two a city rooftop with a flock and a gentle pull out
A branded short uses a rooftop scene at sunset to introduce a logo. The shot needs time to breathe before the title lands. You choose a pull out to reveal more of the skyline and ask for a flock of pigeons crossing at mid distance. You keep the flock behaviour natural and ask for a slight banner movement on a nearby building. The extended frames serve as a platform for the title while the rooftop air holds the mood.
Plan and prompt
- Duration. Eight seconds for a meaningful reveal.
- Camera. Pull out to expand view and space.
- Prompt. A flock of pigeons crosses mid distance once. A banner moves a touch in a faint breeze. The city lights begin to glow. Sky remains warm and calm.
- Audio. Urban air with distant traffic, slight lift as the camera pulls out.
Generation creates a believable flock with a soft arc. The banner moves slightly, and the pull out feels measured. The join is clean with a small adjustment on colour to keep warm highlights steady. You place the logo in the last third of the extension, and it lands with dignity. The note about lights beginning to glow gives the scene a temporal cue without feeling like a jump cut.
Review and polish
- Colour. Maintain warmth without pushing saturation.
- Motion. Flock crosses once, no looping behaviour.
- Edges. No stair stepping on bird wings. Grain helps hide minor strobing.
- Sound. Distant traffic breathes and relaxes at the cut.
Brand presence feels earned rather than forced, and the extension lends both time and space to the title moment.
Case study three woodland dawn with a deer
A nature short holds on a forest clearing at dawn. You want an animal presence to add a centre of interest without breaking the hush. You choose a static camera and ask for a young deer to enter from the left, pause and listen, then exit gently. You add dust motes in the light beam and ask for the slightest breeze in leaves. The tone stays quiet, and the extended segment becomes a precious moment.
Plan and prompt
- Duration. Eight seconds to allow the pause to read.
- Camera. Static to keep honesty.
- Prompt. A young deer enters from the left, pauses to listen, then leaves gently. Dust motes appear in the light beam. Leaves move a touch.
- Audio. Forest air with minimal insect beds and a soft hold on space.
Generation delivers a believable deer with gentle behaviour. Dust motes enrich the light, and leaves shift slightly. The join needs almost no work. You lift the ambience a hair to carry the sense of listening. The extension feels like a natural observation rather than a spectacle.
Review and polish
- Colour. Keep dawn softness and avoid contrast spikes.
- Edges. Deer edges are smooth. Masking not needed.
- Motion. Leaves move in a credible pattern. Dust motes catch light without glitter.
- Sound. Quiet holds and then relaxes at the cut.
The scene gains a centre without losing its calm, and you note the success of minimalism for future forest clips.
Creative exercises that strengthen prompting instincts
Practice makes the feature feel like a creative partner rather than a box of tricks. The following exercises develop your language and your sense of camera intent. Run them with short clips and be patient. You will discover that your words matter more than you realised, and that your camera choices carry emotion directly.
Exercise one quiet view with one small motion
- Pick a static meadow clip and ask for one butterfly crossing once across the lower third.
- Write a prompt that specifies scale, path and behaviour using calm verbs.
- Choose a static camera or a slow push in if the meadow supports it.
- Review for coherence and adjust your words until the feeling matches your intent.
Exercise two lateral discovery without hurried action
- Pick a coastal cliff clip and ask for a truck right move with a distant sailboat emerging.
- Write a prompt that asks for the boat to appear slowly and remain small.
- Listen to your ambience and widen the sound a touch as the camera discovers more space.
- Evaluate whether the boat steals focus. If it does, reduce scale and distance in your prompt.
Exercise three ending on presence
- Pick a city street at dusk and ask for a pull out that ends with a soft street light glow.
- Write a prompt that calls out the glow just before the cut.
- Ensure the audio carries a slight sense of space opening.
- Judge whether the glow feels earned. If not, simplify the prompt until it does.
By completing these exercises, you learn to speak in a way the model understands and a way that matches your sense of film language. The goal is not complexity. The goal is a quiet voice that gets what it asks for.
Troubleshooting and diagnostic paths
When a run disappoints, a gentle diagnostic process can save credits and morale. Resist the impulse to try again immediately. Instead, write down what feels off, reduce it to a sentence and then decide whether the fix is editorial, prompt based or movement based. Often the fix is simple. You may have asked for too many elements or a camera move that crowds the action. If you adjust one variable at a time, you learn quickly and avoid confusion.
Questions that reveal the fix
- Does the added element respect scale and distance in this frame
- Is the camera move helping attention or competing with the action
- Are colours and grain sitting quietly or calling attention to themselves
- Is the audio bed hiding or highlighting the seam
Once you have answers, decide your next step. If scale is wrong, rewrite the prompt with clear human terms. If camera intent is wrong, pick a calmer movement. If colour feels noisy, reduce your grade on the extended frames. If audio exposes the seam, smooth the crossfade and relax automation. One change at a time means you learn what works.
Integration with titles and graphics that feel crafted
Many projects use extended segments as platforms for text or branding. Treat titles as part of the scene rather than a layer dropped without care. Consider where the eye is looking due to the camera move and the action. Place the title respectfully in space, choose size and weight that suit the mood and animate entry with subtlety. Avoid aggressive motion on the title if the camera already moves. A gentle last third fade or a soft slide can feel elegant.
Practical graphic placement
- Do not cover the hero action. Give the subject room to breathe and then introduce the title.
- Match type colour to environment cues. Warm light wants warm type, cool scenes want cooler tones.
- Animate lightly. A small ease in or ease out supports the mood without shouting.
- Keep titles on screen long enough to read comfortably. An extended segment gives you that space.
The result is an elegant and modern presentation that does not betray the extended frames. The viewer experiences a balanced scene where picture, camera movement and words move together.
Working rhythm that protects focus
Editors thrive on rhythm. AI Extend introduces a generative step that can either break or support your focus depending on how you organise your day. Create a routine that places generations at natural pauses. Write prompts in batches, run them, then switch to audio or colour while the tasks complete. When results arrive, review with an editor mind rather than a novelty mind. Resist the urge to keep generating just because the tool is there. Intent remains your north star.
Time boxing for sanity
- Dedicate short windows for writing prompts and running generations.
- Use waiting time for sound design or grade adjustments.
- Schedule review sessions that include a second pair of eyes if available.
- Log prompts and results so you can reuse what works without reinventing the wheel.
Over time, you will learn the model’s strengths and natural seams. Your edits will become smoother, your prompts clearer and your creative confidence higher. The feature becomes a collaborator that fits your routine.
Creative restraint that protects truth
By now you have seen how powerful extension can be. It can also be misused if you chase spectacle for its own sake. Keep the story ahead of the effect. If a scene deserves quiet, honour it. If the real world would never present a certain action, avoid it unless your piece is clearly fantastical. Editors carry responsibility for mood and meaning. The tool gives you choices. Choose well.
Signs that you are over using the feature
- Every shot has busy added elements even when the story calls for rest.
- Camera moves pile up and the cut loses clarity.
- Audio tries to cover too much and draws attention to itself.
- Colour becomes heavy handed and the scene loses natural feel.
Correct by stepping back. Pick three spots in your sequence that genuinely benefit from extension and leave the rest alone. Craft is as much about what you do not do as about what you do.
Credit planning for multi day projects
Larger projects need sensible credit budgets. Estimate how many scenes will need extension and how many runs each might require. Build a buffer and monitor usage daily. If the team grows, add controls to prevent unplanned runs. Assign clear ownership of extension tasks. Upgrade credits in advance if you anticipate a run of experiments so your schedule does not stall.
Simple budgeting model
- Count scenes that genuinely benefit from extension and multiply by two for initial runs.
- Add a ten to twenty percent buffer for surprise failures or creative changes.
- Track credits spent per day with dates and scene names to maintain discipline.
- Review at mid project and adjust plan rather than hoping the buffer will hold.
This small structure ensures that you never feel a pinch at a critical moment. The tool becomes part of your budgeting language and your team’s planning calendar.
Ethics and licensing revisited with practical habits
Keep records of prompts, assets and decisions especially in documentary and client work. If the project calls for transparency, include notes that explain where and why you extended. Respect license terms on stock media and do not misrepresent generated frames as original capture when accuracy matters. For creative projects, decide together how you will talk about generative steps in interviews or case studies. The public appreciates honesty even when the art is clearly transformative.
Practical habits that build trust
- Save prompts with time and scene details in your project notes.
- Keep a folder of reference frames before and after extension to show context.
- Document credit usage and generation attempts so you can explain choices.
- Agree on language for credits and captions that acknowledge stock sources where required.
These habits cost little time and pay back in reputation and clarity. You feel proud of your craft because it includes care for process.
Platform specific guidance for social release
Different platforms compress and display video with particular quirks. Test extended segments on your target platform to ensure motion and colour hold. Some platforms soften grain or band gradients which can expose the seam at the join. Preempt such issues with minor adjustments. Use slightly higher bitrates where allowed and avoid abrupt movement if the platform struggles with it.
Small adjustments that improve social versions
- Add a touch more grain to smooth gradients without making the clip noisy.
- Reduce camera move speed a little in the extension to protect clarity under compression.
- Keep audio peaks in control so transcoding does not distort ambience around the join.
- Check mobile and desktop playback and revise export settings if needed.
Social delivery thrives on consistency and simple excellence. A viewer does not care how you achieved the shot. They care that it feels natural and the story moves.
Teaching the feature in classrooms and workshops
Educators can use AI Extend to teach narrative time, shot intent and prompt craft. Create assignments that require observation of environmental cues, choice of camera movement and reflection on ethical considerations. Students quickly learn that language carries power and that editing is a dialogue between decisions rather than a series of tricks. The tool becomes a platform for discussing film and story rather than a novelty.
Assignment suggestions
- Ask students to extend a calm landscape with only environmental cues. No hero subjects allowed. Evaluate mood and continuity.
- Assign a product shot and require a push in extension with one small motion that supports brand tone. Discuss restraint.
- Give a city clip and ask for a lateral move with a single flock crossing. Analyse scale and behaviour.
- Discuss licensing and record keeping. Require prompt logs and demo frames before and after the extension.
Students become thoughtful about time and motion, which is the heart of editing. The classroom gains a practical tool for discussing narrative arcs inside short durations.
Creative variations with paired camera moves
A rich technique involves testing two movements with the same prompt to feel how camera intent changes meaning. For example, ask for the same whale surfacing in both a push in and a pull out. The push in feels intimate and present, while the pull out feels reflective and spatial. The prompt stays constant. The movement changes the viewer’s heart response. By doing such comparisons, you develop an instinct for pairing language and movement in a way that supports the story you are telling.
Practical test workflow
- Duplicate the clip in your timeline and run two extensions with identical prompts and different movements.
- Play them back to back and write adjectives that describe the feeling of each.
- Decide which supports your sequence and document your choice.
- Reuse the pairing insight in future scenes rather than guessing.
Over time, you will collect small truths about movement and mood that guide your projects. Your edits will feel more intentional and your audience will sense the craft even if they cannot name it.
Model behaviour and expectations
While the underlying model feels flexible, it has patterns. It respects concrete language, scales more reliably when given human distance terms and behaves best when not asked for contradictory cues. Avoid asking for heavy weather and clear skies in the same short clip. Avoid asking for hero action and multiple busy elements together. If your goal is complexity, build it across shots rather than inside one extension. The model rewards editorial craft. Treat it kindly.
Language that the model appreciates
- Visible nouns and verbs that relate to the frame, such as birds crossing, boat gliding, cloud drifting.
- Distance terms that imply scale, such as near shore, mid bay, far horizon.
- Behaviour words that set tone, such as calm, gentle, quiet, soft.
- Light and texture cues, such as pastel sky, warm glow, soft haze.
These words make your requests legible without turning your prompt into a script. The feature understands natural language. Speak clearly and kindly, and it will offer results that respect your scene.
Archiving extended segments for reuse
As you build a library of extended moments that feel timeless, consider archiving them for reuse in future projects. Label clips with scene, movement and mood. Keep notes on prompts and audio beds. When a new project calls for a certain texture or tone, you can audition archived extensions as overlays, references or as part of the edit. This practice turns your work into a growing resource.
Practical archive tips
- Use a clear naming convention such as scene type, camera move and main action.
- Store notes alongside clips, including prompt text and audio design choices.
- Keep short previews for quick auditioning during project planning.
- Revise archived clips if your grading style evolves so the library stays coherent.
Over time, your archive becomes a meta toolkit. You will notice patterns that describe your taste and your approach to motion. The feature teaches you who you are as an editor.
Handling surprises with grace and speed
Occasionally a generation produces unexpected elements that are not acceptable for the project. Your choices remain the same as earlier. Evaluate, decide, and fix with the least cost path. If the surprise is small and does not break the shot, address it in the edit. If it clashes with context or ethics, regenerate with clear language that prohibits the behaviour. Keep notes and share them with your team so the learning becomes communal.
Language that discourages edge cases
- State the absence of certain elements if they sometimes appear. For example, no boats near shore, no additional animals, no dramatic weather.
- Reinforce calm behaviour. Use words such as remains gentle, stays distant, does not crowd the frame.
- Call out light stability. Say light stays soft, colour remains steady, haze does not change abruptly.
- Ask for single occurrences. Say crosses once, surfaces once, glows gently once.
These phrases help the model avoid creative overreach. Your project stays in line with your intent, and your audience experiences a coherent scene.
Deliverables and client reviews
When presenting work that includes extended segments, prepare your client review files with clear labelling and timecodes for feedback. Offer side by side comparison only if the client asks, and always make the discussion about mood and storytelling rather than technology. Clients care about results and narrative. Guide them toward the feeling and the role the extended segment plays. If they request changes, translate their language into prompt and movement adjustments promptly.
Review preparation
- Provide a review cut with clear timecodes and scene names.
- Offer notes about the intent of each extended segment without technical jargon.
- Be ready to discuss camera movement choices and the reasons behind them.
- Keep a list of feasible revisions and their credit implications so clients can decide with context.
Your professionalism during review strengthens trust and speeds approval. You are not selling a technique. You are delivering a story.
Performance notes and system readiness
Generation times vary with connection, model load and clip complexity. Prepare your system and your mind. Keep your project and assets organised, save often and maintain reasonable expectations. If a run takes longer than usual, use the time. The edit table always has something that benefits from attention. View patience as part of craft rather than a delay.
System habits
- Keep source and project settings aligned to avoid surprise artefacts.
- Store media locally to improve performance and to give the model clean frames.
- Close heavy background tasks during generation to protect system resources.
- Update when appropriate, and keep notes on version features and behaviours.
The smoother your system, the more consistent your experience. Your creative energy stays on the story rather than on troubleshooting.
Visual examples that anchor learning
Screens often tell the story faster than paragraphs. Use captured views of the panel, progress and output frames to teach your team and to remind yourself of choices made. You can store them in your archive alongside prompts and notes. When revisiting a scene months later, you will be grateful for those visual reminders that compress memory into a single glance.

Pair each screenshot with a sentence about why it matters. If it shows a camera choice, note the emotional intent. If it shows a task list, note the runs and their outcomes. If it shows an output frame, note the tiny corrections that made the join invisible. Visual memory supports craft and reduces repeated mistakes.
Final checks before sign off
As you prepare to release your project, run a quiet rehearsal for each extended segment. Watch on speakers and on headphones, on a phone and on a desktop. Look for any flicker of colour or any audible seam. If you find something, fix it with the least intrusive move. Do not redo the entire sequence unless absolutely necessary. Your aim is to protect story and mood. The extended frames should feel like they were always there.
Release checklist
- Visual continuity across the join feels natural in motion and colour.
- Audio carries ambience and event cues without drawing attention.
- Camera movement supports the scene and does not compete with action.
- Titles and graphics sit with grace and do not cover hero moments.
- Export settings protect gradients and grain across platforms.
- Licensing and ethical notes are complete and stored.
This checklist takes minutes to run and hours of anxiety off your life. You know what you have delivered, and you trust the sequence.
A living approach to future projects
With experience, you will begin to plan shoots and edits that embrace the possibility of extension. You will capture frames that invite time and motion to unfold with the tool. You will think of camera moves and prompt language at the storyboarding stage. You will forecast credits and deliverables. The feature becomes a companion for your sense of timing and presence. You are not replacing capture. You are crafting continuity and mood when time on set was short or when the scene calls for more breath.
Planning habits to carry forward
- Choose source clips with clean areas for added elements and clear light cues.
- Write prompt drafts during preproduction to test language against story intent.
- Decide on camera movement strategies per scene in advance so your edit has flow.
- Budget credits alongside other resources and schedule generation windows thoughtfully.
These habits turn the feature into a structural part of your filmmaking process. You gain control over the emotional rhythm of your sequence and the way time feels to the audience.
Closing reflection on craft and collaboration
Editors make choices that shape feeling. Filmora’s AI Extend is a tool that responds to those choices and offers frames that belong when used with care. The path remains simple in structure. Select a suitable clip, decide an extension duration, write a clear prompt that names action and environment, choose a camera movement that serves emotion, generate with patience, and review with a craft mind. Then blend gently and release it into the sequence with audio and colour that protect the join. Do this with intention and restraint, and your projects will carry more presence and better timing.
The joy of the work is not in seeing a model perform a stunt. It is in watching a scene breathe exactly as your story needs. The tool is not a shortcut. It is a collaborator that listens to your words and respects your taste. Use it to extend moments, to reveal space, to celebrate small motions and to lift mood. Your audience will not mention the tool. They will remember how the film felt and how it moved. That is the point of all of this craft.

If this article helped you in any way and you want to show your appreciation, I am more than happy to receive donations through PayPal. This will help me maintain and improve this website so I can help more people out there. Thank you for your help.
HELP OTHERS AND SHARE THIS ARTICLE
LEAVE A COMMENT
I am an entrepreneur based in Sydney Australia. I was born in Vietnam, grew up in Italy and currently residing in Australia. I started my first business venture Advertise Me from a random idea and have never looked back since. My passion is in the digital space, affiliate marketing, fitness and I launched several digital products. You will find these on the portfolio page.
I’ve decided to change from a Vegetarian to a Vegan diet and started a website called Veggie Meals.
I started this blog so I could leave a digital footprint of my random thoughts, ideas and life in general.
If any of the articles helped you in any way, please donate. Thank you for your help.
Affiliate Compensated: there are some articles with links to products or services that I may receive a commission.