When I first stumbled upon VirtualBox, I couldn’t believe the flexibility it offered. As someone who often juggles different cloud environments and operating systems for my work Advertise Me, VirtualBox became my go-to tool. In essence, it allows me to run multiple operating systems on a single machine, which not only enhances productivity but also enables me to tackle a wider array of tasks without needing separate hardware. What really excites me, however, is the integration of Guest Additions – a feature that takes the usability of VirtualBox to a whole new level.
Overview of VirtualBox and Its Benefits
Let’s dive into why VirtualBox is invaluable for both casual users and IT professionals alike. Essentially, VirtualBox acts as a hypervisor that allows you to create and manage virtual machines. Here are a few benefits I’ve discovered over my experiences:
- Cost-effective: Being open-source, VirtualBox is free to use, which saves money on licenses compared to its commercial counterparts.
- Cross-platform support: It runs on a variety of operating systems, including Windows, macOS, Linux, and more. This versatility means I can share my virtual machines easily.
- Snapshots: VirtualBox enables me to take snapshots of my virtual machines. This feature lets me create a restore point, making it easy to revert to a previous state in case something goes wrong.
- Networking Options: The breadth of networking modes allows me to simulate various network configurations, ideal for testing applications without taking risks on my actual setup.
What Are Guest Additions?
So, what are these Guest Additions? Simply put, they are a collection of drivers and system applications that enhance the performance and usability of the guest operating system running inside a VirtualBox environment. Having experienced virtual machines both with and without Guest Additions, I can honestly say the difference is night and day.
- Seamless Mouse Integration: With Guest Additions installed, I no longer have to click inside the virtual machine window to regain control of the mouse. It feels like one cohesive environment.
- Clipboard Sharing: This feature allows me to copy text (and even files) between the host and the guest, significantly speeding up my workflow.
- Drag-and-Drop: Moving files back and forth is as easy as a simple drag from one window to another, which I find incredibly convenient for transferring work without any extra steps.
Importance of Compatibility with Windows 2022
Now, let’s touch on the significance of ensuring compatibility with Windows 2022 when setting up your virtual environment with VirtualBox and Guest Additions. I’ve run into my fair share of headaches when versions don’t align correctly, so that’s a lesson I learned the hard way!
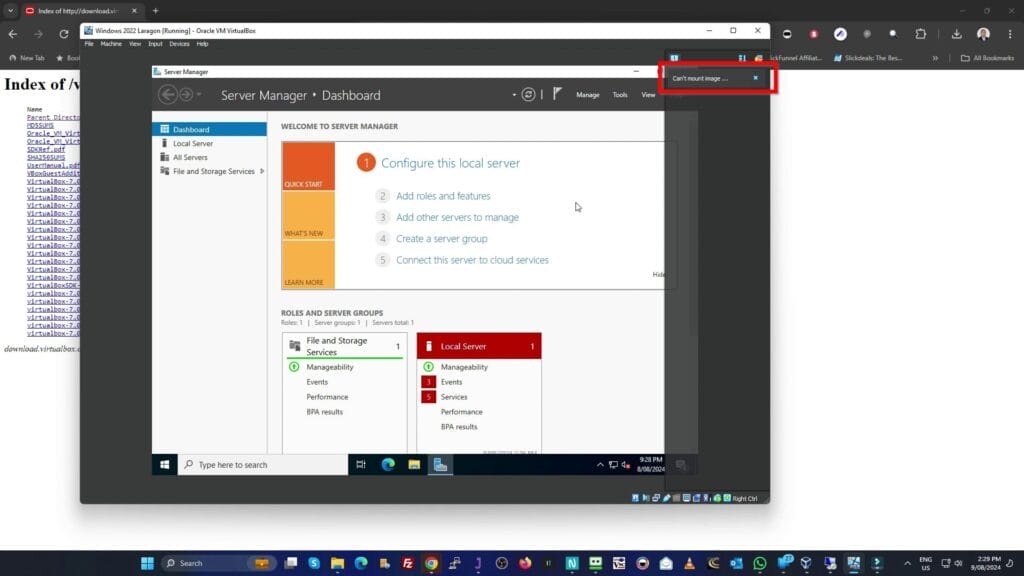
Currently, I’m using VirtualBox version 7.0.12. This version smoothly integrates with Windows 2022, allowing all features of Guest Additions to function without a hitch. The importance of aligning the version of VirtualBox with the corresponding Guest Additions cannot be overstated; failure to do so often leads to compatibility issues which can result in error messages such as “can’t mount image.”
Common Issues Faced Without Guest Additions
Through my explorations, I’ve encountered several common issues when Guest Additions are not installed:
- Inability to resize the guest display dynamically.
- Difficulty using the mouse within the guest operating system.
- Failure to use shared folders or clipboard functionalities.
Step-by-Step Guide to Adding Guest Additions
Adding the Guest Additions can seem tricky at first, but I assure you, it’s quite manageable. Here’s how I approach it.
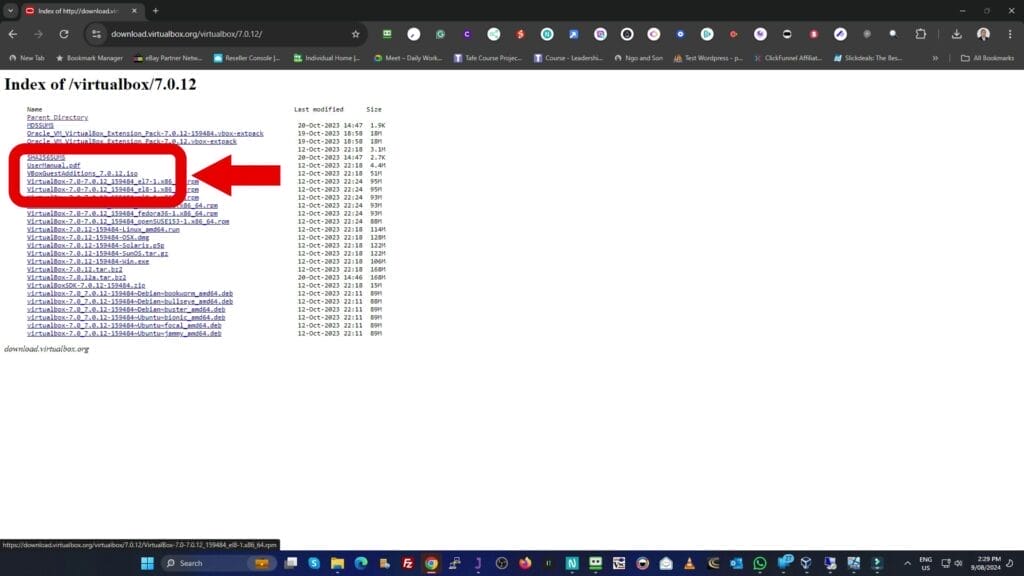
- Download the Correct Guest Additions Image: I visit the official site at downloads.virtualbox.org to download the appropriate Guest Additions image that matches my installed version of VirtualBox.
- Shut Down Your Virtual Machine: Before making any changes, it’s crucial to power down the virtual machine. I usually back up any important data at this stage, just to be on the safe side.
- Access VirtualBox Manager: With the virtual machine powered off, I switch to VirtualBox Manager where I select the relevant virtual machine.
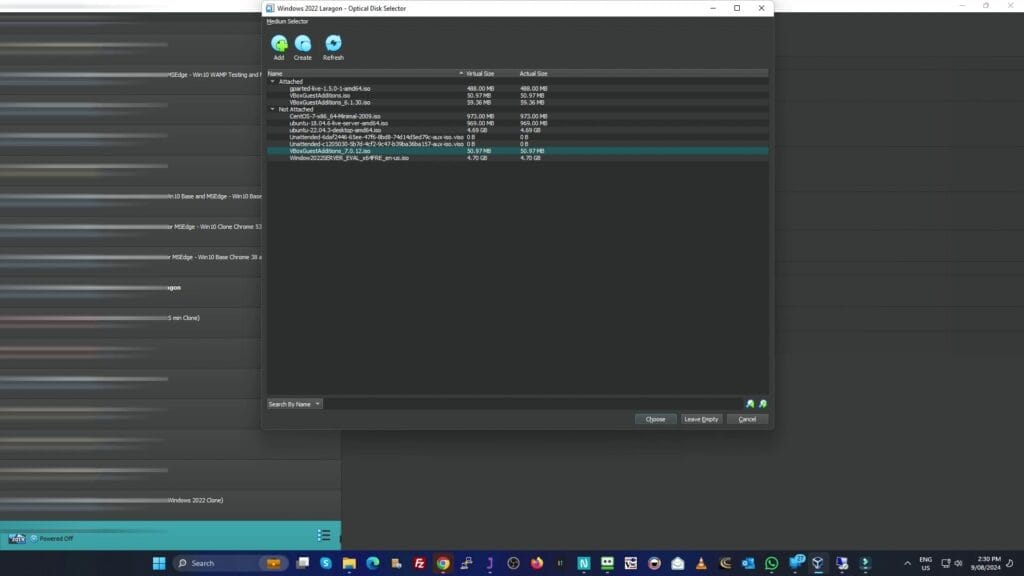
- Edit Settings: I click on ‘Settings’, navigate to the ‘Storage’ section, and add the downloaded ISO file for the Guest Additions.
- Launch the Virtual Machine: Next, I start the virtual machine to initiate the installation of Guest Additions.
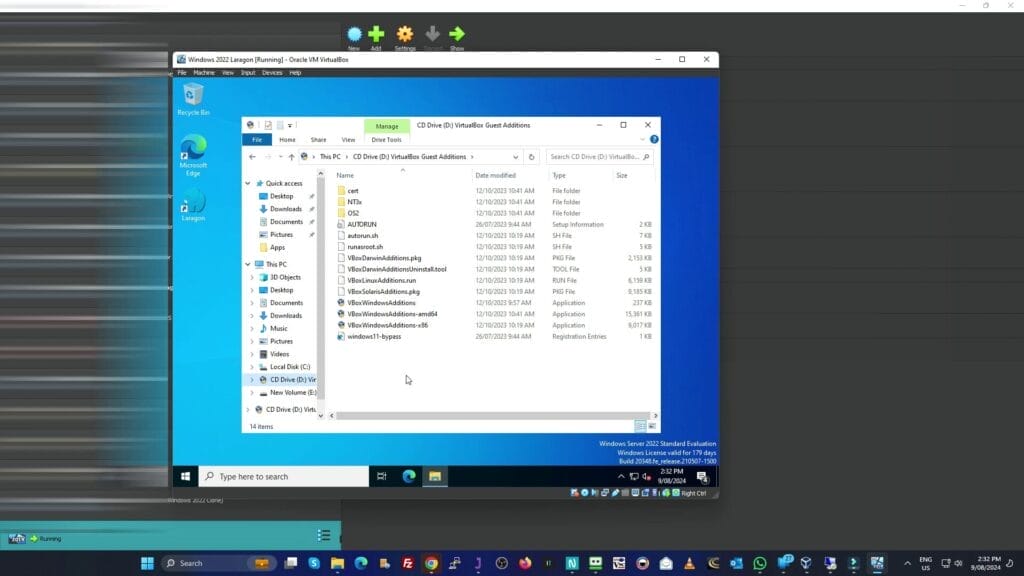
- Install Guest Additions: Once inside the Windows 2022 environment, I head to the “Devices” menu and select “Install Guest Additions CD image.” This action prompts the setup wizard to launch.
- Run the Installer: After navigating to the CD drive, I double-click on the VirtualBox Windows Additions setup file and follow the prompts to complete the installation.
- Reboot the Virtual Machine: Finally, it’s important to reboot for the changes to take effect.

Post-Installation Experience
Once the installation process is complete and I’ve rebooted the virtual machine, I immediately run a test to ensure everything works seamlessly. One of the first things I do is try the drag-and-drop functionality by moving a file into my Downloads folder from the host system. The fluidity I experience is a testament to how much more practical my virtual environment has become after installing Guest Additions!
Another highlight is using the clipboard. I’ve found that copying and pasting between my host operating system and the guest has become incredibly smooth, allowing me to quickly transfer snippets of information, links, or even complete files without any hassle especially since the Linux server operating system doesn’t have a GUI interface.
I highly recommend taking the time to ensure both VirtualBox and Guest Additions are correctly installed and up-to-date. The productivity boost and ease of use are worth every moment spent getting everything set up just right.
Final Tips for a Smooth Experience
To help others avoid pitfalls like those I’ve faced, here are a few extra tips I’ve found useful:
- Always check VirtualBox and Guest Additions version compatibility before installation.
- Consider taking snapshots of your virtual machine before major changes, so it’s easy to backtrack if needed.
- Stay up to date with software updates. Each new release often brings enhancements that could further improve your experience.
The world of virtualisation with VirtualBox offers endless possibilities. The seamless integration after installing Guest Additions truly transforms how I interact with my virtual machines. By sharing my journey with you, I hope to make your experience with VirtualBox and Windows 2022 as rewarding and efficient as possible. Happy virtualising!
Installing Guest Additions enhances the performance of your VirtualBox Windows 2022 setup, allowing for seamless features like drag-and-drop and clipboard sharing. With precise installation steps and a reboot, you’ll experience improved functionalities in no time. Here’s a video HOW TO ADD GUEST ADDONS IN VIRTUALBOX

If this article helped you in any way and you want to show your appreciation, I am more than happy to receive donations through PayPal. This will help me maintain and improve this website so I can help more people out there. Thank you for your help.
HELP OTHERS AND SHARE THIS ARTICLE
LEAVE A COMMENT
I am an entrepreneur based in Sydney Australia. I was born in Vietnam, grew up in Italy and currently residing in Australia. I started my first business venture Advertise Me from a random idea and have never looked back since. My passion is in the digital space, affiliate marketing, fitness and I launched several digital products. You will find these on the portfolio page.
I’ve decided to change from a Vegetarian to a Vegan diet and started a website called Veggie Meals.
I started this blog so I could leave a digital footprint of my random thoughts, ideas and life in general.
If any of the articles helped you in any way, please donate. Thank you for your help.
Affiliate Compensated: there are some articles with links to products or services that I may receive a commission.