Unwanted background sound can turn a clear message into a distraction. A gentle hum becomes a drone, a faint buzz becomes an irritant, and the voice that should lead the story ends up fighting for space against noise. When you produce videos with narration, you want the voice to be present, intelligible, and warm. You want viewers to feel as if you are in the room with them. Background noise gets in the way of that experience. With modern tools, you do not need to settle for a compromised soundtrack. Wondershare Filmora gives you practical and approachable features that take noisy audio and refine it into a clean voiceover that feels professional.
In this guide, you will walk through the process in a focused and thorough way. You will see how to identify the sound you want to remove, how to isolate what must be kept, how to make precise choices with AI Vocal Remover, and how to work with the separated results on your timeline. Along the way you will develop an ear for the differences between voice and interference, and you will build a repeatable workflow that you can apply to any project with confidence.
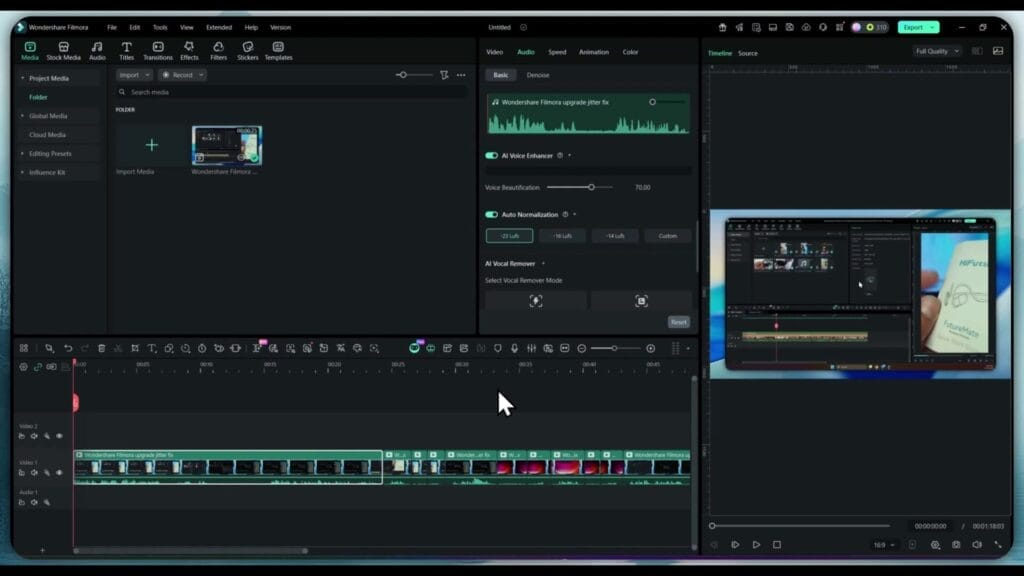
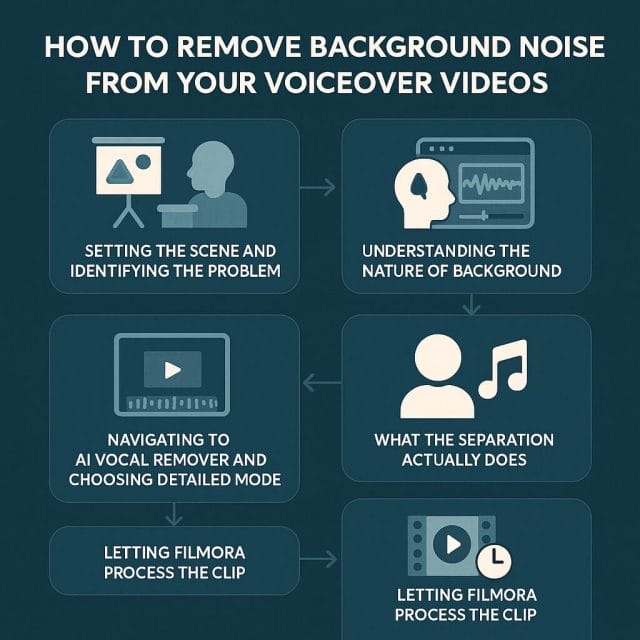
Setting the Scene and Identifying the Problem
Imagine you open a project and drop a clip onto the timeline. The video plays smoothly, the visuals look sharp, and the voiceover language is clear. Then you hear it. A little buzzing noise under the speech. It rides along with the words, disappears when there is a pause, then creeps back as soon as the speech resumes. You may have recorded near a power source, with a cable that added interference, or in a room where a faint appliance sound leaked into the recording. The voice itself is usable and you want to keep it. You just need to remove the buzz. The good news is that you can do this without advanced engineering knowledge, and without leaving Filmora.
Updates to Filmora can move tools to new locations in the interface, and sometimes features evolve into new categories. You may have seen a background removal option in the past and now you notice it is not in the same place. That change does not add extra steps for you. It simply means you will take advantage of a more powerful tool that gives a better result in more varied situations. You will go to AI Vocal Remover, you will choose Detailed Mode, and you will allow Filmora to separate the parts of your audio into distinct elements that you can manage individually.
Understanding the Nature of Background Noise
Before you begin the technical process, take a moment to listen closely and define what you are hearing. If you hear a consistent buzz, it may be electrical hum or interference. If you hear a hiss, it could be microphone self noise or room noise. If you hear low level rumble, it might be traffic or mechanical vibration. Each type of noise behaves differently across the frequency range, and your voice occupies a different range depending on who is speaking, the mic placement, and the room characteristics. This awareness helps you make better decisions while separating and shaping the audio.
Common types of noise in voiceover recordings include the following:
- Steady electrical buzz that sits in the mid range and low high frequencies
- Low frequency hum often caused by mains interference or vibration from appliances
- Broadband hiss from microphone circuitry or preamp noise
- Room ambient sound such as air conditioning, fans, and distant traffic
- Occasional clicks and pops from cable issues or handling noise
The voice is dynamic and expressive. It spans a range that often includes low mid warmth, mid range presence, and high end clarity for consonants. Your goal is to keep the life of the voice intact while reducing or removing the unwanted content. AI driven separation provides an elegant way to do this because it recognises patterns in human speech and distinguishes them from the texture of noise.
Preparing Your Footage and Audio
Begin by bringing your video into Filmora. Place the clip on the timeline and make sure the audio is linked and visible. Play a short section where the voiceover is prominent. Use the speakers or headphones you trust for editing, and set a comfortable listening level where you can hear both the voice and the underlying noise. If needed, solo the audio track to focus on the sound without visual distraction. This first audition tells you what you will be asking the tool to remove and what you will protect.
Check your project settings. Ensure that the audio sample rate matches the rate of your source material as closely as possible. This helps avoid resampling artefacts. Filmora handles most of this for you, but it is still good practice to confirm that the settings are consistent across your project. If you have multiple clips, use markers to note where the noise is most obvious so you can test the separation in those regions.
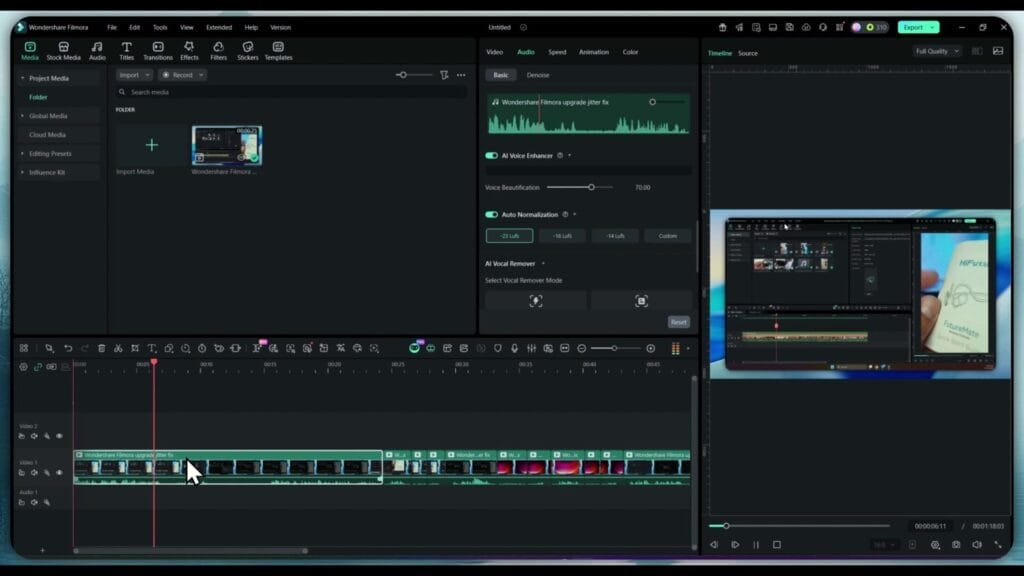
Navigating to AI Vocal Remover and Choosing Detailed Mode
Filmora organises its audio tools so that you can find the most relevant feature quickly. Even if you were familiar with an older background removal option, the newer approach gives you a clearer and more controllable result. Locate AI Vocal Remover within the audio tools. When you open it, you will see options for how thoroughly you want the tool to analyse and separate the audio content. Choose Detailed Mode.
Detailed Mode tells Filmora to make a careful pass through your audio and to create a refined separation between the voice and the remainder of the sound. This is not a shortcut. It is a deeper process that takes a little longer, and it rewards you with tracks that are usable without excessive manual correction.
What the Separation Actually Does
When you activate AI Vocal Remover, Filmora listens to the audio and identifies the parts that match human speech patterns. It creates one element for the voice and another element for everything else. Think of it as taking a mixed painting and pulling the figure from the background. The voice becomes a distinct layer that you can place, adjust, and refine on its own. The background becomes a separate layer that you can mute or delete entirely.
Under the hood, the system looks at frequency content and time domain behaviour. It recognises transitions common to spoken phrases, intonation, even breath patterns, and it peels away the parts that do not follow those patterns. Buzzes and hums tend to be steady with little variation. Hiss spreads across a wide range without the sculpted change that shows up in speech. Ambient room sound may fluctuate slowly with constant texture. These characteristics make them easier to isolate once the voice is tagged.
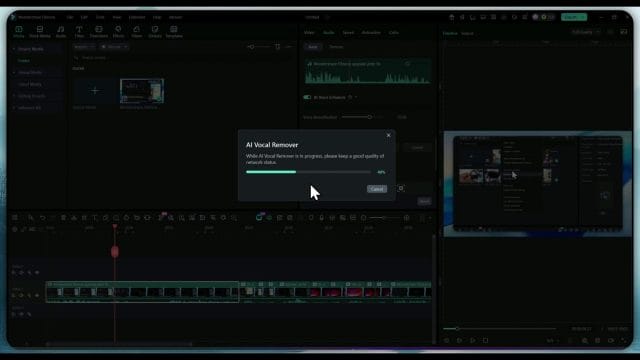
Letting Filmora Process the Clip
Start the separation and let Filmora run. You will see progress as it processes the timeframe of your clip. For shorter segments, this can be swift. For longer segments, especially with Detailed Mode, it may take a little while. This is time well spent because the quality of the separation will save you many minutes of manual filtering later on.
Once the process is complete, Filmora places two audio elements on your timeline. One is the vocal track. The other is the noise or background track. You can immediately interact with them as independent items. You can mute, solo, adjust levels, and add effects without touching the other track. You also still have your original clip, which you can keep for reference or mute entirely to avoid duplication.
Auditioning the Separated Tracks
Begin by soloing the background track. This will sound odd by itself. You will hear the buzz that was bothering you, the hiss, the ambient sound, and anything else that is not the voice. This validates that the separation is working. You can play a short segment and confirm that what you are hearing in the background track matches the noise you want to remove.
Then solo the vocal track. You should now hear the spoken content with much greater clarity and presence. The voice will feel closer and cleaner, often with a pleasing focus. If the buzz was strong in the original, you will notice a striking absence of that annoyance now. This isolated listen gives you confidence that when you mute the background, the voice will carry the message cleanly.
Muting and Managing the Background Track
With your audition complete, mute the background track. You can leave it on the timeline if you want to keep a safety copy, or you can remove it to keep the workspace tidy. Keeping it muted allows you to unmute briefly if you want to check how much ambient sound was present in a particular section. This can be useful if you wish to blend a little ambient sound back in later for natural feel, but in most voiceover projects you will keep it muted entirely.
Mute the original audio from the video as well, to avoid confusion. The separated vocal track will be your primary source. Place it on a track where you can manage its level with clarity, and label the track so you can find it quickly as you work through edits and adjustments.
Placing and Balancing the Vocal Track
Now you have the vocal track isolated and the noise out of the way. Set an appropriate volume level for the voice. Aim for a healthy peak without clipping. In Filmora, use the meters to ensure the voice sits in a strong range. In most cases, you want the loudest phrases to sit just below the top of the meter, and the average speech to sit well above the noisefloor. If the track feels too loud or too soft, adjust the gain. It is fine to use automation to smooth out level differences between phrases, especially if the speaker moved closer or further from the microphone during recording.
Assess the tonal balance as well. If the voice sounds slightly dull after separation, you can add a gentle presence lift with an equaliser. If it sounds a little brittle, roll off a small amount of high end. The goal is natural speech that feels comfortable and intelligible. Use subtle moves. The separation often gives you a clean result without heavy processing.
Enhancements That Complement Noise Removal
With noise out of the way, you can bring out the character of the voice with tasteful enhancement. Filmora gives you straightforward tools to do this. Consider the following gentle adjustments:
- Apply a low cut to remove unnecessary rumble below the useful speech range. This clears up the sound and keeps the focus on the voice
- Add a slight presence boost around the mid high range to bring clarity to consonants and phrases that need extra articulation
- Use a voice enhancer to align the overall tone and handle minor inconsistencies in recording
- Use a soft compressor to bring the voice into a consistent level without squashing dynamics. This makes narration easier to follow in varied listening environments
Keep your ears on the story. Enhancements are tools to support the message, not to draw attention to themselves. If you find yourself listening to the effect rather than the content, dial back the adjustment.
Checking the Result Against the Original
It can be helpful to compare the cleaned vocal with the original mixed audio briefly. Turn the background track back on for a moment and flip between the soloed vocal and the full original. You will hear the buzz return when the background plays. This contrast reinforces the improvement. It also helps you trust the process when you clean longer segments or whole videos. Once you have verified, return to the vocal only playback and continue your edits with the noise muted.
Why Detailed Mode Makes a Difference
Detailed Mode is worth the extra processing time because it maps the voice and noise with greater precision. When you listen to the vocal track produced in Detailed Mode, consonants retain their crisp edge and vowels maintain their body. Transitions between syllables feel natural. If you were to use a faster mode for separation, you might hear a slight smearing or a gentle artefact on s sounds or transitional phrases. Detailed Mode reduces these issues by taking a careful look at how speech evolves over milliseconds and by keeping those micro changes intact.
Filmora design focuses on simplicity for creators, yet the underlying technology for AI Vocal Remover reflects a deep analysis. You do not need to understand the technical mathematics to benefit from it. You simply give it a clear instruction to focus on speech, and it does the heavy lifting in the background so that your result sounds pleasing and professional.
Managing Timeline Clarity After Separation
After a few rounds of separation, your timeline can become busy. Use naming conventions for tracks. Label the vocal track clearly. Place markers for important narration points or emphasis cues. Colour code clips if you prefer to distinguish sections. These small organisational habits save time when you return to the project later or when you reuse the workflow for another video.
Consider keeping a short section of the separated background track at the beginning or end of the timeline as a reference. You can mute it, but keep it as a reminder of what you removed and as a quick way to verify how much ambient sound was present. This can help when you make decisions about subtle ambience in intros or outros.
Handling Different Kinds of Speech
Not every voiceover behaves the same way. A soft spoken narration with careful articulation will separate differently from an energetic speech with strong consonants and wide dynamics. When you use AI Vocal Remover on a soft voice, Detailed Mode will capture the delicate transitions that make it natural. When you use it on a powerful delivery, it will honour the energy while pulling away the noise that rides beneath that power. Listen to the results and tailor enhancements accordingly.
If you have multiple speakers, apply separation to each segment and label the tracks by speaker name. Each voice may benefit from slightly different equaliser settings and compression amounts. The noise removal step itself stays the same, but the polishing decisions vary with the voice.
Practical Steps for a Smooth Workflow
To make the process efficient, follow a clear step by step routine each time you remove background noise from a voiceover. This keeps projects consistent and reduces errors.
- Import your video and place the clip on the timeline with audio visible
- Audition the audio and identify the nature of the background noise to be removed
- Open AI Vocal Remover within the audio tools and choose Detailed Mode
- Let Filmora process the clip and create the vocal and background tracks
- Solo and audition the background track to confirm it contains the unwanted sound
- Solo and audition the vocal track to ensure speech is clear and present
- Mute or delete the background track so it does not play in your final mix
- Mute the original linked audio if needed to avoid duplication
- Set the level of the vocal track and apply gentle enhancement if required
- Proceed with edits, transitions, and any additional audio elements with clarity
Addressing Buzzing Noise with Confidence
When your original clip suffers from a little buzzing noise, it can be tempting to reach first for manual equaliser cuts or a noise reducer. Those tools have their place. However, they often require careful tweaking of thresholds, attack and release settings, and they can introduce artefacts if pushed too hard. AI separation solves a different problem by isolating the voice from its surroundings before any shaping. Once the background sound becomes a separate track, you do not need to fight it. You simply mute it.
This approach often yields a more natural voice, because you are not carving into the vocal frequencies to remove what you do not want. You are protecting the voice and dealing with noise in its own lane. It respects the integrity of the spoken content and keeps the emotional nuance intact.
When You Want a Touch of Natural Ambience
There are occasions when a completely silent background feels unnatural, especially if the video includes on camera presence or scenes with visible environments. In those cases, consider blending a subtle amount of room tone behind the voice to avoid a clinical feel. You can do this with a short, consistent stretch of the separated background track that does not include obvious hum or buzz, or you can use a recorded room tone sample that matches the scene.
Keep the ambient layer at a very low level. The voice should dominate entirely. The aim is to replace distraction with gentle context, not to reintroduce noise. Fade the ambience in and out around transitions where it makes narrative sense.
Guarding Against Clipping and Distortion
With noise removed, the voice may feel louder relative to the new clean background. Watch your levels to ensure you do not clip during peaks. Clipping produces a harsh distortion that undermines the clarity you worked to achieve. In Filmora, keep peaks below the top of the meter. If the track is consistently high, reduce the gain or add a gentle limiter with a reasonable ceiling to catch unexpected spikes. Avoid heavy limiting because it can make speech sound pressed and fatiguing.
Export Settings for Clean Voiceover
When you are satisfied with the separation and the enhancements, prepare to export. Choose an audio format that preserves clarity and aligns with your distribution platform. If you plan to upload to a video platform, the default settings in Filmora usually handle audio well. If you need higher fidelity for archival or further post work, select settings that keep a healthy bitrate for your audio. Check that the sample rate is consistent and that the voice sits at a comfortable level across the programme.
Common Misconceptions and How to Avoid Them
Creators sometimes worry that AI separation will make voices sound robotic or unnatural. In practice, when you use Detailed Mode, the voice remains organic and expressive. Artefacts are minimal, especially compared to aggressive manual noise reduction. Another misconception is that you need to be an audio engineer to get good results. Filmora removes that barrier by offering a clear tool that focuses on the user goal. You do not manage complex parameters. You select the mode, allow the process, and work with the result.
A different concern is whether removing all background sound will make viewers notice hard cuts. The solution is to use smooth crossfades between clips and to keep the narration flowing. If you blend edits thoughtfully, the absence of noise becomes a benefit rather than a calling card. The viewer will be engaged by the story, not by the sound of the room.
What to Do If the Noise Is Still Noticeable
In rare cases, after separation, you may still perceive a trace of noise within the vocal track. This can happen if the noise overlaps very closely with the voice frequencies or if the noise modulates in a way that mimics speech. There are steps you can take to improve the result without compromising the quality of the voice.
- Apply a gentle high shelf reduction if the hiss is faint but persistent, focusing on preserving consonant clarity
- Use a narrow notch to reduce a specific hum frequency if you identify a single tonal intruder
- Use light noise reduction on the vocal track with conservative settings to avoid pumping
- Re run AI Vocal Remover on a short problematic section to refine the separation for that region
Always compare with and without each adjustment. Trust your ears. If the speech loses natural character, simplify the process and return to the clean separation as your foundation.
Building a Repeatable Workflow for Future Projects
Consistency matters. When you work on regular content, you want a workflow that you can rely on even when you are under time pressure. Develop a routine around AI Vocal Remover that includes clear steps, quick checks, and a predictable outcome. Document your choices in a simple note. Keep a template project with track labels and markers ready. When you start a new video, copy the template, import the clip, and proceed with the separation. This speeds up editing and ensures that your channel maintains a coherent audio quality standard.
Troubleshooting Interface Changes After Updates
Software evolves. There may be moments when a feature appears to move or a button looks different. In Filmora, if you cannot find AI Vocal Remover right away, explore the audio tool panels and search within the effects or audio section. The feature is present, and its placement may shift with an update to make the interface more intuitive. Once you locate it, the core process and the result remain the same. Choose Detailed Mode, let it work, and manage the separated tracks on your timeline.
Practical Listening Tips During Editing
Your hearing is your most valuable tool when you refine voiceover audio. Give yourself the best chance to make good decisions by listening in ways that reveal the truth of the sound.
- Use headphones with a neutral balance when you need to detect faint noise
- Switch to speakers for a broader sense of how the voice sits in a room
- Listen at a moderate level to avoid fatigue and to perceive detail without strain
- Take short breaks during longer edits so your ears remain fresh and objective
- Compare sections with and without separation briefly to recalibrate your judgement
These habits help you avoid over processing and keep the focus on communication.
Maintaining Natural Dynamics in the Voice
Noise removal can tempt you to tidy the voice into a perfectly even level. Resist the urge to remove all dynamics. Natural speech rises and falls with emphasis, intention, and emotion. Keep those contours intact. Use automation to smooth out extremes, but allow breaths and gentle variations to remain. They make the narration feel human and relatable.
Organising Multiple Takes and Versions
If your project contains several takes or versions of the same line, separate each one with AI Vocal Remover and label them clearly. Then audition quickly to choose the best performance. The separation ensures you are comparing takes based on vocal quality rather than background interference. Store alternate takes in a separate track folder or group so you can revisit them if needed.
Understanding When to Re record
Although separation is powerful, there are situations where the original audio is simply unsuitable. If the noise overwhelms the voice or if the recording has distortion baked in, consider re recording the line in a quieter environment with proper mic technique. Filmora will turn a good recording into a great result. It is not a cure for fundamentally flawed source material. Trust your judgement. If you can fix it with separation and gentle enhancement, proceed. If you cannot, a fresh recording is the smart choice.
Conclusion and Next Steps
You have learned how to approach background noise removal in a voiceover with clarity and purpose. You know how to find the right tool in Filmora, why Detailed Mode suits narration, and how to manage the separated tracks without fuss. The process is simple in practice, and it gives you creative control over the sound of your project. When the buzz is gone and the voice stands forward, viewers stay with the story and the message lands.
If you find an even simpler method that suits your workflow, share your experience. The goal is always the same. Clear voice, minimal distraction, confident communication. If this guide helped you, consider giving a like and subscribing to support the channel and to receive more insights on video and audio craft.
Refining the vocal after separation
With the vocal cleanly separated, you have the freedom to polish the performance without fighting the buzz or rumble that used to mask details. The goal now is to shape clarity, keep the voice sounding natural, and remove minor distractions that might pull attention away from the message. A light touch is still the guiding principle. Work in short passes, listen, then decide whether a change truly improves intelligibility or simply makes the voice sound processed.
Zoom into the waveform while watching the meters. Your ear will always be the final judge, yet the visual shape of consonants and breaths helps you target edits efficiently. Focus on problems that your audience will notice in the first seconds of playback. Once these are fixed, any remaining minor imperfections will often fade into the background of music or ambience.
Micro edits that protect intelligibility
Micro editing can lift a good recording into a polished narration, so long as you keep edits invisible. The separation already removed most of the background, which means small timing or level adjustments will be far more obvious than before. Move slowly and track by track.
- Trim and fade clip edges: Create short fade ins and fade outs of a few frames to avoid clicks when clips start or end. If you hear a tiny tick at a cut, extend the fade slightly until it disappears.
- Repair tiny bumps: If you hear a microscopic bump between words, add a short crossfade over the join so the waveforms blend. Keep the crossfade just long enough to remove the bump without blurring consonants.
- Even out word endings: Some words end a touch early or late. When needed, nudge a clip boundary a frame or two, then reapply a tiny fade. Never pull a word off its sync with the video.
- Spot fix abrupt breaths or lip noises: Instead of removing them entirely, reduce their level with a gentle clip gain dip. This keeps performance energy intact.
Managing sibilance without a dedicated de esser
Sibilance lives in the upper mids and high frequencies, often between six and nine kilohertz, and it can sound sharp now that the background is gone. If Filmora does not present a dedicated de esser in your version, you can still tame sibilance effectively.
- Targeted EQ dip: Apply a small cut in the sibilant range, one or two decibels at most. Move the centre of your cut while listening to find the sweet spot where S sounds soften without dulling vowels.
- Word level automation: Add a keyframe before and after a strong S, pull down the level by a decibel or two through the sibilant, then return to normal. This manual de essing is very transparent.
- Presence balance: If you boosted presence earlier to bring the voice forward, try reducing the boost by a small amount and judge whether clarity is still present. Often a slight back off is all that is needed.
Controlling plosives and thumps
Plosives are sudden blasts of low frequency air on consonants like P or B. The separation step does not always remove them because they are part of the voice. Handle them with simple edits rather than heavy filtering across the entire clip.
- Micro split and EQ: Split the vocal clip just before the plosive and again just after. On the small section, raise the low cut frequency to reduce the rumble and restore it to normal on the following section. Blend with a short crossfade so you do not hear a change in tone.
- Clip gain dip: If the plosive also jumps in level, lower the level of just that tiny section by two or three decibels and fade into the dip. This tames the thump without thinning the whole sentence.
- Alternate take repair: If you have a cleaner take of the same word or phrase, swap it in and match the transition with a small crossfade. Label the replaced section for future reference.
Dealing with breaths naturally
Breaths make speech human. A completely breathless narration can feel robotic and fatiguing. The trick is to reduce only the breaths that draw attention.
- Identify distracting breaths: Loud or harsh breaths that sit at the same level as words should be reduced. Natural soft breaths can stay.
- Reduce, do not erase: Lower the level of distracting breaths by three to six decibels and apply a short fade out and fade in to keep the envelope smooth.
- Avoid gating: Hard gating can make the room feel like it switches off and on between words, especially after separation. Volume automation or clip gain changes are safer and more musical.
As you refine, keep checking the separated background track to ensure nothing useful has been lost in the voice. Solo the background for a few seconds, then solo the voice again. You can confirm that the noise remains isolated and that the vocal track holds all important consonants and room cues for naturalism.
Shaping space without reintroducing noise
Absolute silence under a voice can feel clinical. In storytelling, a touch of space helps the voice breathe, and it can mask tiny artifacts that remain after heavy noise removal on difficult recordings. The key is to use ambience in a way that never competes with speech.
Building a seamless room tone loop
Room tone is the sound of a quiet room with no speaking. It is the glue behind a voice track and it is your friend when you need to cover edits or smooth transitions.
- Find the cleanest patch: In the original audio or the separated background track, locate a section with no speech and minimal movement. Even two or three seconds can be enough.
- Trim and test: Isolate the patch, apply tiny fades at the start and end, then duplicate it a few times and listen in a loop. If you can hear a pattern, slightly change the length or crossfade the joins until the loop sounds stationary.
- Keep it quiet: Lay the loop under the entire narrated section at a very low level. The audience should never notice it. The aim is to avoid a vacuum, not to add a new layer of noise.
Smart fades between scenes
Scene changes, edits between takes, or insert shots can expose changes in the noise floor. With the vocal separated, these jumps stand out. Smooth them with subtle fades and thoughtful ambience management.
- Crossfade room tone: If your scene changes location, crossfade the outgoing room tone into the new tone over half a second or so while keeping the vocal continuous. This feels like the space breathes with the story.
- Use ambience to hide cut points: If you need to tighten phrasing, add a little breath or a pause, or insert a subtle swish or whoosh at an edit that falls over b roll. Keep it tasteful and low.
- Maintain a constant acoustic perspective: The voice should remain the anchor. Do not make the voice sound like it is moving to a new room unless the story demands it.
Marrying voice with music and sound effects
Once the narration stands on its own, bring in music and effects with confidence. Your task is to support the message without pulling the listener off the words. The separated voice track gives you headroom and control, so you can mix at reasonable levels instead of burying the voice or fighting the noise floor.
Establish a clear priority
Decide what the audience must always understand. The voice comes first. Then add music to frame the emotion and rhythm. Effects add detail and realism only where needed. If you keep this order in mind while you mix, you will avoid common clashes and maintain clarity.
- Choose music that leaves space: Tracks with sparse arrangement and gentle midrange make narration easier to understand. Pads, light percussion, and evolving textures are often better than dense arrangements.
- Place effects sparingly: Short accents and transitions can help keep attention flowing, but they must never cover key consonants or numbers in the script.
- Start lower than you think: Bring music up slowly under the voice until it just supports the tone. If you can clearly hear the bass and melody while reading along, it may be too high.
Auto ducking in Filmora
Ducking lowers the music level automatically when the voice plays and brings it back between phrases. In Filmora you can set this up quickly so that the mix breathes around your narration without constant manual work.
- Place the clean vocal track on its own lane and label it clearly. Position the music track on a lane below.
- Select the music clip, open the audio controls, and enable ducking. Choose the voice track as the reference if the option is available. Set reduction so that words remain clear while the music still feels present.
- Adjust fade time so that the music dips fast enough at the start of phrases and rises gently during pauses. Listen to a few sentences and tweak until the motion feels natural.
- Write a few manual keyframes for moments that need special emphasis, such as numbers, product names, or punchy lines where you want the music to dip a little more.

After ducking is set, audition quiet phrases, fast sections, and your loudest delivery to ensure the ducking range suits all parts. You want consistent intelligibility, not pumping. If the music still competes in busy sections, try reducing the low mids of the music slightly with EQ rather than turning the entire track down further. A gentle cut where the voice sits will create space without sacrificing musical energy.
Tackling stubborn noise and artefacts
Some recordings carry a mix of hiss, hum, room echo, and mechanical whirrs that change over time. Separation removes the broad background, yet a trace can remain on the voice or the voice can sound a little too sculpted in some moments. Here is how to handle these edge cases in Filmora without risking speech quality.
Hums and mains buzz
If you still hear a stable hum, it is usually related to electrical mains and appears around fifty hertz in the UK and at multiples of that frequency. Separation reduces the hum in the background element, yet a faint hint can cling to vowels.
- Use a small low frequency cut: Increase the low cut on the vocal by a tiny amount. A gentle move below one hundred hertz often clears the sensation of hum without thinning the voice.
- Trim low mids slightly: If the hum includes harmonics, a one or two decibel cut in the low midrange may help. Move slowly and compare with the previous setting after each change.
- Re run separation for short sections: If a hum spike appears only in a short phrase, copy that region to a new lane and run separation again with the same Detailed Mode. Replace only that phrase in the main track.
Hiss and high frequency noise
Hiss is a broadband texture. After separation it often becomes noticeable during sustained vowels or in very quiet passages.
- Trim the highest air band: A gentle shelf reduction above eight kilohertz of one or two decibels can be enough to make hiss less obvious while keeping the voice open.
- Mask with ambience: A very low bed of room tone can tuck the hiss away from attention without taking away clarity. Keep it subtle.
- Avoid aggressive noise reduction: Filmora includes noise reduction options, but apply them lightly and locally if needed. Overdoing it can create watery or pumping textures that are more distracting than the original hiss.
Clicks, knocks, and rustles
Short non speech sounds are best removed surgically. The clean separation gives you precise access to them because the background track no longer carries the voice that would otherwise mask small edits.
- Zoom and split: Split around the click, add a tiny crossfade, and test. Many small mechanical noises disappear with a micro splice.
- Alternate ambience patch: If a rustle sits under a pause, consider replacing that short patch with a segment of your room tone loop. Combine with a fade to keep the transition invisible.
- Keep consonants intact: Never cut through the middle of a consonant. If the noise sits within a word, a small volume dip is safer than a cut.
Phasey or hollow tone
A hollow tone often comes from doubling or unintended summing with the original audio. First, confirm that you are not combining the old linked track with the new separated voice.
- Mute or remove the original: Double check that the original camera audio is muted or deleted. A tiny residue can create combing.
- Centre the voice: Make sure the voice is not duplicated across lanes with a small delay. Keep a single clear vocal in the centre.
- Back off processing: If tone still feels thin, reduce the depth of any EQ boosts and compression until the voice breathes again.
Working faster with templates and presets
Consistency across projects brings both speed and a professional sound that audiences recognise. Build your own repeatable chain in Filmora and lean on it with minor tweaks rather than reinventing every time.
Save and reuse settings
- Track naming and colour: Keep your voice track, background reference, music, and effects in the same lanes with consistent colours. One glance at the timeline will show what is what.
- Copy attributes: When you are happy with the vocal EQ and dynamics for a given speaker, copy audio attributes and paste them onto other clips from the same session. Tweak only where needed.
- Presets: If your Filmora version allows saving EQ or noise reduction presets, create a handful for your most common voices and rooms. Name them clearly with the speaker and location.
Silence detection to tidy long takes
Long voiceover sessions often contain retakes, pauses, and notes to self. Filmora includes silence detection that can find gaps and split clips automatically, which speeds up culling and arrangement. Run silence detection on your raw take before separation if you prefer, or on the clean vocal afterwards. Either way, use the generated cuts as a starting point and refine manually around breaths and phrasing.
Smooth playback on modest hardware
- Proxies: If your system struggles during dense projects, enable proxy generation for your video files. Audio editing will remain responsive, and your voice will be easier to judge without stutter.
- Render sections: Pre render heavy sections with many effects before doing critical audio fine tuning. Smooth playback helps you focus on sound.
- Keep the project tidy: Remove unused audio from the timeline, especially any earlier copies that you no longer need. This lowers CPU load and avoids confusion.
Remote guests and mixed sources
Real world projects often bring in voice from phones, webcams, or remote interview platforms. These sources vary in tone and noise. The separation workflow still applies, but you will want to match voices across different mics and rooms.
Sample rate and sync confidence
Video projects usually run at forty eight kilohertz. If a guest sends a recording at forty four point one, Filmora will resample on import. Keep all assets in the project at the same sample rate where possible to avoid subtle drift over long timelines. If you notice a slow drift, split the clip every few minutes at a quiet point and nudge the later section slightly until the sync is restored.
Tone matching across microphones
- Find a common target: Decide on a reference voice that sounds most natural. Shape other voices gently toward it rather than trying to make them identical.
- Balance warmth and presence: Add or remove a decibel or two in the low mids for warmth, and a similar small move in the presence range for clarity. Small changes add up across a whole video.
- Use separation on each source: Run AI Vocal Remover Detailed Mode on each person’s track. This ensures that your ducking and mixing steps later will not bring back noise from a different room.
Handling clipped or distorted files
If a contributor sends audio that is clipped, separation will not restore lost peaks. Clean what you can and prioritise intelligibility, but do not over process. If the content is crucial and the distortion is heavy, it is worth asking for a new take with a lower input gain. Offer a quick guide for the speaker to record closer to the mic, in a quieter room, and with levels peaking safely below zero on their recorder.
Salvaging live cameras or action camera audio
Sometimes you must work with on camera sound from a live event or an action camera picked up on location. The background is complex and the recording chain was not optimised for voice. The separation step is at its most valuable here, because it will often retrieve a surprisingly usable voice line from very messy material.
- Run separation and evaluate: Solo the background to identify what was removed. You may find a crowd, machinery, or wind mostly captured in the background track, with the vocal far cleaner than expected.
- Reduce echo with automation: In a reverberant room, the tail of the voice can still linger. Use volume automation to gently ride down the gaps between sentences, which reduces the sense of echo without imposing heavy processing.
- Support with captions: If a few words remain hard to understand, add concise on screen captions. This helps the audience follow along without raising music or processing the voice further.
Quality control, loudness, and export
With the content mixed, you are ready to check loudness and deliver a master that sounds consistent on phones, laptops, televisions, and larger speakers. Loudness is a journey across the whole timeline rather than a single number. You want a steady voice level, musical balance, and gentle dynamics that never jump or vanish.
Metering and headroom
- Watch peaks: Keep the highest peaks of the final mix a few decibels below full scale. Peaks around minus three to minus one on the metre leave safety for platform encoding.
- Listen at several volumes: Check how intelligible the voice remains when you turn down your speakers to a quiet level, and again at a moderate level. If you can still follow every word quietly, your mix is likely in a good place.
- Check transitions: Move through scene changes, music entries, and heavy edits to ensure the voice does not dip or jump unexpectedly.
Export settings for masters and versions
Export in a format that preserves your work without adding new artefacts. For video, set audio to forty eight kilohertz and choose a high bitrate for compressed formats. If you need an audio only master for archive or distribution to a podcast channel, export a lossless or very high quality file.
- Sample rate: Use forty eight kilohertz for video delivery.
- Bitrate: For AAC, a high bitrate like three hundred and twenty kilobits per second maintains clarity. For lossless archive, export WAV at twenty four bit if available.
- Normalisation: If your Filmora version offers a loudness normalisation option, use it gently and verify the results with listening tests rather than relying only on a number.

Always keep an ear on how different platforms handle your mix. Some social networks apply their own loudness processing or transcode audio to lower bitrates. A conservative peak level and sensible dynamics will travel better across these systems than a louder master that hugs the top of the metre.
Organising assets and archiving for future edits
Good housekeeping saves hours when clients request revisions or when you revisit a series months later. Treat audio like any valuable asset. Store it clearly and back it up.
- Folder structure: Use a simple structure with folders for raw audio, separated stems, music, effects, project files, and exports. Keep names readable and include dates so you can find the latest version quickly.
- Versioning: Save incremental project versions at key milestones such as post separation, post mix, and pre export. If a change introduces a problem, you will have a safe point to return to.
- Export stems: Alongside the final mix, export a clean voice stem and a music plus effects stem. Stems let you build alternate versions without repeating the full process.
- Notes: Maintain a small text note inside the project folder listing sample rates, key EQ moves, and any special handling used. This becomes a quick reference for consistent future work.
Common mistakes and quick fixes
Even experienced editors run into the same patterns of trouble. Here are frequent missteps and fast solutions that protect your voice quality.
- Over processing: If the voice sounds lifeless or metallic, remove one process at a time until life returns. Often it is a combination of too much EQ and too much noise reduction.
- Vacuum effect: If the track feels like it is in a void, add a whisper of room tone under the voice. The audience should not hear it, but they will feel the improvement.
- Sss build up: If S sounds leap out on headphones, reduce any high shelf boosts and apply manual de essing only where needed.
- Clipping: If your metres hit the top, lower the overall mix slightly and back off any per clip boosts. It is better to remain modest and clean than loud and crunchy.
- Ducking that pumps: If music swells up and down too obviously, lengthen the fade time or reduce the ducking depth a little. Manual keyframes around important lines can smooth the ride.
- Missed background remnants: If a distant door slam or cough slips through, search in the separated background track for a matching sound to understand its timing, then patch the vocal region with a short ambience loop and a crossfade.
Practical walk throughs
Laptop fan next to the mic
A creator recorded at a desk with a laptop fan that rises and falls. The speech is decent but the whir is distracting.
- Import, verify sample rate, and mark the noisiest sections. Listen on headphones to hear the fan behaviour clearly.
- Run AI Vocal Remover in Detailed Mode and wait for analysis to complete. You now have a clean vocal track and a background track containing the fan.
- Solo the background and scan. Confirm that the fan movement sits there and that the voice is not bleeding through in a way that disturbs intelligibility.
- Mute or remove the background track. If the voice now feels too naked, build a whisper of room tone and lay it in at a very low level.
- Apply a gentle low cut to remove any remaining low frequency rumble. Add a small presence boost if needed and a soft compression to keep the voice steady.
- Mix with music, using ducking. Keep the music sparse and avoid sustained high frequency textures that might reveal any faint hiss that remains.
- Export and check on a phone and laptop. Make final tweaks if a particular consonant feels too sharp or if a few breaths call attention to themselves.
Persistent mains buzz under a voiceover
A narration recorded with a poorly grounded power supply has a constant buzz. Traditional EQ cut the life from the voice, so the editor turns to separation.
- Import and separate with Detailed Mode. The buzz moves almost entirely to the background track.
- Solo the voice to check for any residual hum. Raise the low cut slightly until the voice remains full but the hint of buzz softens.
- Apply manual dips on a couple of deep breaths that exaggerate the buzz. Keep the dips small and add short fades.
- Mix with music that supports the tone but avoids heavy bass that could flirt with the buzz frequency. Use ducking to keep music tucked under speech.
- Final check with light ear fatigue. The voice should be clear and comfortable. Export at forty eight kilohertz with a solid bitrate.
Outdoor narration with wind and birds
An on location product demo includes wind bursts and intermittent birds. The speaker is close to the camera mic but the environment is busy.
- Separate and audition. Much of the wind and birds sit in the background track, freeing the voice.
- Identify any wind hits that leak into the voice. Use micro splits and temporary low cuts on those brief sections with crossfades on either side.
- Cover visible edit points with good ambient bed derived from the background track, set very low and looped seamlessly.
- Choose music with light percussion and minimal high frequency shimmer. Set ducking to maintain clarity during quick phrases where the speaker turns their head.
- Export and listen outdoors on a phone to simulate real use. If birds feel too prominent at any point, write a small dip in music at that moment so attention stays on the words.
Beyond removal: using separation for creative control
Once you are comfortable splitting voice from background, you can use the same technique for creative control beyond noise removal. Separation becomes a way to isolate content and make confident choices.
- Creative reframing: Keep an ambience track at a whisper under your narration to maintain a sense of place for storytelling. Fade it slightly stronger at scene reveals, then back under the voice.
- Educational emphasis: During key definitions or steps, dip the ambience by a decibel more than usual so the words sit forward. The audience may not notice the change consciously but they will feel the added focus.
- Alternate language versions: Export a clean voice stem for translation. New voiceovers can be dropped in later without touching the original music or effects mix.
Confidence checklist before you publish
Before you render and upload, run through this compact checklist to catch any last issues without second guessing your entire mix.
- Voice first: Can you understand every word at a low listening level on laptop speakers
- Noise floor: Do you hear any new pumping or warbles when the speaker pauses
- Room feel: Is the space consistent and believable across cuts
- Music balance: Is the music supportive without stealing focus, especially beneath quieter phrases
- Transitions: Do edits feel smooth and natural with no clicks or bumps
- Levels: Do your peaks stay safely below full scale on the metre
- Devices: Have you listened on at least two playback systems, such as headphones and a phone speaker
Export strategies for different destinations
Different platforms and client needs call for different deliverables. Prepare a small set of exports to cover the bases with minimal extra work.
- Master video: Export at your project resolution with audio at forty eight kilohertz and a high bitrate. This is your primary upload to video platforms.
- Archive audio stems: Export a clean voice stem and a music plus effects stem at the same length as the master. These make future revisions simple.
- Social cutdowns: For short versions, maintain the same audio settings but confirm that intros start cleanly with no room tone gaps. Short formats get straight to the point.
- Podcast or audio only: If you also publish an audio only version, export a high quality audio file. Consider a small extra presence boost for listeners on phones only if it remains natural.
Why this workflow holds up over time
The beauty of a separation first approach is its resilience. Software interfaces change, names for panels move, and extra features come and go. The core idea remains stable. Isolate the voice, protect its dynamics and tone, then mix everything around it with intention. The steps are logical and do not depend on a deep engineering background. With a bit of practice, you will trust your ears and move through projects faster and with better results.
Final thoughts and next steps
You now have a reliable pathway for turning noisy voiceover recordings into clear, warm narrations that feel effortless to hear. Start with clean separation in Detailed Mode, verify the split, mute the background, and bring the voice forward with small, deliberate moves. Support the voice with subtle ambience, mix with music using smart ducking, and keep levels consistent across the timeline. When stubborn problems appear, fix them locally with gentle edits rather than heavy global changes. Keep a tidy project, save your favourite settings, and build a repeatable approach so every new video gains the benefit of your experience.
As you refine your craft, you will find that you need fewer tools, not more. Your attention to listening, micro editing, and musical balance will do the heavy lifting. Keep notes on what works for your voice and your room, and enjoy how much easier each new edit becomes. If this guide helped you bring a noisy track back to life, consider sharing your before and after results with your peers. Your workflow will inspire others to embrace clean, confident voiceover production.

If this article helped you in any way and you want to show your appreciation, I am more than happy to receive donations through PayPal. This will help me maintain and improve this website so I can help more people out there. Thank you for your help.
HELP OTHERS AND SHARE THIS ARTICLE
LEAVE A COMMENT
I am an entrepreneur based in Sydney Australia. I was born in Vietnam, grew up in Italy and currently residing in Australia. I started my first business venture Advertise Me from a random idea and have never looked back since. My passion is in the digital space, affiliate marketing, fitness and I launched several digital products. You will find these on the portfolio page.
I’ve decided to change from a Vegetarian to a Vegan diet and started a website called Veggie Meals.
I started this blog so I could leave a digital footprint of my random thoughts, ideas and life in general.
If any of the articles helped you in any way, please donate. Thank you for your help.
Affiliate Compensated: there are some articles with links to products or services that I may receive a commission.