If you are editing in Wondershare Filmora version fifteen and your timeline playback is jittery, stuttering, or just feels wrong, you are not alone. A number of creators have noticed playback issues particularly in version fifteen point two point one. While Filmora is a friendly and fast editor for many workflows, some system combinations and settings can cause the preview to stutter even when the source footage and final exports are fine. In this guide I will walk you through a practical, temporary fix that has helped many users overcome jitter while working, then broaden the discussion with deeper insights, tests, and tips to keep your editing experience smooth.
This is not a generic summary. We will go step by step as shown in the referenced video, expand with real world explanations, and add extra troubleshooting that will help you in different scenarios. Keep in mind that the preview window is not always an exact reflection of your final export. We want smooth playback for confidence while editing, and we want to understand what is happening in the background so we can make smart choices.
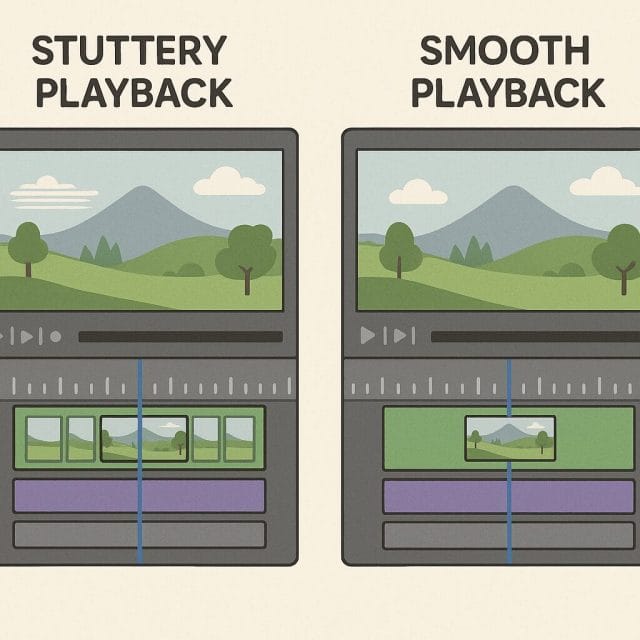
What the Jitter Looks Like in Practice
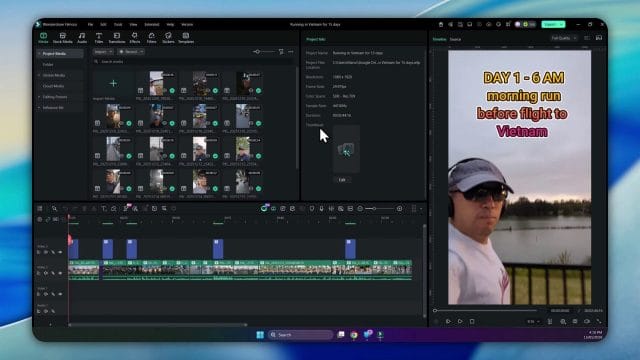
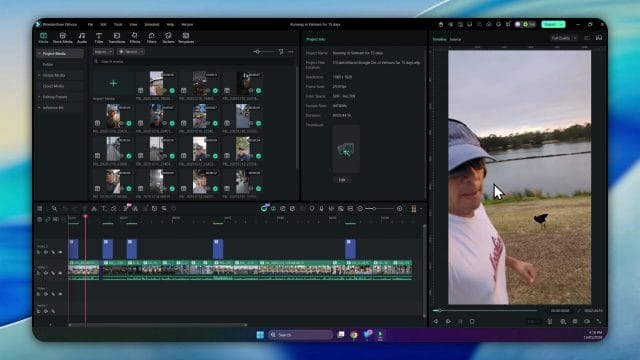
The creator demonstrates the issue with a simple handheld video clip from an early morning run. There is natural motion in the frame, a bit of panning, a person speaking, and the scene includes moving elements like ducks on the water. This is precisely the kind of footage where jitter stands out. Smooth motion should look natural, but when playback is stuttering you see uneven cadence, tiny pauses, and a lack of flow that distracts you from the content and makes timing edits frustrating.
Even if the recorded footage is perfectly fine, the timeline preview in the editor can stutter due to how the program is decoding frames, how the graphics driver interacts with the software, or how effects and scaling are handled in real time. The video begins by pressing play on the clip, and the viewer can hear the narration starting with a cheerful greeting while the visuals do not feel steady.
This is a good reminder to test with typical footage. Static shots can hide problems. Handheld motion or panning across fine detail like foliage, water, or a row of buildings is a better stress test for the playback engine. If you notice jitter in these cases, it can signal a decode or render path issue rather than a problem with your camera files.
First Attempt: Update Filmora from Fifteen Point Two Point One to Fifteen Point Two Point Two
When you run into any glitch, the first sensible move is to check for updates. Filmora receives maintenance releases that specifically mention bug fixes and improved user experience. In the video, the creator opens the update dialogue and checks the installed version, which is fifteen point two point one, then looks for a newer build. This is good hygiene. Sometimes the very issue you are seeing is a known problem and the latest patch resolves it quickly.
The on screen message confirms that version fifteen point two point two is available and claims fixes and improvements. The update is downloaded and installed. Patience is valuable here. Give the installer a moment to complete, allow the restart, and do not interrupt the process. If you have multiple versions, ensure the shortcut or launcher points to the newly updated executable so you are actually running the latest build when you reopen Filmora.
Once back in the program, Filmora tests the environment and shows the updated version number. Now comes the critical step that many users skip. Test with the same footage under the same timeline conditions. The creator reloads the original clips and begins playback again, starting at the same moment, so we are comparing like for like. This makes the results clear and avoids confusion introduced by different clips or added effects.
In this case, the update did not solve the playback jitter. That does not mean updates are pointless. It simply suggests the cause might be deeper than a simple patch fix. Many timeline playback issues are tied to how decoding is handled by your hardware and graphics drivers, and these interactions can vary across systems. The next section presents a reliable workaround that targets the most likely source.
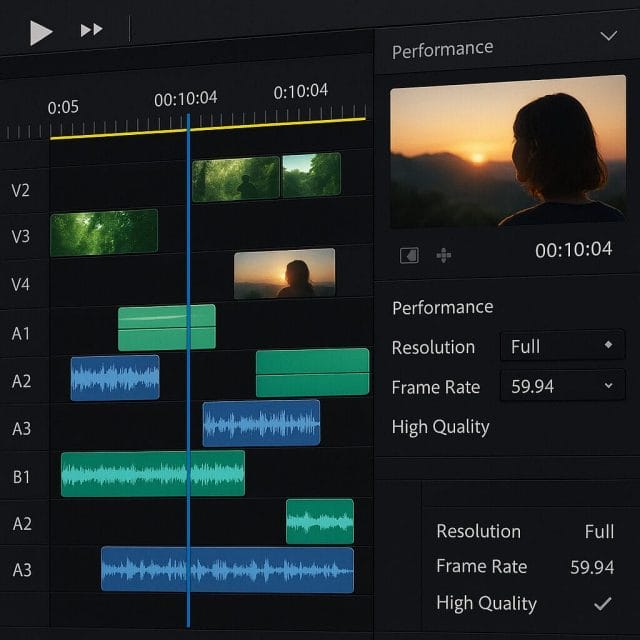
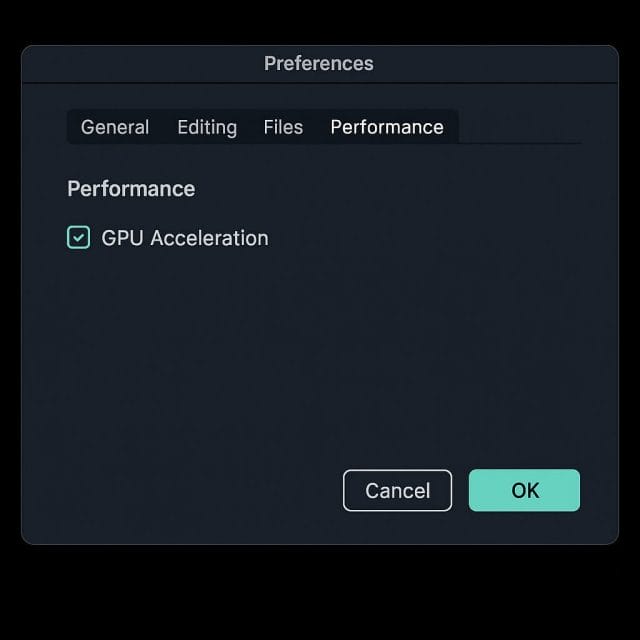
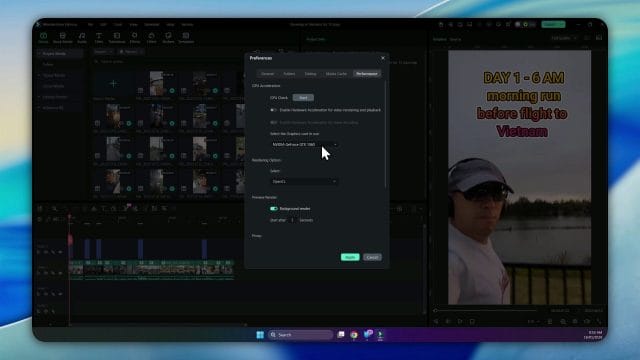
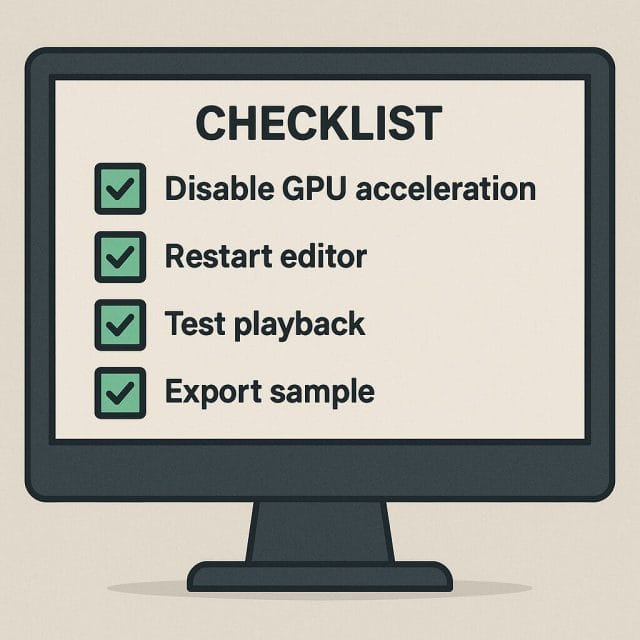
The Temporary Fix: Disable GPU Acceleration for Playback
The video mentions that the issue appears related to video rendering paths. Filmora allows you to toggle GPU acceleration for playback and certain tasks. Disabling GPU acceleration in preferences has helped many users achieve smoother timeline previews, especially in cases where the graphics driver is not playing nicely with the editor.
Here is the step by step process:
- Open Filmora and go to Preferences. You can find this under the main menu. On Windows it is often under File or a dedicated Preferences option. On mac it is usually under the Filmora menu in the top bar.
- Navigate to the Performance section. This area controls how Filmora uses your system resources for playback and rendering.
- Locate the GPU acceleration option. The interface will indicate whether it is using your graphics card, for example an NVIDIA card, or a different device.
- Untick or disable GPU acceleration. Leave other settings unchanged unless you know they are contributing to the issue.
- Confirm the changes.
After changing this setting, it is essential to restart Filmora for the change to fully take effect. The program may continue to use certain cached resources until a full restart. In the video, the creator closes the preferences window and then closes the main Filmora window too, before launching it again. Follow that exactly, as a simple preferences change without restart may not reset the playback engine.
Once Filmora restarts, reload the same project and clip. When playback begins, users often report the jitter is gone or drastically reduced. The creator demonstrates pressing play on the same running clip, and the timeline movement feels steady and natural.
Note that this fix targets jitter during editing, not final render performance. Disabling GPU acceleration can make certain effects preview slower or reduce export speed. If you have a project with many heavy effects or high resolution clips, you might want to re enable GPU acceleration for final export after you finish timing edits, or use proxies and pre renders during editing. The balance depends on your workflow.
Why Disabling GPU Acceleration Can Help
It might feel counterintuitive. Graphics acceleration is supposed to speed things up. However, the interaction between the editor and your graphics driver can be complex. Here are the common reasons why turning off GPU acceleration smooths timeline playback:
- Driver inconsistency. Graphics drivers change often, and not all versions handle decode tasks equally. A stable CPU path may be more predictable for certain formats.
- Variable frame rate sources. Phones and action cameras often record variable frame rate footage. Some GPU decode paths struggle with cadence in real time, causing stutter even with light clips.
- Complex overlays. Titles, transitions, and blend modes can change how frames are composited. On some systems, the GPU preview of these composites does not maintain steady timing.
- Power management. If your system shifts the GPU into a low power state under certain conditions, the preview engine can stutter until the power state changes.
- Parallel tasks. Other applications using the GPU can interfere, especially if a browser is rendering video in the background, or if a game overlay is active.
The CPU decode path is slower in absolute terms, but it can be more consistent with certain file types. Filmora uses a combination of native libraries and accelerated paths to give the best experience on most systems. If your particular driver or card is misbehaving, forcing a CPU path removes that variable and stabilises timing.
Testing Methodology: Compare Like for Like
Whenever you apply a fix, use a consistent testing approach. The video makes this point implicitly by returning to the exact same clip. Here is a simple method you can follow:
- Choose one representative clip with natural motion. Handheld walking footage works well.
- Note your project settings such as resolution and frame rate.
- Play from the same in point before and after the change.
- Avoid adding effects or resizing between tests.
- Observe the audio and visuals together. Sync issues may indicate stutter rather than simple rendering delay.
If the change results in noticeably smoother playback, you have identified a working workaround. If not, proceed to the more detailed troubleshooting steps below.
When to Re Enable GPU Acceleration
After you finish timing edits and you are ready to export a project, you may prefer to re enable GPU acceleration for speed, provided it does not re introduce display issues. Here is a suggested workflow:
- Disable GPU acceleration while you build the edit and fine tune timing.
- Use proxy media for high resolution files to keep playback snappy.
- Pre render complex sections if your system allows it, so the timeline preview does not struggle.
- Before export, re enable GPU acceleration if your system benefits, and run a short test export of a minute to confirm stability.
This balance gives you smooth editing and faster delivery without sacrificing the creative process.
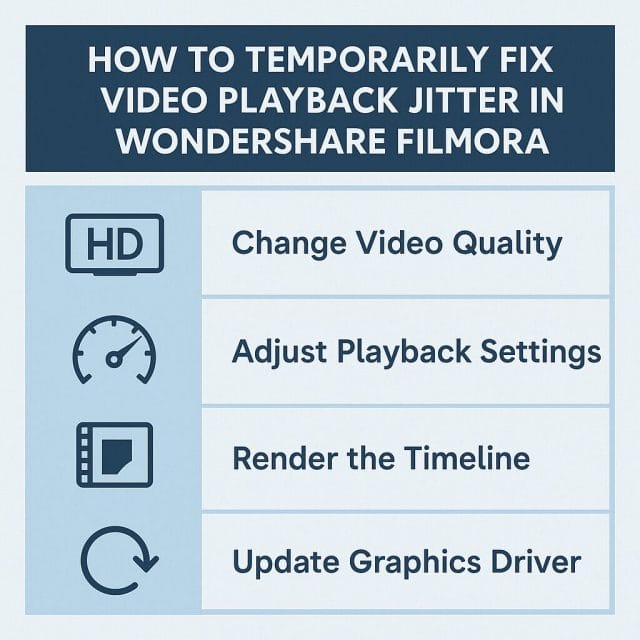
Additional Steps to Improve Playback Smoothness
Disabling GPU acceleration is a quick fix, but there are many other steps that can enhance stability and speed. Consider the following:
Match Project Settings to Source Footage
Ensure your project is set to the same frame rate and resolution as your source clips wherever possible. For instance, if your camera recorded at thirty frames per second, set the project frame rate to thirty. Mismatched rates can create cadence issues on playback.
Use Proxy Media
Proxy media are lower resolution temporary versions of your clips. Filmora can create them automatically. Editing with proxies reduces the load on your system, making playback smoother. The final export will still use the original high resolution files, so quality is preserved.
Reduce Playback Quality in the Preview Window
Filmora allows you to lower the playback quality for the preview, such as switching from full to half or quarter resolution. This can remove stutter without changing the final export quality. Use this when working on complex sequences or high resolution footage.
Pre Render Sections of Your Timeline
Some editors allow you to render a preview of complicated portions of the timeline. Once rendered, playback uses the pre rendered file which is easier on the system. If Filmora offers render previews, use them for parts with many effects or transitions.
Update Graphics Drivers
Check for the latest stable driver for your graphics card. Avoid rushed beta drivers unless you need a specific fix. If your driver was recently updated and introduced issues, rolling back to a previous stable driver can restore smooth playback.
Close Background Applications
Browsers, streaming apps, and even chat clients can consume GPU and CPU resources. Close them during editing sessions to free up power for Filmora. If your system has a resource monitor, watch for processes that spike usage while you play the timeline.
Verify Disk Performance
Footage stored on slow drives can stutter under load. Use a fast SSD for active projects. If you are working from an external drive, ensure it is connected through a capable port and is not power saving during use.
Set the Correct GPU for Filmora
On systems with both integrated and discrete graphics, confirm which device Filmora uses. For example, on laptops with NVIDIA Optimus, you may want Filmora to use the discrete GPU for exports but the integrated device for simple playback if that proves more stable. Some control panels allow you to set application specific preferences.
Check Power Settings
Power saving modes can throttle performance unexpectedly. Set your system to a high performance plan during editing, and ensure that the graphics card is not limited by aggressive power management when the editor is active.
Keep Filmora Components Updated
Aside from the main version number, Filmora may rely on codec libraries that update separately. If the program offers an option to refresh or repair components, use it after major updates or driver changes.
Restart After Major Changes
As the video demonstrates, a full restart after toggling performance settings makes a difference. This flushes the previous state and ensures the new configuration is in effect.
Troubleshooting Checklist
If jitter persists, work through this quick checklist:
- Confirm that GPU acceleration is disabled in preferences and that Filmora was restarted.
- Ensure project frame rate matches source footage where possible.
- Switch preview quality to half or quarter and test again.
- Generate proxy media for high resolution clips and re test.
- Close all other applications that may use GPU or CPU heavily.
- Update or roll back graphics drivers to a known stable version.
- Move the project files to a fast internal SSD and check performance.
- Re import the clip and test in a new project to rule out a corrupt timeline state.
Understanding Timeline Preview vs Final Export
Timeline preview is a real time process. Filmora decodes frames on the fly, composites effects, and outputs them to the display as quickly as possible. If the workload spikes or the system hesitates, you see stutter. Final export is different. It is a non real time process that allows the encoder to take its time, ensuring every frame is computed and written to the file. A project that stutters during preview can still export perfectly if the export path is stable.
For confidence, export a short sample with the same settings you plan to use for the final project. If the sample plays smoothly in a dedicated player, such as VLC or your operating system default player, the preview stutter does not reflect the final quality. You can continue editing with the knowledge that your audience will see a stable picture.
Advanced Considerations for NVIDIA and AMD Users
If you are comfortable adjusting graphics control panels, there are a few settings that can influence video editing behaviour:
- Application specific preference. Set Filmora to use either the integrated or discrete GPU based on your stability tests.
- Power management mode. Choose a performance oriented mode during editing to avoid unexpected downclocking.
- Vertical sync and similar options. While these are more relevant to games, some display timing settings can affect preview behaviour. Test with default settings before making changes, and revert if new artefacts appear.
These choices can have side effects. Always document your changes, and revert if a new issue arises. For many users the simplest path is still to disable GPU acceleration within Filmora rather than altering global graphics settings.
Filming Tips to Reduce the Appearance of Jitter
While most jitter in this context is a playback issue, certain filming practices can minimise perceived stutter and make editing easier:
- Use appropriate shutter speeds for your frame rate. A natural motion blur helps smooth handheld movement.
- Avoid rapid pans across fine detail unless you specifically want that effect. Slow pans are kinder to both viewers and decoders.
- Maintain consistent frame rates. If your camera supports constant frame rate modes, prefer them to variable rate when possible.
- Stabilise with a gimbal or brace when walking, or hold the camera close to your centre of mass for steadier motion.
These practices make the footage easier to preview and reduce the strain on real time decoding paths.
A Note on the Update Dialogue and Future Fixes
In the video, after testing the fix, the creator checks again for updates and none are available. This is a good habit. Filmora continues to release patches, and future builds may improve the GPU path for your system specifically. If a later update resolves the playback jitters with GPU acceleration active, you can re enable it permanently.
When an update arrives, read the notes and back up your project files before installing. After update, test with the same representative clip to compare results. If jitter returns, you can repeat the workaround by disabling GPU acceleration and restarting.
Frequently Asked Questions
Does disabling GPU acceleration affect export quality
No. Quality is determined by codec settings and source footage. Disabling GPU acceleration may change export speed, but the visual result should remain the same. Test with a short segment to confirm if your system changes export time in a meaningful way.
Is jitter a sign that my files are corrupt
Usually not. Jitter in the preview often stems from the playback engine and driver interactions. If your files play smoothly in a dedicated media player, they are not corrupt. If both the editor and external players stutter, then consider checking the files for capture issues.
Will proxies lower my final quality
No. Proxies are for editing only. Filmora uses the original files for final export. Proxies help the timeline stay smooth by lowering the decode and composite cost while you work.
Should I upgrade my hardware
If the issue is strictly driver related, new hardware is unlikely to fix it. If your system is generally underpowered for your content type and effects, upgrading the CPU or adding more memory can improve the overall editing experience. Move projects to a fast SSD and ensure stable power settings as a first step.
How can I confirm that the fix worked
Use the same clip, start at the same in point, and play for a consistent duration. If motion feels fluid and audio stays in sync without micro stutters, the fix has worked for timeline playback. Always test a short export to validate final output as well.
Putting It All Together
In summary, if you are experiencing playback jitter in Filmora version fifteen point two point one or even after moving to fifteen point two point two, try disabling GPU acceleration in the Performance preferences, then fully restart Filmora. This simple change often stabilises timeline playback and makes editing far more pleasant. Remember that this is a temporary workaround. Keep checking for software updates and graphics driver releases, and revisit your settings after each change.
Support your workflow by matching project settings to your source footage, using proxy media for heavy clips, reducing preview quality during complex sequences, and keeping your system lean while editing. The creator in the video demonstrated the core steps clearly, and the additional guidance here should help you diagnose and address jitter on a wide range of systems.
The next time you press play and hear a cheerful greeting as you watch a morning run unfold, you want the motion to feel as effortless as the narration sounds. With a few smart settings and good editing practice, you will get there.

If this article helped you in any way and you want to show your appreciation, I am more than happy to receive donations through PayPal. This will help me maintain and improve this website so I can help more people out there. Thank you for your help.
HELP OTHERS AND SHARE THIS ARTICLE
LEAVE A COMMENT
I am an entrepreneur based in Sydney Australia. I was born in Vietnam, grew up in Italy and currently residing in Australia. I started my first business venture Advertise Me from a random idea and have never looked back since. My passion is in the digital space, affiliate marketing, fitness and I launched several digital products. You will find these on the portfolio page.
I’ve decided to change from a Vegetarian to a Vegan diet and started a website called Veggie Meals.
I started this blog so I could leave a digital footprint of my random thoughts, ideas and life in general.
If any of the articles helped you in any way, please donate. Thank you for your help.
Affiliate Compensated: there are some articles with links to products or services that I may receive a commission.