Silence in a video can be perfectly fine when it supports the story, gives viewers a moment to absorb information, or crafts a mood. Silence can also be a problem when it adds no value, stalls the flow, or drags out the watch time without purpose. The Wondershare Filmora Silence Detection feature gives you a smart, precise way to target unneeded silent sections and remove them quickly, letting your content land with clarity and pace. In this comprehensive guide, you will learn how to set up Silence Detection, adjust the controls for different kinds of recordings, analyse your timeline, and replace silence with clean, natural cuts that make your video feel intentional and refined.

Why Silence Detection Matters for Everyday Editing
When you capture screen recordings, tutorials, reviews, walkthroughs, or live demonstrations, there are often stretches where nothing happens. You wait while a programme installs, a simulation runs, a page loads, or a cache clears. During these moments, you get silence and a still image that does not push the story forward. Removing these parts saves your audience time and helps your content stay focused. Silence Detection is built for precisely this situation. Rather than scrubbing through the whole timeline to find quiet segments, you let Filmora scan the audio intelligently and present suggested edits. This turns a task that used to take many minutes into a quick and repeatable step that fits cleanly into your editing workflow.
Silence in Context: Helpful Pause versus Dead Air
Not all silence is equal. A pause before a punchline builds tension. A moment of quiet after a complex explanation lets viewers absorb details. These examples enrich the narrative. On the other hand, silence that arrives because the system is installing assets, a file is downloading, or a server is responding is dead air. It is simply time spent waiting. In the latter case, cutting silence improves pacing and clarity. The Filmora Silence Detection feature helps you separate useful pause from dead air by analysing the signal and proposing segments that meet your chosen criteria. You stay in control at every stage and can preview, adjust, and confirm changes before they are applied to your timeline.
Understanding the AI Behind Silence Detection
The feature uses intelligent analysis of your audio waveform. It reads amplitude over time, compares the signal to a threshold, and identifies regions where sound drops below that level for a given duration. It then applies a softening buffer so that cuts avoid chopping the audio at hard boundaries. The result is a set of selections that align with moments of genuine quiet. While the core process is automated, you steer the analysis through three key controls. The volume threshold sets how quiet the audio must be to count as silence. The duration determines how long the audio must remain below that threshold to qualify. The softening buffer adds a cushion around cuts so that transitions feel smooth and natural. These controls are easy to use and highly effective once you learn how they relate to your unique recording environment.
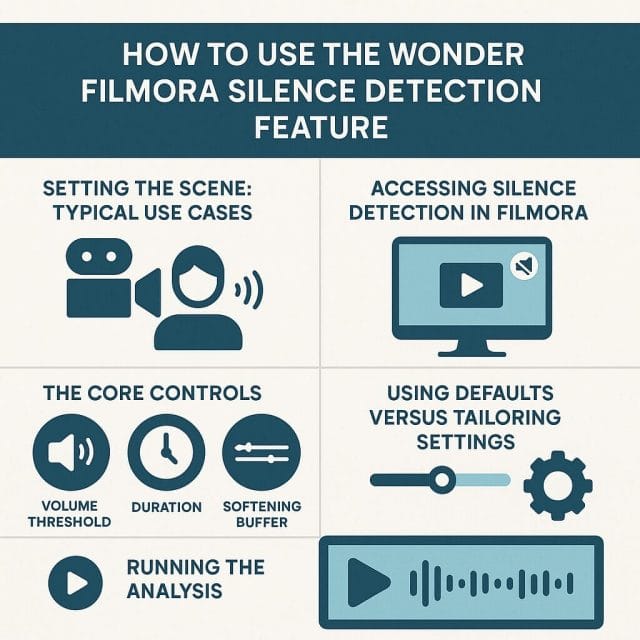
Setting the Scene: Typical Use Cases
Consider a screen capture tutorial where you click install and wait while the status bar fills slowly. There may be thirty seconds where nothing happens in the interface and your microphone picks up room tone or minor background noise. In a live coding session, you might run a test suite and sit quietly while the results compile. In a device review, you may reboot a handset and wait for the home screen to return. In all these cases, your viewers gain nothing from that silence. Instead, you want a neat jump from click to completion. Silence Detection is perfect for stripping out these moments. It cuts the empty space, shortens the timeline, and presents a taut version of your content that respects the viewer’s time without sacrificing the message.
What You Need Before You Begin
- A project with a video clip on the timeline and clean audio from your recording setup.
- A sense of where silence occurs, such as installation steps, loading screens, or calculation phases.
- Basic familiarity with Filmora’s timeline tools, right click context menu, and edit dialogue panels.
- Willingness to preview changes and refine settings until the cuts feel natural for your style of content.
Accessing Silence Detection in Filmora
Filmora places Silence Detection in the smart edit toolset so that it is always a few clicks away. The workflow is straightforward, and you can repeat it across many clips in the same project.
Step by Step Path to the Tool
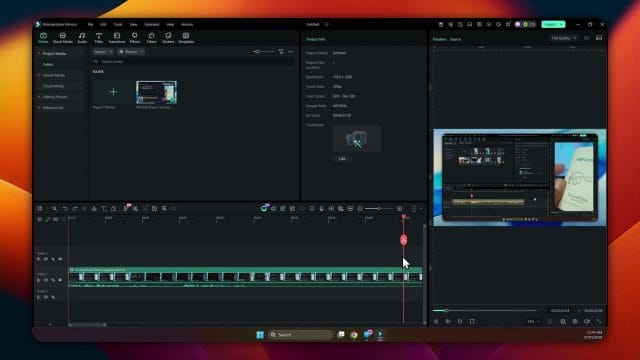
- Click the video clip on your timeline to select it. Make sure the audio you want to analyse is part of that clip.
- Right click the selected clip to open the context menu. This is the fastest way to reach the editing options.
- Choose Edit from the menu to access the smart edit tools. Filmora groups intelligent features here.
- Locate Silence Detection and click to open the control panel. You will see default settings and explanatory labels.
This doorway gets you into the analysis settings swiftly. From here, you decide whether to stick with the defaults or tailor the controls to match the nature of your recording.
The Core Controls: Volume Threshold, Duration, Softening Buffer
Understanding the three controls will help you get precise and natural results. Think of them as dials that shape how strict the detection will be and how gentle the cuts will feel.
Volume Threshold: Where Quiet Becomes Silence
Volume threshold defines the level below which sound is considered silence for the purpose of analysis. It is measured in relation to the amplitude of your clip. If your environment is very quiet and your microphone is close to your mouth, you can use a lower threshold so that tiny ambient sounds do not accidentally count as speech. If your environment has more background noise, such as air conditioning, traffic rumble, mechanical keyboard clicks, or nearby conversation, you may want to increase the threshold. This reduces the risk that noise masks the silence and prevents detection. The aim is to set the threshold so that intentional vocal content sits clearly above it and passive noise sits below it. In practice, you can make this decision based on a brief listen to your clip and a glance at the waveform. When your speech looks dense and your pauses look thin, you are in a good zone. If your pauses still contain noticeable hum or hiss, set the threshold higher until those regions count as quiet.
A practical way to arrive at a useful threshold is to run a quick analysis with the default value, inspect the selections, and then decide whether the tool caught enough of the silence without misclassifying speech. If it missed obvious dead air, nudge the threshold upward. If it captured small breath pauses between words, lower the threshold slightly. This iterative approach takes seconds and delivers settings that match your recording real world conditions.
Duration: How Long a Quiet Segment Must Last
Duration sets the minimum time the audio must remain below the threshold to count as silence. Short pauses often help cadence and should remain in the video. Long pauses typically add no value, especially in tutorials that wait for processes to complete. If you want to remove only the larger gaps, increase the duration so that the analysis selects stretches of quiet that last many seconds. If you want a tighter edit that reduces medium length pauses, lower the duration so that more segments qualify. This control is essential for preserving natural delivery while eliminating dead air.
Consider a demonstration where you speak, then pause for two seconds while a button becomes active. A two second pause may be useful or may feel sluggish depending on your audience. If you plan to keep the flow brisk, set the duration to something like three or four seconds so that a two second pause does not get removed. In a longer install process where you wait twenty seconds, set the duration above five or six seconds so that those long stretches are flagged without interfering with shorter intentional pauses in your narration. The correct value depends entirely on your goal. Relaxed content benefits from longer duration thresholds. Fast paced content benefits from shorter ones, as long as the cuts remain smooth.
Softening Buffer: Gentle Edges for Natural Cuts
Softening buffer adds a small cushion at the start and end of each selection. It is the secret that prevents harsh cuts where audio stops abruptly. With a buffer, Filmora shaves a little time off the beginning and end rather than cutting exactly at the moment the threshold was crossed. That gives the waveform a chance to dip gently, which feels more natural to the ear. Without a buffer, you may hear clicks or notice that a syllable gets clipped. With a buffer, transitions feel calmer and more human. The default buffer often works well, but it is worth understanding its effect so you can adapt it to your clip.
If your voice has clear attack and release on words, a slightly larger buffer can help. If your recording has lots of room tone, a modest buffer keeps the tone consistent across cuts. If you are working with music or sound effects layered under speech, consider a buffer that protects the tail of those elements, so the rhythm and ambience are preserved. Balance matters, and in most cases the default buffer strikes that balance effectively. Still, take a moment to preview cuts after analysis. If anything sounds sharp or clipped, increase the buffer a little and run analysis again.
Using Defaults versus Tailoring Settings
Filmora provides defaults that deliver reliable results for many standard tutorials and screen recordings. If your clip is recorded in a quiet room with a speaking voice that sits well above the ambient noise, the defaults will likely isolate the long moments of dead air and leave your delivery intact. This is the easiest way to start. If your recording environment is less controlled, or if your content contains different segments with varying noise levels, invest a minute in tailoring the threshold, duration, and buffer. That minute pays off in clean selections that match your content and save you time during review.
A simple strategy is to begin with defaults, select analyse, and let Filmora mark the candidates. Then scrub through the timeline and listen. Ask whether any chosen section includes words or useful sound. If so, lower the threshold or raise the duration. Ask whether any silent section was missed. If so, raise the threshold or lower the duration. Once the selections feel right, you are ready to apply changes confidently.
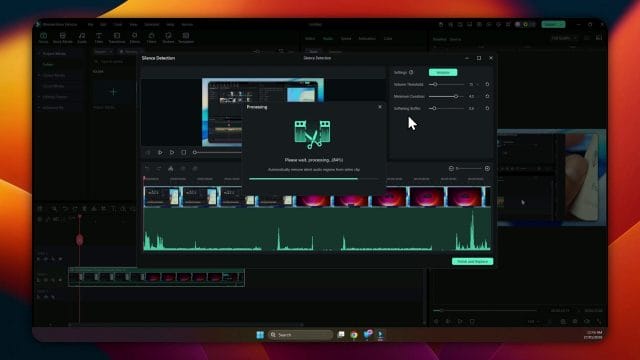
Running the Analysis
With settings chosen, the next step is to let Filmora analyse the clip. Click analyse and watch as the tool processes the audio, identifies regions that match your criteria, and highlights them on the timeline. The length of analysis depends on the duration of the clip, but in most cases it completes quickly. The selections give you a visual map of silence set against the rest of your content.
As soon as the analysis finishes, you will see sections marked that represent dead silence. These are likely to be the waiting periods during installs, progress bars, or processing steps where the screen is static and the soundtrack is quiet. The tool is very good at pulling out these stretches, especially when threshold and duration are aligned with the reality of your recording room.
Interpreting the Results
The analysis does not apply changes immediately. It shows you proposed segments so that you can review them before committing. This is where your editorial judgement matters. Listen to the beginning and end of each selection. Confirm that the selection is genuine silence and that there is no essential word or cue inside. Confirm that the cut would happen at a sensible moment in the visual story. If a selection begins just before a key on screen change, consider adjusting the buffer or duration so that the cut aligns with the visual beat. Filmora makes this easy to refine. You can adjust the controls and run analysis again until the results match your creative intent.
Applying Changes: Finish and Replace
When you are satisfied with the selections, click finish and replace. Filmora will remove the silent segments and compress the timeline accordingly. This is the moment you see the impact on total duration. The video becomes noticeably shorter, and the pacing tightens. The edits are ripple style, meaning the content after the removed sections shifts left to fill the gap. Visual continuity remains as long as you plan your settings with a buffer that keeps transitions graceful.
After finish and replace, play through the timeline. Listen for any section where the cut feels abrupt or where a phrase is clipped. If anything needs attention, you have options. You can undo and adjust the controls, you can manually refine the cut in the timeline with a tiny trim, or you can insert a short transition if the context calls for it. In practice, if you chose a sensible buffer, the cuts should sound natural and require minimal polishing.
Why Finish and Replace Saves Time
Manual editing of silence requires scanning the waveform, setting in and out points, and making dozens of cuts. It is accurate but slow. Silence Detection reduces the task to a small number of decisions. You choose the sensitivity, duration, and buffer, and the tool does the heavy lifting. This is especially valuable in longer projects where silence appears many times. The time saved adds up across multiple clips and across entire series of videos, enabling you to publish more often without sacrificing quality.
Practical Scenarios and Settings Recommendations
While every project is unique, common scenarios appear again and again in tutorial and review content. Here are practical tips for settings based on typical cases.
Screen Recordings with install or load waits
- Use a higher threshold to catch low hum and room noise during waiting periods.
- Use a longer duration so that short natural pauses remain and only long waits are removed.
- Keep a moderate buffer to protect syllable tails and avoid clicks at the cut boundaries.
Live coding or data processing demonstrations
- Set threshold to a level where keyboard clicks do not count as speech.
- Approach duration with care. Remove only longer waits to preserve natural rhythm between commands and outputs.
- Use a buffer that maintains the ambiance of your room tone so the cuts feel continuous.
Product reviews with device resets or app installs
- Raise threshold if your environment includes appliance noise or distant traffic.
- Set duration high enough that only the reboot or install wait is removed, not thoughtful pauses in commentary.
- Consider a buffer tailored to any background music track so that the music does not jump.
Reviewing the Timeline After Replacement
Quality control is essential after automated edits. Treat this stage as a final pass to ensure the viewer experience is smooth and intentional. Play the entire clip with attention to transitions. Watch the frame where each cut lands. Does the visual make sense at that moment. Does the audio feel natural. If you hear any abruptness, nudge the cut boundary by a fraction of a second. Filmora’s timeline tools make micro trims quick and precise.
Listen for two potential issues. First, clipped words at the start or end of a phrase. If you hear one, extend the boundary slightly and allow the syllable to finish. Second, tonal jumps where room tone changes noticeably from one section to the next. If this occurs, lengthen the buffer or add a tiny cross fade on the audio. These corrections take seconds and can elevate the feeling of polish significantly.
Evaluating the Pacing and Narrative
Silence Detection is a tool in service of narrative pacing. After the edits, ask whether the story flows better. Are viewers carried from action to outcome without unnecessary waiting. Are explanations intact and clear. Did any nuanced pause help set a mood that you accidentally removed. If you miss a pause that adds flavour or clarity, undo that specific cut and choose to keep it. Your goal is not to remove all silence but to remove silence that does not help the audience. The best results come when you apply the tool with intention and use your editorial judgement as the final arbiter.
Working with Projects that Contain Multiple Clips
Many timelines contain a series of clips rather than a single continuous recording. You can apply Silence Detection to each clip in turn, or to a merged clip that combines them. If you work clip by clip, settings may vary based on environmental changes during the recording session. A clip recorded in a quiet office may succeed with the default threshold, while a clip recorded near a window may need a higher threshold. Take a moment to set controls per clip and analyse them separately. This approach yields cleaner results across varied conditions.
If you prefer to merge clips and apply the tool once, ensure that the settings reflect the worst case noise level among the clips. That way, silence is detected consistently. Be mindful that a single set of values may over capture or under capture segments in clips that differ strongly from the average. In such cases, per clip analysis remains the more precise option.
Combining Silence Detection with Other Filmora Tools
The best edits often blend multiple tools. Consider pairing Silence Detection with visual annotations that explain what was removed. For example, insert a short on screen title that says install complete to bridge the jump. This helps viewers understand that content was condensed deliberately. You can also combine the tool with speed adjustments. If a silence includes minor activity on screen, rather than removing it completely, you might accelerate that span so that viewers see progress without waiting. Use audio ducking and noise reduction to clean the soundtrack further so that remaining quiet moments feel intentional and clean.
Filmora’s smart edit tools complement each other. Silence Detection removes unneeded quiet. Trim and split handle manual boundaries. Transitions smooth visual jumps. Colour tools ensure continuity across cuts. Titles and elements guide viewer attention. Together they produce videos that are tight, clear, and professional, even when the source material began life as a raw screen recording packed with moments of waiting.
Common Pitfalls and How to Avoid Them
While the feature is robust, a few pitfalls are worth noting so that you avoid them in practice.
- Removing meaningful pauses by setting duration too low. Protect the cadence of your delivery by choosing a duration that targets only the longer stretches of dead air.
- Missing silence because the threshold is too low. If background noise masks the quiet, raise the threshold until those regions are detected.
- Harsh cuts due to a buffer that is too small. Increase the buffer slightly to protect the start and end of words and maintain room tone continuity.
- Applying the same settings across clips with very different noise. Tailor controls per clip when conditions change during the recording session.
- Skipping the review phase. Always play through after finish and replace to catch any small issues before exporting.
Refining Your Ear for Silence
Editors develop an ear for what silence feels like in different contexts. In a voice over tutorial, a second or two between ideas can feel natural. In a live demonstration, even a short pause may feel sluggish if nothing changes on screen. In a dynamic review, quiet can intensify focus. Silence Detection is a tool that helps you enforce these instincts efficiently. Over time, you will recognise the interplay between threshold, duration, and buffer and adjust them quickly to suit the moment. This saves time and gives your videos a signature pace that feels attentive to viewers while honouring the content’s rhythm.
A Test Process You Can Repeat on Every Project
If you want a repeatable way to apply the feature with confidence, follow this simple test process each time you work on a project.
- Run the defaults and analyse a representative clip from your timeline.
- Listen to the selections and decide whether the tool captured the right moments of dead air.
- Adjust the threshold up or down based on how much background noise exists in the quiet parts.
- Adjust the duration to protect natural pauses and target only the stretches that waste time.
- Increase the buffer if any cut sounds sharp, or leave it if transitions feel smooth.
- Reanalyse and then finish and replace when selections align with your intent.
- Play through the edited timeline and make any minor trims or adjustments needed.
This loop takes only a few minutes and turns a potentially tedious task into a streamlined step. It also builds your confidence as you see the impact of small adjustments on the quality of the final result.
When to Preserve Silence Intentionally
As you apply the feature, remember that silence can be powerful. Preserve it when it adds meaning. If you pause after a key idea to let viewers think, keep that pause. If silence emphasises a reveal, keep it. If quiet underscores a moment of reflection or surprise, keep it. The aim is to remove only silence that emerges from waiting or inactivity that adds nothing to the narrative. A respectful edit honours the viewer’s time and the content’s heart.
Exporting with Confidence
Once you have removed unneeded silence and verified pacing, you are ready to export. Choose a format and settings that suit your distribution platform, whether you publish to a social channel, a learning platform, or a private client site. Review the first minute and a few random spots in the exported file to confirm audio transitions sound natural outside the editor. If you hear any difference compared to the timeline preview, return to the project, adjust buffer or add a tiny audio cross fade, and export again. This final check ensures that the improvements you made translate perfectly into the delivered file.
The Payoff: Shorter Videos, Stronger Impact
Silence Detection trims time without trimming value. It respects your voice, your ideas, and your audience. It cuts away only the parts where the story stands still and sound drops into quiet that serves no purpose. The outcome is shorter videos with stronger impact, smoother pacing, and a professional feel. Viewers appreciate content that gets to the point, and creators appreciate tools that make that editing easy. With Filmora’s intelligent analysis, you can produce work that feels intentional at every moment, save hours across a series of recordings, and devote more energy to creative expression rather than manual trimming.
A Note on Background Noise and Room Tone
Room tone is the subtle sound of your recording space, like air movement, equipment hum, and distant ambience. It fills the gaps between words and helps edits feel cohesive. Silence Detection works best when room tone is consistent and low. If your recordings vary in noise level, consider basic noise reduction before running the analysis. This can lower the noise floor so that threshold decisions become clearer. You do not need to eliminate room tone entirely. In fact, a little tone helps transitions feel natural. The aim is a steady, quiet backdrop against which speech stands out and silence becomes easy to detect.
Ethical Editing and Viewer Trust
Removing silence is not about hiding mistakes or masking content. It is about respecting attention. By trimming waiting periods, you present information efficiently and honestly. Be transparent if you compress time in ways that change the perception of effort or difficulty. A simple visual note that a process was shortened maintains trust. In educational contexts, it helps learners know that a step takes time, even though they are not made to sit through it. This balance between clarity and honesty builds credibility and fosters a loyal audience that values your work.
Final Thoughts on Mastering Silence Detection
The Wondershare Filmora Silence Detection feature is straightforward to use and powerful in practice. Click the clip, open the smart edit tools, choose Silence Detection, and tune three controls to match your recording conditions and creative intent. Analyse, review selections, and finish and replace. Then play through, refine small details, and export with confidence. With a little practice, you will apply these steps quickly and consistently, turning raw recordings with waiting periods into succinct, engaging videos that respect your viewers and showcase your message with focus.
Advanced techniques for precision and flow
The Silence Detection tool is deceptively simple on the surface, yet its behaviour becomes incredibly nuanced as you apply it to different kinds of content. The more you work with it, the more you will notice how small adjustments in settings can rescue the natural rhythm of a scene or tighten a rambling section without sacrificing warmth. This section dives into advanced techniques that help you shape clean, confident edits that feel deliberate rather than mechanical.
Dialling in the threshold with context
Threshold is not just a number. It is a lens through which the tool interprets the world you recorded. In a quiet office with a close microphone and soft keyboard, a gentle threshold captures most of what you say while sensibly ignoring room air. In a lively space with fans, traffic, or air conditioning, the same value might treat that constant hiss as speech and refuse to mark anything as silence. The right threshold is the one that separates voice from background, nothing more and nothing less.
To find it quickly, play a portion with no speaking. Raise the threshold until background texture stops registering as activity on the meter and the detection marks that region as quiet. Then play a sentence with soft consonants and tailing syllables. If the end of the word disappears in detection, lower the threshold a touch. That is your working range. Repeat this test with a different part of the clip, especially if your position or microphone distance changed during recording.
This approach respects the fact that voice often varies within a single take. You might start strong, lean back, then turn toward the screen. The tool should follow the voice, not the room. The practice of testing both a silent patch and a soft spoken phrase gives you a threshold that honours both.
Refining duration for human cadence
Duration governs what lengths of quiet are considered worth removing. It is tempting to set a very short duration to clear every tiny gap, but natural conversation breathes. Teachers pause between clauses to let ideas land. Reviewers pause to let emotion register. Viewers subconsciously judge confidence and authenticity from pace. Instead of shaving every micro moment, set duration to remove only the truly empty stretches. Where you want a tight tutorial, lower duration until medium lulls disappear but short breaths remain intact. Where you want reflective tone, raise duration so the tool focuses on obvious dead air and loading waits.
Duration also helps when your waveforms contain intermittent taps and mouse clicks. Those small spikes can fragment detection. A slightly longer duration encourages the tool to treat those spikes as passing noise inside a larger quiet region rather than speech that breaks it. Listen for continuity around those noises and adjust duration until the selections look continuous and sound natural.
Buffer as your musical edge
Buffer adds a margin to each side of a detected gap so that cuts do not feel abrupt. It is your artistic control over tone. If you ever hear a cut that lands right on the last consonant of a word, increase buffer so the tail of the syllable breathes out before the silence begins. If you hear a fast jump from one camera angle to another with a tiny audible pop, buffer plus a tiny audio fade can both solve it.
Buffer also helps with background music. A music bed provides continuity across shots, but a hard cut in the bed can make the viewer feel a hiccup. When Silence Detection removes a quiet stretch, buffer smooths the join. In music heavy edits, set buffer generously, then listen across transitions. If the music dips or swells unnaturally, apply a short audio crossfade on the join to shore up the seam. The buffer sets the ground. The fade polishes the edge.
Visual confirmation before you commit
Once you have a working combination of threshold, duration, and buffer, run analysis and use the timeline as a second opinion. A clear waveform is your friend. Scan for detected segments that begin inside a word or end just before a click you intend to keep. Use zoom to inspect complex areas. If needed, adjust the settings and run analysis again on the same clip. It is faster than manual slicing and gets you close to the target in a few cycles.
For a practical view of what strong settings look like, here is an example of Silence Detection marking loading time while preserving speech tails and soft room tone.

Maintaining emotional beats while removing dead air
The best edits feel intentional. You want viewers to sense that every pause has a purpose. The tool is at its most powerful when you ask it to remove only the parts that add nothing to meaning. Everything else is a pause you choose to keep. That might be a breath before a difficult idea, a glance toward a chart, or a held silence that lets a reaction speak louder than words.
Mark protected regions before analysis
Use markers to claim certain beats as off limits. If you know a pause at the end of a paragraph is deliberate, drop a marker at its start and end. After analysis, check that the tool has not marked that stretch. If it has, reduce duration or threshold so the pause is no longer considered silence. You can also slice around it before running detection and apply the tool to the surrounding clips instead. This simple practice prevents a well placed reflective moment from being removed in the sweep.
Breaths, smiles, and thinking faces
Silence is not absence in human communication. Many creators leave a breath audible before a new point. Coaches pause to let a message land. Creators smile quietly while listeners consider the last statement. If you remove every quiet fragment, you risk flattening the humanity out of your piece. Use duration to set a lower bound that preserves these micro beats, and buffer to soften the join so they do not feel cut. Then listen to the full paragraph at normal speed. If it still flows, you have found the right balance.
Background music and ambient sound
Silence Detection can work beautifully with a music bed and ambient textures, provided you think like a mixer. Music sets mood and keeps energy up through functional edits. Ambient sound grounds scenes in a real place. The tool should not fight these layers. It should glide through them.
Detect relative to voice, mix relative to mood
Set threshold based on the voice. Voice carries meaning. Music and ambience are supports. If you raise threshold to account for music, you risk slicing inside words. Instead, keep threshold tuned to speech and let buffer and audio fades handle the bed. After replacing silences, add short fades or gentle ducking to maintain continuity under the joins. If the bed has rhythmic elements, ensure cuts land between beats or use a tiny time stretch to align them. These micro moves prevent a noticeable jump in tempo.
High noise environments
In a warehouse, a trade show, or a busy home studio, silence is rarely truly silent. Fans, voices, and distant traffic live in your floor noise. Use noise reduction first to tame the bed, then set a higher threshold so the tool treats the bed as non speech. Raise duration so it targets only the stretches where you are not actively talking or demonstrating. After replacement, add a low level room tone under the join if the bed dips too much. That thin layer hides seams and keeps the space feeling real.
Interviews and multi voice content
Conversations introduce overlapping speech, shared pauses, and background affirmations that can confuse automated detection. With the right preparation, Silence Detection becomes an ally instead of a blunt instrument.
Separate tracks, separate decisions
When possible, record each participant on a separate audio track. Run Silence Detection on each track independently so the tool can remove one person’s dead air while preserving the other’s reactions. If you have a single mixed track, be cautious with threshold. You do not want the tool to treat quiet acknowledgements like speech and refuse to mark real pauses. In multi voice cases, rely more heavily on duration to target only longer gaps between turns, and supplement with manual trims where overlap occurs.
Respect active listening
Interviewees often pause while thinking. Interviewers often respond with small sounds, nods, and expressions. Those cues are part of the dance. Keep them when they convey empathy or signal the next turn. Remove space only where both parties are silent or both have broken eye contact while reading or searching. This preserves rhythm and fairness in the conversation while trimming dead time.
Long recordings and batch workflows
Lectures, webinars, full install guides, and game streams can run for an hour or more. Running detection once per giant clip is possible, but there are smarter ways to maintain control and performance.
Segment before analysis
Divide the recording into logical chapters first. Split at section breaks, topic changes, or major scene transitions. Then apply detection to each segment with tailored settings. A chapter that contains an install sequence might need a higher duration and threshold. A chapter that contains a Q and A might need gentle settings to preserve banter. Segmenting also improves analysis speed and lets you review selections in manageable chunks.
Use compound clips to protect outcomes
After you have applied detection and refined joins in a segment, create a compound clip to lock in the result. This makes it harder to accidentally run detection again or ripple cut through a polished section. Compound clips keep your timeline tidy and your work safe while you continue editing neighbouring sections.
Efficient review patterns
Do not review at uniform speed. Focus on joins and complex passages first. Play at normal speed where you expect risk of clipped consonants. Skim at faster speed through simple waits and screen loads. Drop markers on any join that feels brittle, then return to those spots to adjust buffer or add short fades. This targeted review pattern keeps you moving and prevents fatigue, which can dull your ear for detail.
Here is an example timeline after replacement, showing ripple edits and preserved beats around action highlights.

Captions, chapters, and metadata
Many creators publish with captions and chapters. Silence Detection changes timing. Make sure metadata stays aligned to the story.
Subtitles
If you already have captions, do a quick pass to confirm that line breaks still land near sentence ends. If a cut moved the sentence boundary, extend or shorten a caption so it starts and ends on the right words. If you plan to generate captions after editing, run detection first so the captions inherit the final timeline. This prevents a second round of alignment work.
Chapters
For platforms with chapter markers, update start times after you trim dead air. Trimming two minutes of install progress can shift subsequent chapters significantly. Verify that thumbnail frames still match content at those start points, especially if the chapter image is chosen automatically from the start frame.
Descriptions and links
If your description includes deep links to moments in the video, recalculate those times. Consider using an accompanying text file or spreadsheet to track adjustments as you edit. When you finish, paste the updated times into your description or chapter list to keep navigation accurate.
Accessibility and cognitive pacing
Clarity and speed are wonderful, but viewers absorb information at different rates. Silence Detection should serve understanding, not just brevity.
Leave room for processing
For educational content, preserve brief pauses between major ideas. Audiences need a moment to digest the last statement before the next one arrives. If you remove every gap, you may raise cognitive load and cause important points to slide past unnoticed. Use duration to leave beats between definitions, steps, and key claims. You can still remove long dead time during installs and loads without collapsing breathing room between concepts.
Caption friendly joins
Ensure your transitions are caption friendly. Crossfades can make it harder for some viewers to track speech. If you rely on captions for clarity, keep joins crisp while protecting word ends with buffer. Where you use crossfades, keep them short and avoid overlapping phrases that confuse speech to text tools.
Troubleshooting common issues
Even with good settings, certain situations call for special handling. Here are practical fixes for the issues creators encounter most often.
Whispers and soft speech are marked as silence
- Lower the threshold slightly so whispers sit above the line.
- Reduce duration so the tool stops grouping soft speech into longer quiet regions.
- Consider manual trims around the whisper rather than automated detection if the section is rare.
Click sounds break a long quiet region into fragments
- Increase duration so short clicks are treated as noise in a larger quiet stretch.
- If clicks are frequent, lower threshold just enough to keep them below the activity line.
- Apply a gentle declick or noise reduction pass before detection to tame spikes.
Harsh joins after replacement
- Increase buffer to add breathing room at the edges.
- Add short audio fades across the join.
- Check that music or ambience continues under the join to hide the seam.
Detection marks silence inside meaningful pauses
- Raise duration so short rhetorical pauses are preserved.
- Lower threshold so soft breaths and small vocalisations register as activity.
- Mark those regions for protection and apply detection to surrounding clips only.
Long analysis times on very large clips
- Split the clip into chapters and analyse each individually.
- Close unnecessary applications to free processing resources.
- Work on proxied or lower resolution copies for faster timeline performance, then relink to full quality for export.
Noise floor shifts mid recording
- Choose threshold based on the louder section so detection remains conservative.
- Run detection separately on each section with tailored settings.
- Use noise reduction to normalise the floor before detection.
Practical case studies
Concepts land better with examples. The following scenarios show how small setting changes produce big wins.
Software tutorial with several installs
You screen record a tutorial that includes multiple installs, each with long progress bars. Set a threshold slightly above the room noise, duration long enough to capture each progress section as a single quiet block, and buffer moderate to protect the edges around speech. After analysis, confirm that detection did not mark quick explanatory pauses before a new step. Adjust duration if needed. Replace silences with ripple edits. Add annotations to bridge the gap so viewers understand the install happened off screen. The result is a tight tutorial where installs are quietly condensed and speech is preserved.
Live coding session with keyboard clatter
You record a coding stream with several minutes of thinking and typing. Keyboard clatter can fragment detection. Increase duration so clicks are swallowed by the larger quiet segments, and set threshold so voice stands above the line even when soft. Add buffer so consonants do not clip. After replacement, drop in a short overlay that shows code diff or a note that time was condensed to keep pace. This preserves the value of the session while respecting attention.
Product review in a cafe
You film a review with a camera mic in a cafe. The room is full of ambient sounds. Apply light noise reduction first, then set a higher threshold. Raise duration so the tool only removes long gaps as you reset the product or change angle. Buffer generously so edits glide beneath the ambience. After replacement, add a subtle bed of cafe room tone underneath joins. This hides seams and retains the feel of the place.
Quality assurance workflow on the finished timeline
After replacement and initial polish, treat the timeline like a master mix. The goal is a seamless viewer experience.
Join patrol at normal speed
Play through at normal speed with attention to the ends of sentences and the starts of new points. If any word feels clipped, nudge the join outward by a frame or two or increase buffer and rerun detection for that clip. If a jump feels sudden, add a tiny audio fade. Keep changes minimal and surgical. The heavy lift is already done.
Music continuity check
Solo the music track and step through joins. Listen for dips or swells introduced by ripple edits. Smooth them with short fades or minor gain adjustments. If needed, shift a bed region slightly to align with musical phrasing.
Caption pass and chapter alignment
Open captions and verify that each line still matches speech. Adjust any lines that now start or end mid phrase. Update chapter markers to reflect new start times. Confirm that visual thumbnails still represent the chapter content accurately.
Here is a view of a detection settings panel and selection preview just before committing to replacements.
Working with voice overs and layered narration
Some creators record a voice over separately and place it above screen capture or b roll. Silence Detection can support this by keeping narration tight while preserving the underlying visuals.
Narration first, pictures second
Apply detection to the narration track before you arrange visuals. This gives you a clean spine to build upon. Set threshold to the voice and duration to remove only genuine dead time. With the narration timeline stable, place b roll and graphics to match beats. If you later adjust narration pacing, ripple edits will move visuals accordingly, so keep your room tone and music below to hide any small timeline gaps as you refine.
Protect cues and cues cannot move
If you call out on screen labels and expect viewers to see them during the cue, do not let detection mark the quiet moment before the label appears. Either keep duration high enough to preserve the lead in or manually trim after the cue is visible. The goal is to preserve the call and response rhythm between voice and picture.
Mobile capture and variable environments
Creators often record on phones while moving through different rooms or outdoor spaces. The noise floor can vary wildly.
Detect in sections that share a noise profile
Group clips by environment. Run detection with one set of values per group. Inside a quiet office group, use a gentle threshold and short buffer. Inside a noisy street group, use a higher threshold and longer buffer. Keep duration consistent across groups to maintain pacing across the video, then refine per group as needed. This approach prevents one set of values from flattening your whole piece.
Room tone as glue
Between environment changes, add a thin layer of room tone or ambient bed that bridges the join. This is especially helpful after Silence Detection because the tool removes quiet sections that might otherwise carry room tone from one clip to the next. A consistent low bed reminds the ear that the space still exists, even as you cut dead air.
Repeatable process and light documentation
While the tool does not need complexity, your future self will thank you for documenting successful values for common situations. Write down the threshold, duration, and buffer values that worked in your studio with your microphone at typical distance. Record alternatives for noisy events and remote calls. Keep a short checklist for setup and review. The next time you edit similar content, you will save minutes and avoid reinventing the mix.
Checklist for consistent results
- Assess environment noise with quick listening before recording.
- Run detection with defaults, then adjust threshold against the floor noise.
- Tune duration to preserve natural pauses while removing waits.
- Set buffer to protect syllables and smooth joins.
- Analyse, review marks, and reanalyse as needed.
- Replace and ripple, then polish transitions.
- Verify captions, chapters, and metadata alignment.
- Export, spot check, and deliver.
FAQs and quick answers
Will Silence Detection remove meaningful pauses automatically
No. It will mark quiet based on your settings. If your duration is high and threshold properly tuned, meaningful short pauses will remain. Protect them with markers or manual decisions where needed.
Does the tool work well with music beds
Yes, with care. Set threshold for the voice, then adjust buffer and add short fades to preserve the bed’s continuity. Do not raise threshold so high that you clip words just to account for music.
Can I apply detection to several clips at once
You can analyse clips one by one to tailor settings per clip. That is usually better. If you must apply the same settings across many clips, use the worst noise case when choosing threshold and duration, then review the results carefully to avoid over removal in quiet clips.
What if my audio peaks are inconsistent
Normalise levels or apply gentle compression before detection to reduce variance. This can help a single threshold value behave more consistently across the clip.
Will detection help with echo
No. Echo is still audible within speech and can be mistaken for activity. Use acoustic treatment during recording or apply de echo processing before detection. Then tune threshold so the reduced echo does not confuse the tool.
Performance and timeline hygiene
Silence Detection is fast, but very large projects benefit from light housekeeping.
Keep timelines lean
Disable or hide tracks that are not part of the current review. Remove unused media from the project bin. Clear caches if performance degrades. Work on a copy of the project for heavy edits so you can revert if something goes awry.
Use markers and naming
Rename clips with descriptive labels. Use markers to flag joins, chapter starts, and places that require a second listen. These small touches make review fast and keep your mental map of the timeline clear.
Creative polish beyond silence removal
Silence Detection makes space for creative choices. Use it to give yourself room to polish rather than as a substitute for polish.
Visual bridges
Add cutaways, overlays, or simple lower thirds that carry the viewer through joins. A quick on screen summary during a condensed section tells the viewer you moved ahead on purpose. A relevant b roll clip that plays under a trimmed pause can deepen context without loss of pace.
Audio storytelling
Use short musical motifs to signal progress or completion after a condensed task. Add a subtle chime when a long load finishes. These cues help viewers follow your narrative around condensed sections and feel guided rather than rushed.
A final refinement pass
Before export, run one complete view in real time with fresh ears. If possible, take a short break beforehand. Fatigue hides flaws. Listen for clipped consonants, abrupt tone changes, and music discontinuities. Check that captions and chapters align. Confirm that all condensed sections are clearly signposted. Make any final small adjustments to buffer or fades, then export at platform appropriate settings.
Ethical clarity and viewer trust
When you condense time, tell viewers. A small on screen note such as condensed install or long render removed builds trust. It signals that you respect their time without hiding the process. Viewers who rely on steps will appreciate transparency. Viewers who care about pace will appreciate momentum. Silence Detection helps balance both values when used thoughtfully.
Conclusion
Silence Detection distils a painful manual chore into a few focused choices and a quick review. The core controls give you the power to define what silence means in your specific context, and the workflow respects the editor’s judgement at every step. Tune threshold to your environment, set duration to match human cadence, and use buffer as your musical edge. Segment long recordings, protect meaningful pauses, and polish joins with small fades. Align captions and chapters, keep an eye on accessibility, and be clear with your audience when time is condensed. Used this way, the tool becomes more than a shortcut. It becomes a craft collaborator that helps you deliver shorter, stronger videos that carry your voice with clarity and care.

If this article helped you in any way and you want to show your appreciation, I am more than happy to receive donations through PayPal. This will help me maintain and improve this website so I can help more people out there. Thank you for your help.