Wondershare Filmora 15 introduces a set of intelligent tools designed to streamline creative workflows, and among them, AI Extend stands out as both intriguing and potentially transformative. It promises to take a brief clip and generate additional footage that matches the style and scene, giving editors a way to push beyond the recorded material without reshoots. In practice, this involves prompt-based guidance, a credits system, and a rendering pipeline that sits alongside your usual editing tasks. What follows is a meticulous exploration of how AI Extend behaves in a real project, what to expect from first attempts, and how to refine your approach for more convincing results.
Starting Simple: Building a Minimal Test Project
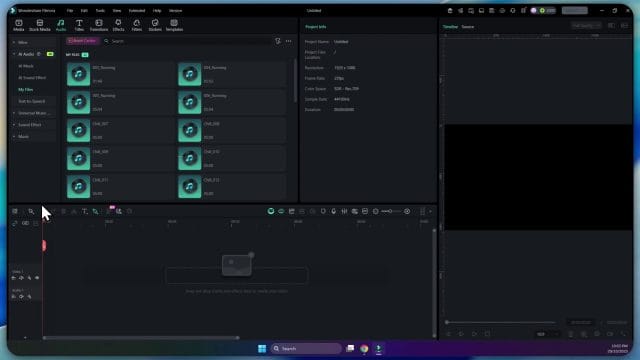
When evaluating a new feature, it’s wise to begin with a minimal, controlled setup. In this case, the project starts with a short video previously created—an 8-second clip of a relaxed, static scene: just sitting, chilling, and wearing a hat. The timeline also includes a photo asset with a slight pulsating style. There is no complex colour grading or heavy effects pipeline running—just basic media brought into the Media panel and dragged onto the timeline.
This simplicity matters. With AI-driven generation, the algorithm will be extrapolating appearance, lighting, and motion cues from the footage you supply. Clean, stable material makes it easier to assess how well the extension matches the original in terms of colour, texture, and continuity. If the source is chaotic, it becomes harder to determine whether oddities are artefacts of the original or misfires from the AI.
Locating AI Extend and Understanding What It Does
Within Filmora 15, AI Extend appears as a tool associated with a clip on the timeline. When you trigger it, Filmora reads the selected segment and prepares to generate additional frames. At first glance, it may look like you are simply stretching the clip—pulling out the right edge to make it longer—but the underlying process is generative. Filmora creates new video that attempts to continue from the material you already have.
Based on observation, the system appears to leverage the final frames of your clip to anchor the new sequence. You can think of it as establishing a visual seed: the look and pose at the end of the clip inform how the AI will extrapolate motion and context beyond that point. Some users speculate that Filmora’s AI Extend might be using a particular model version for this task and that it “gets the last image of the video and then tries to generate from it.” Regardless of the specifics under the hood, the practical takeaway is clear: the end of your clip matters. That last frame provides the starting point for what follows.
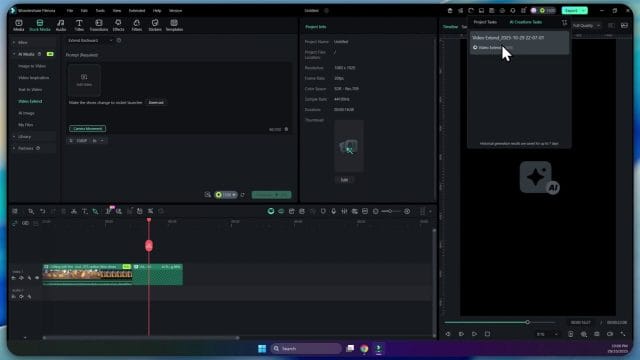
The Prompt: Small Box, Big Impact
As soon as you engage AI Extend, you’re prompted to describe what happens next. This is where the creative direction comes in. Even though you are extending a real clip, the AI is not limited to mundane continuation. It can introduce new visual elements or behaviours if prompted accordingly. In the first pass here, the prompt was playful: “make the shoes change to rocket launchers.” There’s also a camera movement parameter—“Zoom out” in this test—that nudges the AI to animate a particular framing change while generating new content.
Note the character limit. Filmora constrains prompts to about 200 characters. That’s tight. It means you must be precise, choose descriptive words carefully, and focus on the most important elements: what should change, how it should move, and what the end state should be. If you’re used to verbose prompts, this will feel restrictive at first. It’s worth drafting a few versions in a text editor before pasting them in, so you can trim redundancies and keep vital details.
AI Credits and the Legal Agreement
AI Extend consumes credits per generation. In this test, one run cost 500 AI credits. That is substantial, especially if you intend to iterate. You also must agree to Filmora’s AI usage statement, pledging to comply with laws and use generated content legally. It’s a sensible reminder that generative tools amplify creative possibility, but they don’t exempt you from responsibility.
The credit model directly affects your workflow. You can absolutely experiment—indeed, you’ll likely need a few passes to coax the best results—but each attempt has a cost. If you generate a result and don’t like it, running it again requires another block of credits. The incentives are clear: improve your prompt up front and think in terms of targeted iterations rather than random trial and error.
Working While It Renders: Task List and Progress
Once you submit the prompt and confirm the credit usage, Filmora begins the generation process. You can watch a progress indicator advance—52%, 53%, and onward—inside the Task List. This unobtrusive queue allows you to keep editing other parts of your project while the AI works in the background. The overall interface remains familiar, almost indistinguishable from Version 14 in layout and daily workflow, with the new AI tools tucked into accessible positions rather than rewriting your entire editing process.
Initial Results: Expect the First Attempt to Be Rough
With the first pass complete, the extended segment appears on the timeline. On playback, the scene looks plausible at first glance: head movements continue, the pose shifts, and a new object appears. Rather than transforming the shoes into rocket launchers, though, the output conjures an entirely different interpretation—a rocket now present in hand. It’s a fascinating example of how the AI “understood” the prompt directionally (rockets) but didn’t map it literally to the shoes.
This divergence illustrates a few important points:
- Generative models often aim for coherent visuals over strict adherence to every prompt detail. If “rocket launchers” on shoes conflicts with body pose, scene geometry, or typical affordances, the model may choose a more conventional placement that it can render convincingly.
- Specificity matters. The more literally you want the result to match a particular placement, the clearer you must be about location, action, and context.
- There is an element of stochastic interpretation. Two runs with similar prompts can yield different visual decisions, because the model balances prompt text against visual priors from the last frame.
Nevertheless, the aesthetic quality is surprisingly strong: the rocket looks “real” in the lighting context, and the motion of lifting it has usable continuity. If you were aiming for a whimsical extension of the original clip, this is a credible first attempt—even if it misses the precise intention about the shoes.
Noticing Artefacts: Logos, Emblems, and Inconsistent Details
Careful scrutiny reveals minor anomalies. The logo on the hat changes subtly—an emblem morphs into something else, possibly reminiscent of other visual material the model has seen. This can happen when the AI tries to recreate branded marks or fine typography; these are notoriously difficult to reproduce consistently. There may also be a random insignia or emblem appearing for no clear reason, as if borrowed from elsewhere.
Such artefacts are part of the current reality of AI video generation. Fine details like logotypes, small patches, or thin lines often get approximated. If your brand identity is crucial, you’ll want to plan to patch or mask these areas after generation, or avoid placing critical brand marks in zones that are likely to be regenerated. Alternatively, consider trimming around the moment where the artefact appears, or layering a clean logo from your asset library on top, locked to the hat using motion tracking.
Extending Again: The Case for a More Descriptive Prompt
Prompt craftsmanship becomes the difference between a neat trick and a polished shot. In the second attempt, the prompt shifts to a richer instruction: “launch the rocket to the moon,” with extra detail to guide the visual cues (“make it look like the bottom of the rocket,” implying exhaust or ignition visuals) and a practical consequence (“the shoes are burnt and turn black”). This is a meaningful improvement in specificity. It tells the AI what should happen, where attention should be, and what post-action state to render.
This second run also costs 500 credits, underscoring the value of strategic iteration. If you don’t have unlimited credits, you need to make each pass count. That doesn’t mean you must nail everything in one go—but it does mean you should make a list of what fell short in the previous output and address each with direct, compact phrasing in the next prompt.
Second Output: A Clearer Match to Intent
On playback, the new extension demonstrates a more faithful response to the directive. The rocket lifts upwards; the hands move in a way that supports the action; motion feels incremental rather than disjointed. The core lesson emerges: when you are more specific, the AI can align its interpretation more closely. Given the limited prompt length, tight, descriptive language yields better continuity and more predictable results.
It’s also an object lesson in thinking like a director. If you want “burnt shoes turning black,” that phrasing alone may still be interpreted loosely. Consider including cues like “scorch marks spread from soles upwards,” or “light smoke trails at feet,” as long as you can keep within the character limit. Every concrete sensory detail gives the model an anchor to render.
Zoom, Movement, and Framing: The Role of Camera Direction
The “camera movement” control—set to “Zoom out” in the first test—matters more than it may seem. It gives Filmora a cue on how to manipulate framing as it generates new frames. If the subject is holding a new object (like a rocket), a zoom-out can help reveal that object and the environment it interacts with. If you choose a different movement, such as a steady hold or a slight pan, the outcome may present a different emphasis or hide certain artefacts.
General guidance when choosing a camera movement:
- If introducing new elements, a gentle zoom-out can provide space and establish context.
- If you want to maintain intimacy and detail in the subject’s face, a static or subtle zoom-in may be better—though it can increase the risk of noticing artefacts.
- If the prompt implies lateral motion (e.g., something entering the frame from the side), a slight pan can support the narrative.
Remember that camera motion is part of storytelling. Even in generated footage, movement suggests intention. Align it with what your prompt is trying to achieve.
Extend, Extend Forward, and Timeline Behaviour
Filmora exposes variations of “Extend,” including an “Extend forward” option. In practice, this suggests different ways of laying out the generated material relative to your existing timeline. Extending forward typically appends new frames after the selected clip’s end, continuing the action linearly. In some contexts, you may also encounter an option to add or replace material, depending on where your playhead sits and what is selected.
This matters for pacing. If you are pushing a punchline, reveal, or action beat, you’ll want the extension to carry rhythm and timing from the original into the new segment. Before committing credits, check that your selection boundary is at the exact frame you want to continue from, and that any transitions or effects on the original clip won’t cause unintended overlaps or double-exposures on the extension cut.
Keeping an Eye on Progress While You Edit
One advantage of Filmora’s approach is that you don’t have to sit idle while generation runs. The Task List shows a live percentage; meanwhile you can refine cuts, adjust audio, or prepare titles elsewhere in the timeline. This parallelism is practical when experimenting with prompts. You might, for example, draft the next prompt in a text layer placed as a guide in the timeline, or set markers noting what you want to improve in the next pass. Treat it like a normal iterative edit: plan, render, review, annotate, and repeat.
Prompt Optimisation Under a 200-Character Limit
Filmora’s compact prompt box is both constraint and blessing. It forces a kind of poetic precision that often produces clearer, stronger instructions. Consider the following pattern to make the most of it:
- Action first: “Rocket ignites and launches upward.”
- Location/subject link: “Flames near shoes; soles scorch.”
- Visual cues: “Thick smoke; sparks; bright exhaust glow.”
- Camera guidance: “Slow zoom out to reveal height.”
When space is tight, strip adjectives you don’t need and prefer concrete nouns and verbs. “Big, powerful rocket” may be less helpful than “bright exhaust flame; dense smoke.” If you’re struggling to trim, write the full prompt elsewhere, then compress synonyms and remove redundancies. You can also use another LLM tool to suggest shorter phrasings without losing core meaning, then paste the refined version into Filmora.
Managing Credits Without Killing Creativity
At 500 credits per generation in this test, you can burn through your allotment quickly. That doesn’t mean you should be timid—it means you should structure your experiments intelligently. A few practical tactics:
- Storyboard in bullets before you prompt. Decide what happens in the next 2–3 seconds and express it in plain language.
- Start with conservative changes. Ask for one or two specific behaviours rather than a cascade of transformations.
- Iterate surgically. If the hand motion is good but the shoes didn’t burn, keep the same base instruction and add one concise line about the shoes.
- Review frame-by-frame on the first few passes. Use the left/right arrow keys to check artefacts at cuts and in fast motion.
- Save earlier versions. If you get a pass with clean faces but imperfect props, you can consider compositing elements from multiple runs if necessary.
Credit discipline is not about limiting vision; it’s about focusing the scope of each iteration so that you make additive progress rather than rolling the dice anew each time.
Why the AI Might “Misread” Your Intent
Even with a clear prompt, the model can deviate. Several forces are at play:
- Pose and physics plausibility: Turning shoes into rocket launchers may introduce shape and scale conflicts the model finds harder to render believably, so it chooses a different locus (e.g., hands).
- Texture continuity: Detailed shoe textures can be complex to alter while preserving realistic seams and shadows; the model may divert effort elsewhere.
- Semantic priors: If the model has seen more imagery of humans holding rockets than wearing them as shoes, it may map “rocket” to “hand-held object” by default.
To counter this, specify attachment points and outcomes explicitly: “shoes transform into rocket boosters; flames from soles; black scorch on uppers,” and pair it with sensible camera direction that shows those areas clearly. If your subject’s feet are cropped out near the end of the source clip, consider re-editing the base footage so the final frame includes the shoes prominently. The AI needs to “see” the area it’s meant to change.
Assessing Realism: What Looks Convincing and What Doesn’t
In the first extension, the rocket’s material and lighting read convincingly in the scene. Specular highlights and shadows matched ambient conditions closely enough to preserve immersion. The hand movement aligned with the new object fairly well. Where things faltered was in microdetails: the hat logo drifting to a different design, and a small emblem popping up unexpectedly.
When evaluating realism, use this checklist:
- Lighting continuity: Do highlights, shadows, and colour temperature match across the cut?
- Contact points: If an object is held, do fingers wrap naturally? Is there any clipping?
- Edges: Are contours crisp where needed, or mushy and unstable, especially during motion?
- Textures and patterns: Do they remain consistent on clothing, props, and background?
- Brand marks and text: Do logos morph? Is text legible and stable across frames?
If 80% of the frame looks solid but one area wobbles, consider masking and replacing that region with a patch from the original clip for a few frames, or overlay a clean graphic. You don’t have to discard an otherwise excellent generation because of a small artefact.
Precision Through Iteration: Turning Vague Notes Into Direction
Let’s translate a vague idea into promptable directives step by step:
Vague idea: “Make it more dramatic and sci-fi.”
Deconstructed into specifics:
- “Rocket ignites with blinding flash” (brightness spike)
- “Thick smoke at feet; sparks scatter” (ground interaction)
- “Hands recoil slightly, then steady” (body reaction)
- “Camera slowly zooms out, slight shake” (cinematic motion)
Condensed to fit Filmora’s prompt limit: “Rocket ignites with bright flash; thick smoke at feet; sparks scatter; hands recoil then steady; slow zoom out with subtle shake.” This kind of pre-structured thinking is what turns AI Extend from a novelty into a purposeful tool.
Legal and Ethical Considerations, Briefly
The checkbox acknowledging legal use is not just boilerplate. If you’re working with recognisable people, branded apparel, or copyrighted textures, be aware that generative alterations can introduce compliance considerations. Don’t prompt the model to produce infringing marks or likenesses; if a logo mutates, replace it with an approved asset. Keep your output within the boundaries of applicable laws and your project’s client agreements.
Editing While You Wait: Parallel Workflow Tips
While Filmora generates your extension, invest your time upstream and downstream:
- Polish the base cut so the final frame—the seed—shows the elements you want extended (e.g., include the shoes if you need transformation there).
- Set markers on the timeline where you plan reveal beats to land; this helps you judge whether the AI’s pacing fits.
- Balance the audio bed. Even if the AI is handling visuals, music and SFX will sell the moment. Prepare rocket ignition sounds or subtle rumbles to layer in.
- Draft potential captions or titles that align with the generated action.
This way, as soon as the extension is ready, you can drop it into a well-prepared context and judge it fairly, rather than getting distracted by unrelated rough edges.
When to Use AI Extend versus Traditional Editing
AI Extend shines when you need a few extra seconds to complete an idea, create a transition that wasn’t captured on set, or add a stylised flourish that would be costly to shoot practically. It’s less suitable for mission-critical brand shots where every pixel must match reality, or for long-form sequences where small inconsistencies accumulate.
Use AI Extend for:
- Bridging gaps in B-roll when you’re just a few seconds short.
- Creating whimsical or surreal beats in vlogs and social shorts.
- Exploratory mood-building: trying variations to see what tone feels right.
Reach for traditional methods when:
- Brand fidelity and legal compliance require exact logo and product rendering.
- You need frame-perfect replication of complex text or UI elements.
- Shot continuity relies on precise physical action captured in-camera.
Troubleshooting Common Issues
If your first output underwhelms, treat it as diagnostic data rather than failure. Common issues and how to respond:
- Target object not transformed (e.g., shoes unaffected): Place the object clearly in the final frame of the source clip; explicitly name location (“soles,” “toes,” “uppers”); reduce competing requests.
- Unwanted logos or emblem changes: Overlay approved graphics; consider masking that area with the original clip for a few frames.
- Awkward limb motion: Add a brief direction like “hands lift smoothly,” or “arms remain relaxed,” to guide the model’s pose choices.
- Overly dramatic camera motion: Dial back to “subtle” language or switch to a static camera instruction.
- Soft or smeared details: Avoid asking for too many simultaneous changes; keep action focused; try a tighter frame if edge fidelity is crucial.
A Practical Review Workflow
Adopt a consistent approach each time you generate:
- Preview at full speed for overall feel.
- Scrub slowly through critical moments (ignition, reveal, cut points).
- Step frame-by-frame through fast motion to catch tearing or odd morphs.
- Toggle between original and extension to check continuity in colour and lighting.
- Make notes, then translate them into prompt language for the next attempt.
This discipline is how you compress experimentation into fewer, more purposeful passes—saving credits and time.
Compositing Extensions with Originals
Even when an AI extension is strong, you may want to blend it more tightly with the original footage. Techniques to consider:
- Crossfade carefully at the seam to reduce any abrupt change in microtexture.
- Apply a unified colour grade across both segments to harmonise contrast and hue.
- Use motion blur or a subtle camera shake overlay to mask small inconsistencies during action spikes.
- Add sound design that starts before the visual change (pre-lap) to lead the viewer’s perception and make the cut feel motivated.
Evaluating Cost–Benefit: Is 500 Credits “Worth It”?
The value of a 500-credit run depends on context. For a social clip where a surprising visual beat can make the difference between bland and shareable, a single strong generation can pay off. For projects with tight brand guidelines, the risk of re-running to iron out small artefacts may be higher. Consider planning a small credit budget for exploration at the start of a project; establish what the model handles well on your typical footage and what it struggles with. Then spend the remainder on targeted, production-worthy generations.
What the First Two Tests Teach Us
From the initial run—where the AI introduced a rocket in hand rather than transforming the shoes—we learn that the model favours plausible object placements unless guided precisely. From the second run—where the rocket lifts and hands move convincingly—we see that tightening the prompt yields more faithful action and better motion alignment. Together, they underline a workflow principle: clarity before complexity. Nail the core action, then layer in details like burn marks or smoke, rather than asking for everything at once.
Refining Language: Examples You Can Adapt
Here are concise prompt fragments that map to common needs:
- Object ignition: “Rocket ignites with bright exhaust; dense smoke.”
- Footwear transformation: “Shoes morph into rocket boosters; flames from soles; scorch marks.”
- Body motion: “Hands lift steadily; elbows relaxed; natural recoil.”
- Camera cue: “Slow zoom out; mild handheld shake.”
- After-effects: “Shoes charred black; light smoke drift.”
Combine two or three at a time according to your priority, staying within the 200-character cap. If one aspect underperforms, keep the successful clauses and swap the weaker one with a sharper description.
Planning for Continuity Beyond the Extension
AI Extend creates a segment that feels like a natural continuation, but think ahead to what follows. If you plan to cut to a different shot, decide whether the AI extension should deliver you a clean exit point—e.g., as the rocket leaves frame or as hands settle. If you need space for a title or a transition, consider asking for a brief stabilisation of motion at the end: “Action resolves; subject holds pose for 1s,” to create a clean cut opportunity.
The Interface: Familiar Layout, New Possibilities
Filmora 15 doesn’t overwhelm you with a new UI paradigm. The panels, timeline, and toolbars feel familiar if you come from Version 14. The AI tools appear as context-sensitive options with simple configuration fields. This is an advantage: you don’t have to relearn the application to leverage AI Extend. If anything, the restraint encourages disciplined use—select a clip, describe what happens, monitor the Task List, and fold the result back into your normal rhythm of editing, grading, and sound design.
Edge Cases: When the Model Surprises You
On occasion, you may see gestures you didn’t request—like folded arms appearing unexpectedly. This can occur when the model tries to smooth a transition or stabilise a pose. If it works for your narrative, embrace the serendipity; if not, steer it with a counter-instruction like “arms remain at sides” or “hands hold rocket steady,” which can nudge the pose back into line.
Setting Expectations with Clients and Collaborators
If you’re using AI Extend in a professional context, set expectations early. Explain that it’s a generative tool: initial drafts are explorations, not final frames. Share the prompt constraints and credit costs so stakeholders understand the value of clear, concise direction. Encourage feedback in the language of action and visual cues (“more smoke at feet” vs. “make it cooler”) to map feedback directly to prompt revisions.
Practical Checklist Before You Hit “Generate”
- Is the final frame of your source clip a clean seed for the change you want?
- Does your prompt lead with the core action, then add one or two specific visual cues?
- Have you chosen a camera movement that supports the action?
- Are you prepared to accept minor artefacts and fix them in post if necessary?
- Do you have enough credits to allow at least one targeted iteration?
With these boxes ticked, you’ll make the most of each generation cycle and turn AI Extend into a reliable tool in your editing repertoire.
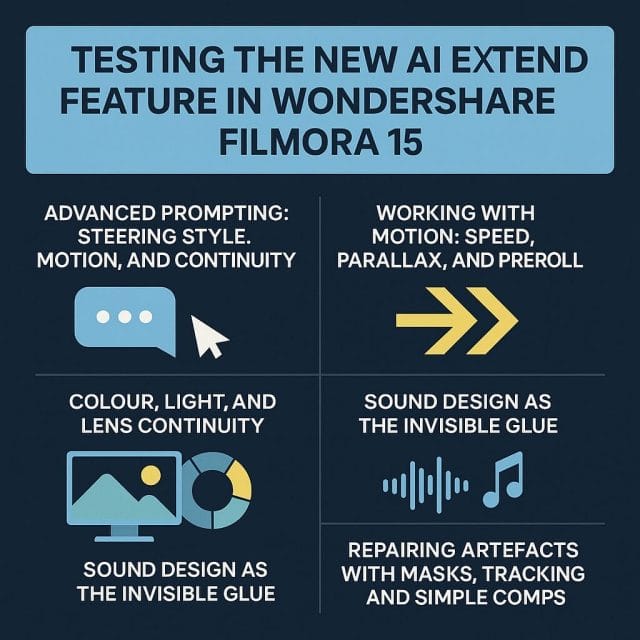
Advanced prompting: steering style, motion, and continuity
Once you’ve validated that AI Extend can continue a shot in broadly the right direction, the next leap is shaping nuance. With a hard character cap, your words must carry both instruction and constraint. Think of each prompt as a short, binding contract: it tells the model what must happen, what must not change, and how the camera should help you sell the moment.
A practical way to think about this is to fold your intent into three pillars:
- Action fidelity: What changes on screen? What physical outcome confirms success?
- Continuity guardrails: What must visibly remain the same?
- Camera utility: What movement or restraint helps the shot read cleanly?
In Filmora 15, AI Extend interprets the last frame of your source clip as a visual seed. It will prioritise textures, colours, and shapes from that frame, then map your prompt onto a plausible continuation. Your language is the compass; the final frame is the terrain.
Prompt templates for common scenarios
Use these compact structures as a starting point, then swap nouns and adjectives to suit your shot. Keep sentence count low and favour nouns over adjectives.
- Object entry from frame edge: “A red delivery drone enters from top left, hovers above the phone on desk, soft prop wash on papers. Keep desk layout and logo. Subtle dolly in.”
- Subject transformation: “Trainer soles split and glow blue, small sparks, no flames. Laces stay tight. Maintain black logo. Gentle zoom out to reveal floor texture.”
- Background reveal: “Curtains sway to reveal a bright city skyline, golden hour colour, no rain. Keep subject in foreground steady. Slow pan right.”
- Energy effects without chaos: “Thin smoke trail from heel, light grey, quick curl, fades in 2s. No thick fog. Maintain skin tone and sleeve texture. Hold camera.”
- Mechanical action: “Watch crown rotates clockwise twice, subtle click. Do not move hands. Maintain reflection on glass. Tight static macro.”
Using soft constraints and negatives
Negative phrasing can tame the model. Reserve it for elements that commonly go wrong (logos, text, hands, faces). Within the character limit, short negations are potent:
- “Do not change logo shape.”
- “No extra fingers.”
- “No smoke on face.”
- “Keep sleeve colour.”
- “No camera shake.”
Place these stabilisers after your main action to avoid diluting the primary instruction. If you overuse negatives, the model may default to minimal change; be selective.
Timing language that the model respects
AI Extend does not obey timecodes, but it does respond to relative timing cues. Prefer short, ordinal words:
- “Immediately” for instant onset.
- “After a beat” for a brief pause (roughly 6–12 frames).
- “Gradually” for slow ramps.
- “Quick burst” for one-off spikes.
Example: “Heel ignites immediately, quick burst, then fades after a beat. Maintain trousers and floor.” That phrasing is more reliable than numerical seconds, though your mileage varies by clip length.
Working with motion: speed, parallax, and pre-roll
Generative continuations often feel most natural when the motion cadence of your source clip is clear and consistent. If your original ends on a speed ramp or mid-blur, the model can misread the motion vector. Three strategies help:
- Stabilise your seed frame: If your last two seconds are shaky, apply gentle stabilisation to the source before extending. You can reintroduce shake later with a controlled effect.
- Pre-roll the action: Start the desired change one or two beats before the cut so the seed frame already contains early hints (e.g., a faint glow, a hand angle). The model tracks direction more reliably when it can see momentum.
- Generate long, then trim: Ask for more than you think you need, then trim to the best section. Cutting away the first half-second can eliminate awkward morphs as the model “bootstraps” motion.
Camera movement that clarifies rather than complicates
A small, intentional move can hide stitching artefacts and enhance clarity. Consider the following pairings:
- Reveal objects with a tiny dolly out. This creates breathing space and lowers the chance the new object intersects the subject’s silhouette in distracting ways.
- Use a slow pan to guide viewer attention towards the action area. If you prompt “pan right to follow the drone,” you also anchor motion continuity.
- Avoid aggressive handheld unless you plan to add the same shake to both original and generated segments. Inconsistency in micro-shake is a giveaway.
Dialogue and lip-read safety
AI Extend is not a lip-sync tool. For talking heads, limit extensions to reaction shots, camera reframing, or cutaways. If mouths must appear, avoid new phonemes. Prompts like “gentle nod, eyes glance left, no mouth movement, hold camera” keep continuity safe without creating uncanny lips.
Colour, light, and lens continuity
Colour and contrast are the foremost signals of authenticity. Even if the model matches rough hues, micro-contrast and highlight roll-off can shift. Bake your look before you extend:
- Lock in a base grade: Apply your LUT or base correction to the source clip first. AI Extend reads the graded frame as the seed, then continues in that colour space. Matching after the fact is harder.
- Maintain lens traits: Add subtle vignette, chromatic aberration, or softness before extending so those artefacts carry through. The model will tend to continue edge fall-off and vignettes if they exist in the seed frame.
- Control exposure: If you’re mid-exposure ramp, stabilise exposure first, extend, then reintroduce any ramps as an overall adjustment. Rapid exposure shifts can confuse texture continuity.
After generation, unify with a gentle overall correction. Be conservative: push too hard and the differences between real and generated material may reappear.
Sound design as the invisible glue
Visual plausibility benefits enormously from audio context. Because Filmora’s Task List lets you keep cutting while AI Extend renders, pre-lay your sound to guide edits and mask any micro-stutters.
- Build a sound bed early: Add a room tone or environment bed that spans the cut.
- Use diegetic triggers: Button clicks, shoe scuffs, paper rustles—these anchor new motion beats.
- Layer transitional SFX: Whooshes, risers, and dopplers can lean into camera moves and conceal minor visual wobble during the join.
- Respect physics: If you add “light smoke,” avoid heavy, roaring flames. The ear calls out the eye when scale disagrees.
Champion restraint. Less is often more: a single, well-timed fizzle can legitimise a subtle visual effect better than a busy soundscape.
Repairing artefacts with masks, tracking, and simple comps
When AI Extend delivers a good overall continuation but fumbles a small region—fingers, logos, fine print—you can fix the fault instead of rerolling the entire generation.
- Holdout masks: Freeze a high-quality frame from your original clip and use it as a still patch over a small area. Feather the mask edges and track its position to the shot.
- Logo overlays: Replace deformed marks with your vector logo. Track, corner-pin if necessary, and add a slight blur to match the plate.
- Edge softening: A tiny, animated blur over the seam can sell the blend. Add grain to unify noise characteristics.
- Selective sharpen/soften: AI outputs can be slightly too sharp or too smooth. Apply micro-contrast selectively to match neighbouring areas rather than globally.
Track slowly and verify often. If motion tracking drifts, keyframe corrections at inflection points rather than fighting every frame.
Task List and progress visibility
Filmora’s Task List is your friend when you’re trying multiple variations. Keep names meaningful (e.g., “Heel_smoke_v03_zoomOut”) and note prompt differences. The preview thumbnails help you spot divergent colour or motion before you commit to timeline placement.
An end-to-end iteration example
To illustrate a resilient process, here’s a practical sequence you can apply to most shots:
- Prep the seed:
- Stabilise if necessary; apply base grade and lens vignette.
- Trim the source so the final frame clearly shows all objects that will change.
- Add a marker two beats before the cut to remind you where the action should begin.
- Draft Prompt A (broad stroke):
- “Blue smoke puffs from heel immediately, tiny sparks, quick fade after a beat. Keep logo shape and floor texture. Slow zoom out.”
- Check character count; remove adjectives that don’t affect physics (e.g., “small” vs “tiny” is redundant).
- Generate and review:
- Preview at normal speed, then frame-step the transition zone.
- If the smoke drifts onto the trousers, note: “needs distance from leg.”
- Draft Prompt B (surgical correction):
- “Blue smoke from heel only, no smoke on trousers, quick burst, fades after a beat. Keep logo shape. Gentle zoom out.”
- Generate a longer segment than required:
- Ask for 2–3 seconds more than you plan to use, giving you trimming room.
- Place and trim:
- Use a 6–10 frame crossfade into the extension to conceal the first morphy frames.
- Trim the tail where motion settles; lingering static frames can look “painted.”
- Patch small issues:
- Mask and track the logo if it still breathes.
- Match grain and subtly blur edges that feel unnaturally crisp.
- Unify with audio:
- Add a brief sizzle and a faint whoosh aligned to the first smoke pulse.
- Final pass:
- Grade check: highlights and blacks consistent?
- Continuity check: shoe, floor, sleeve unchanged unless intended?
- Motion check: camera pace consistent end to end?
Chaining extensions and multi-shot continuity
Sometimes one extension leads to another: you might extend Shot A to reveal a new element, cut to Shot B, then extend B to continue the story. Three practices improve coherence:
- Echo motifs: If smoke had a blue tint in Shot A, ensure Shot B seeds that same hue in its last frame (add a tiny, visible hint before extending).
- Align camera language: If A uses a slow zoom out, let B begin with a matching pace or stabilise into a static composition.
- Bridge with B-roll: Insert a quick cutaway (hands, environment) that can be safely extended if needed. This gives you another place to hide cuts and compress time.
For especially ambitious sequences, storyboard your prompts. A small text document listing each shot’s action, constraint, and camera cue helps maintain consistency while you work across multiple clips and credits.
Performance, queue strategy, and credits discipline
Generation time depends on your clip length, resolution, and network. Hardware affects preview smoothness more than generation speed, since the heavy lifting occurs in the cloud. To keep momentum:
- Batch by idea: Queue two or three variations of the same prompt, each with a single variable changed. This minimises cognitive switching and helps you learn what wording matters.
- Name intentionally: “Drone_hover_v01_staticCam,” “Drone_hover_v02_slowPan,” etc. Future you will thank you when digging through the Task List.
- Use proxies for editorial: If your machine struggles to play the generated clip smoothly, create proxies to make placement and trimming easier. Swap back at final export.
- Plan a credit budget: Decide your exploration ceiling up front (e.g., 2,000 credits per shot), then hold yourself to two or three purposeful iterations.
If an idea isn’t converging by iteration three, pause. Either revise the seed (change the last frame composition), simplify the action, or move on. Throwing more credits at a poorly framed seed rarely helps.
Edge cases and how to tame them
Even careful prompts can stumble on certain textures and optical phenomena. Here’s how to manage them:
- Fine text and signage: Keep text static whenever possible. If it must move, overlay a clean plate or track your own text layer rather than trusting generative output.
- Reflections and glass: The model can hallucinate reflections that contradict subject placement. Consider framing to avoid reflective surfaces in the seed frame, or plan to mask reflections and composite a controlled one later.
- Specular highlights: Shiny surfaces can “crawl.” Soften speculars in the seed via diffusion or minor blur, extend, then restore crispness globally.
- Hair and fabric: Wispy edges can jitter. Add gentle motion blur to the extension and feather masks to soften transitions around hairlines and sleeves.
- Moire and micro-patterns: Busy fabrics and grills can shift. Reduce detail in the seed with slight noise or blur, extend, then reintroduce texture subtly with grain rather than sharpening.
- Smoke and fire scale: The model often over-commits. Use words like “thin,” “wisp,” “hint,” and cap it with a negative: “no thick fog,” “no large flames.”
Three quick case studies
1) Product reveal on a rotating turntable
Goal: Extend a 360-degree spin by another quarter turn to accommodate text callouts.
Seed prep: Grade locked, background seamless white, turntable mark visible at frame edge.
Prompt: “Turntable continues clockwise, smooth speed, no wobble, white background stays clean. Keep logo sharp. Static camera.”
Outcome: Good continuation of rotation and reflections. The cap’s logo drifted slightly.
Fix: Tracked a vector logo overlay for 12 frames, added 0.4 px blur and 3% film grain to match plate. Result read as real on first viewing.
2) Corridor that ‘extends’ into infinity
Goal: Create a surreal beat where a hallway keeps stretching as the subject walks.
Seed prep: Final frame shows converging lines, subject mid-stride, strong side light.
Prompt: “The corridor elongates ahead, straight lines stay parallel, same warm light. Subject keeps walking, natural pace. Slow dolly forward.”
Outcome: Convincing depth increase with occasional wall texture repetition.
Fix: Placed a 10-frame crossfade at the join and added a low-frequency camera breathing pattern (subtle ease-in-out) across both shots. Texture repetition read as stylistic once motion felt unified.
3) Skateboard ollie continuation
Goal: Generate a landing and small roll-away from a cut that ends at peak jump.
Seed prep: Freeze on the apex with clear board position and foot placement, shadows visible on ground.
Prompt: “Skater lands cleanly, wheels roll forward 2 metres, dust puff on impact, keep board graphic. Follow cam smooth.”
Outcome: Solid landing, but rear wheel intersected the ground plane briefly.
Fix: Trimmed the first 8 frames of the extension, added a brief impact blur and dust SFX. A quick mask on the wheel rim for 6 frames removed the intersect artefact. The roll-away felt authentic in motion.
Collaboration, versioning, and feedback
When multiple hands touch a timeline, structure keeps costs and time under control.
- Prompt log: Maintain a shared note with each shot’s prompt history and outcomes. Include the character count and the single most important constraint per iteration.
- Version naming: Adopt a pattern like “S03_SH010_extend_v04_smokeThin.” Consistency matters when you revisit weeks later.
- Marker codes: Use colour-coded markers on the timeline to mark “seed OK,” “extend here,” “mask fix,” and “SFX required.” The visual guide speeds handoffs.
- Feedback framing: Ask reviewers for point-in-time comments: “00:12:09 – logo breathes” beats “logo looks odd.” These map cleanly to prompt tweaks and comp notes.
Export choices and delivery QC
After you’ve married the extended clips into your edit, keep exports conservative to avoid revealing seams.
- Constant frame rate: Prefer CFR over VFR to keep frame-accurate joins aligned.
- Bitrate headroom: Don’t over-compress. Fast-moving, generatively textured areas need bits to avoid macroblocking that draws attention to itself.
- Gamma guard: Export test frames to check for gamma shifts between original and extended clips. Address with a subtle, clip-level gamma adjustment if needed.
- Audio peaks: If you used SFX to cover joins, ensure final loudness normalisation doesn’t squash the transient that sells the moment.
Run a final pass:
- Full-screen playback at 100% zoom.
- Frame-step across each join.
- Mute audio and watch only motion; then solo audio and listen blind to spot mismatches.
When to pivot to other techniques
AI Extend is powerful for short, plausible continuations and imaginative beats. For some tasks, other methods are faster or safer:
- Rigid graphics and UI: Use motion graphics layers rather than hoping generative will keep text crisp and aligned.
- Long, complex choreography: Break into shorter, controlled beats and bridge with cutaways or traditional effects.
- Critical brand work: Composite real assets over the generated continuation, or swap to plan-based VFX where you control every pixel.
If you require multi-shot, photoreal character or object additions across significant durations, consider pairing Filmora with specialist tools and reserving AI Extend for moments where serendipity shines without risking continuity.
Frequently asked questions
- How long can I extend a clip? Shorter is safer. Aim for 1–4 seconds. Beyond that, textures and continuity drift increase.
- Does it read numbers and time exactly? Not reliably. Use relative timing words rather than “2 seconds.”
- Can I extend backwards from the start of a clip? The tool is designed to continue forward from the last frame. For a “pre-roll,” duplicate the clip, reverse it, extend, then reverse again and rejoin—workarounds vary in success.
- What resolution works best? Match your project settings. Higher resolutions take longer and reveal more artefacts; 1080p is a friendly starting point for tests.
- How do I save credits? Make the last frame unambiguous, keep prompts tight, iterate surgically, and fix small issues with comps rather than rerolling.
- Can I use it on faces? You can, but keep changes subtle and avoid new speech. Ethical and consent considerations apply—get releases and be transparent.
A practical pre-generation checklist (refined)
- Seed clarity: Are the objects to be changed fully visible and cleanly lit?
- Grade locked: Have you applied base colour and lens traits?
- Prompt compactness: Does your prompt state the action, one key constraint, and a camera guide within the character cap?
- Timing cue: Do you specify “immediately,” “after a beat,” or “gradually” where relevant?
- Negative guardrails: Have you added a single, essential “do not” if a brand mark or body part must stay perfect?
- Credit plan: Are you committed to two or three iterations, not open-ended experimentation?
- Audio prep: Is there a sound bed or placeholder SFX to audition the beat?
- Exit plan: If this fails, do you have a cutaway or alternative idea ready?
Polish moves that consistently help
- Short crossfades: 6–10 frames at the join smooth the “boot-up” of generative motion.
- Unified grain: A light grain layer across the whole scene ties textures together.
- Micro-blur: 0.3–0.6 px directional blur on fast-moving elements reduces discrepancy in motion portrayal.
- Rumble and shake: A subtly shared camera motion across original and extension hides minute geometric deviations.
- Sound as sleight-of-ear: A single, well-timed audio element sells a visual shift better than stacking multiple sounds.
Ethics, expectations, and transparency
In professional contexts, be upfront about the generative nature of the extended material and the inherent variability. Secure licences for any assets, ensure talent consent covers AI-driven modifications, and keep your change log readable. If a client must sign off on a look, export a short test and invite specific, visual notes before committing credits to a final iteration.
What success looks like
A successful use of AI Extend disappears into the edit. The viewer notices the story beat—an object reveals itself, a motion completes, a mood lingers—without clocking the method. The path to that outcome favours clarity over complexity:
- Make the seed frame broadcast your intent visually.
- Use plain language to request one clear action.
- Protect the two or three details that must not change.
- Deploy camera movement to guide and disguise.
- Fix small issues surgically rather than rerolling.
- Lean on sound and unified grading for cohesion.
A closing example prompt bank
Below are extra compact prompt lines tuned for the character limit. Swap nouns, colours, and directions to taste.
- “Steam drifts from mug, thin, curls right, fades after a beat. Keep logo crisp. Static cam.”
- “Neon sign flickers on, warm orange, slight hum implied. Do not change text shape. Slow dolly in.”
- “Door opens a crack, light spills onto floor, soft edge. No change to wall poster. Hold frame.”
- “Cat tail swishes once, left to right, subtle. Keep collar tag sharp. Gentle pan right.”
- “Rain eases to drizzle, droplets on window, no streaks on face. Maintain skin tone. Static cam.”
- “Drone ascends slowly, props blur, no shadow on subject. Keep sky colour. Zoom out slightly.”
- “Watch second hand ticks twice, smooth. Do not move hour/minute hands. Macro static.”
- “Torch beam widens, soft edge, dust motes, no fog cloud. Keep shelf labels. Slow dolly forward.”
Conclusion
AI Extend in Filmora 15 is a genuinely useful bridge between editorial intent and generative possibility. It thrives when you grant it a clear, uncluttered final frame and a prompt that elevates one action above all others. The tool’s integration into the timeline and Task List makes experimentation feel native to the edit, while the credit system encourages discipline: build a hypothesis, test it, measure, and adjust.
It won’t replace careful shooting, practical effects, or robust compositing for high-stakes brand work, nor should it. But as a creative accelerator for short continuations and imaginative flourishes, it delivers disproportionate value—especially when paired with thoughtful sound, cautious colour, and a surgical approach to fixes. If you treat your prompts like shot directions and your seed frames like storyboards, you’ll find the results both controllable and pleasantly surprising.
Ultimately, the craft here is the same as it has always been: guide the audience’s eye, respect physics and light, and make decisive choices. AI Extend becomes another tool in that craft—most powerful not when it shouts, but when it disappears into the cut and leaves only the idea behind.

If this article helped you in any way and you want to show your appreciation, I am more than happy to receive donations through PayPal. This will help me maintain and improve this website so I can help more people out there. Thank you for your help.
HELP OTHERS AND SHARE THIS ARTICLE
LEAVE A COMMENT
I am an entrepreneur based in Sydney Australia. I was born in Vietnam, grew up in Italy and currently residing in Australia. I started my first business venture Advertise Me from a random idea and have never looked back since. My passion is in the digital space, affiliate marketing, fitness and I launched several digital products. You will find these on the portfolio page.
I’ve decided to change from a Vegetarian to a Vegan diet and started a website called Veggie Meals.
I started this blog so I could leave a digital footprint of my random thoughts, ideas and life in general.
If any of the articles helped you in any way, please donate. Thank you for your help.
Affiliate Compensated: there are some articles with links to products or services that I may receive a commission.