There’s something inherently satisfying about unboxing a new grooming tool, especially when it promises to simplify your routine and tidy up the clutter of clips, guards and cables that tend to accumulate over time. In this hands-on look at the Remington Barber’s Best Personal Grooming Kit, we dive into the packaging, explore the attachments, and share practical tips for using and maintaining the kit. Whether you’re refining a beard, tidying sideburns, trimming body hair or dealing with those tricky nose and ear hairs, this kit aims to be an all-in-one solution that’s portable, easy to handle and versatile.
From the outset, the kit presents itself as compact and travel-friendly, with multiple attachments and an orderly in-box layout. But as anyone who’s ever battled stiff packaging will know, appearances can be deceiving. Let’s get into the nitty-gritty of what’s inside, how it all fits together, and what to expect when you switch from box to bathroom shelf.


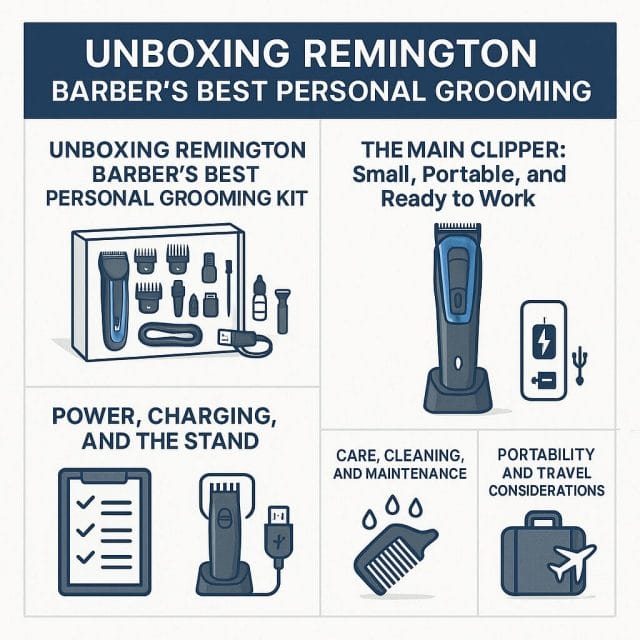
First Impressions: Packaging and Opening
The box is compact and reassuringly sturdy, clearly designed to protect the contents during transport. A small security sticker across the opening keeps everything sealed; it’s simple enough but can be surprisingly tenacious. If you’re eager to get inside, a pair of scissors is your friend—carefully slice through the sticker rather than tugging and risking damage to the box or its contents. This is one of those small but important moments where patience pays off.
Once the sticker is dealt with, you’ll notice a series of tabs and grooves that hold the internal trays firmly in place. The inner packaging is more complex than it appears at first glance, with multiple layers and compartments designed to keep each attachment separated and protected. It feels like a thoughtful approach to shipping safety, even if it makes the initial extraction slightly fiddly. Pull the tabs gently, locate the plastic grooves that secure the tray, and ease everything out rather than forcing it. A methodical approach here helps prevent the dreaded cascade of accessories across the floor.
What’s in the Box
With the outer packaging set aside, you begin to see the kit’s modular design. The main unit—the clipper/trimmer body—is small and light, with an on/off switch that engages a surprisingly punchy motor. Then there are the attachments: differing heads and combs for a whole spectrum of grooming jobs, from precision shaping to broader trimming. It’s an intuitive idea: one motor body, multiple heads, and adjustable combs for varied lengths.

One immediate detail that stands out is the charger. Remington has opted for a pin-hole (barrel style) charger instead of the now ubiquitous USB-C. There’s a case to be made for a proprietary charger in terms of power delivery and consistency, yet for travellers and those who prefer cable minimalism, USB-C would undeniably be more convenient. With the pin charger, you’ll want to remember to pack the specific cable, especially if you’re the sort of person who charges everything from a single multi-port hub. Still, once it’s plugged into a mains adapter, charging is straightforward, and the lithium battery promises decent runtime between charges.
The Main Clipper: Small, Portable, and Ready to Work
The grooming body is slim and ergonomic, designed to sit comfortably in the hand. The on/off switch has a firm, confident click, and the motor hums with a steady, unflustered buzz—enough power to handle facial hair and light body grooming without feeling aggressive. It’s a good balance: not so loud that it’s jarring, and powerful enough to avoid tugging when used correctly. The weight is just right for manoeuvrability, which helps when you’re working around contours like jawlines, moustaches and sideburns.
If you’re new to personal grooming kits, the included manual is worth a quick read. These devices are simple, but each brand uses a slightly different system for attaching and removing heads. A few minutes with the guide can save you wrestling with the mechanism—and, importantly, prevent damage to the locking points that secure the attachments.
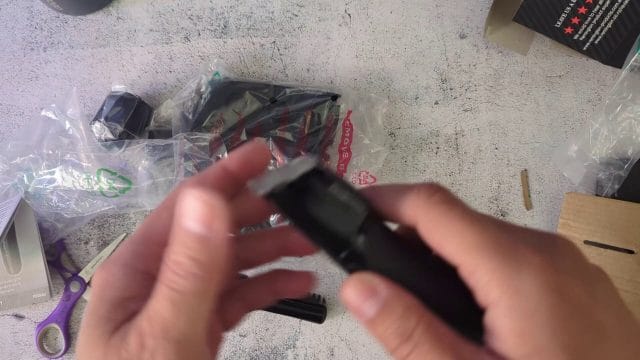
Switching Attachments: Twist to Remove, Click to Lock
Changing heads is one of the most important aspects of a multi-tool kit, and the system here is a twist-lock affair. It’s not a push-to-release: you’ll want to avoid forcing the head straight off. Instead, hold the body securely and rotate the attachment anti-clockwise to unlock. It can feel a bit stiff on the first attempt—manufacturers often set the factory lock tight to keep the head secure during shipping—but a steady, moderate amount of force should free it. Once it’s loosened, you can lift it away cleanly.
To attach a new head, align the base fitting with the connection point on the body, press gently into place, and turn clockwise until you feel it click or tighten. It’s reassuringly mechanical: a tactile, snug lock that gives confidence you won’t knock the head loose mid-trim.
- Unlocking: Turn the head anti-clockwise to release.
- Removing: Lift straight off once torque is overcome.
- Attaching: Seat the new head, then turn clockwise to lock.
- Test: Give a gentle tug to confirm the lock, then power on.
These small details matter. Push-based systems are quicker but can wear faster; twist locks, when done well, last longer and keep the fit tight, reducing vibration and improving precision.
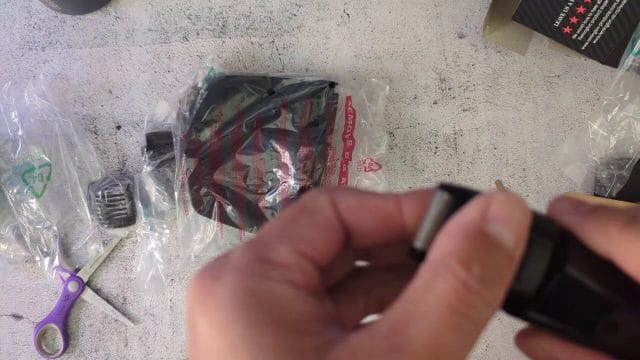
Meet the Attachments: From Foil Shaver to Nose Trimmer
The kit includes a range of heads and combs to cover all personal grooming needs. You’ll find a small foil shaver head for finishing touches, a body comb trimmer for larger areas, and beard-specific attachments for shaping and maintaining facial hair. There’s also a dedicated nose and ear trimmer, which is essential for safe, comfortable trimming in those sensitive areas.
- Foil shaver head: Ideal for getting closer to the skin after you’ve reduced bulk with a trimmer. Great for finishing sharp lines around beard edges and sideburns. Don’t expect a full clean shave like a large electric razor; it’s built for detail work and tidy finishes.
- Standard steel blade (trimmer head): The workhorse. Use this for bulk reduction on beards, necklines and body hair. Paired with combs, it controls length consistently.
- Beard combs (fixed lengths): Snap these onto the trimmer to maintain a uniform beard length. Choose shorter combs for a neat stubble or longer ones for fuller beards.
- Adjustable beard comb: The most flexible option. A sliding mechanism lets you tweak length without swapping combs. Perfect for gradual fades or when you want a specific length around different parts of the face.
- Body comb trimmer: Typically wider, designed to cover larger areas efficiently. Good for chest, stomach and limbs—just be mindful of skin sensitivity.
- Nose and ear trimmer: A small, rounded, safety-first design that trims hair without pulling. Always insert gently and avoid pressing against the skin.
The variety here is comprehensive. By pairing the standard blade with different combs, you can adapt on the fly, balancing precision with speed depending on the job at hand.
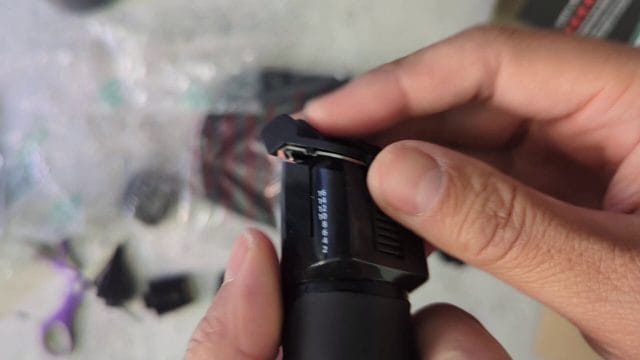
How to Use the Adjustable Beard Comb
The adjustable beard comb deserves special attention because it’s the most versatile piece in the set. Once you attach the standard steel blade, slide the adjustable comb onto the blade until it clicks. The slider mechanism lets you set different lengths, and the side of the comb typically shows numbers corresponding to millimetres (or a rough equivalent). This makes it easy to replicate a favourite length every time you trim.
For example, you might choose a longer setting for the cheeks and a slightly shorter setting for the neck and jaw to create a natural fade. Adjust gradually rather than making big jumps in length. The comb’s small head size helps reach narrower spots like under the nose or along the moustache line, but always angle the trimmer to match the direction of hair growth to avoid snagging.
When it’s time to swap to a different job—say, tidying the edges—you can remove the adjustable comb and switch to the foil shaver for crisp lines. The flexibility of going from trimming bulk to refining detail without changing the main tool is what makes the kit efficient and satisfying to use.
Power, Charging, and the Stand
The included charger is a pin-hole style, and while it’s perfectly functional, the absence of USB-C is notable. For frequent travellers, having USB-C can be a real convenience: one cable for phone, tablet, headphones and grooming kit. With the Remington, you’ll need to carry the dedicated charger. It’s not a deal-breaker, but it’s worth planning for—especially if you’re away from home and don’t want to rely on spare cables.
On the plus side, the kit uses a lithium battery, which generally means better longevity and consistent performance compared to older rechargeable chemistries. You can expect a reliable runtime, and lithium cells tend to maintain power more steadily as they discharge. If you’re using the kit daily, consider charging it once or twice a week, depending on the length of your grooming sessions. Avoid fully draining the battery regularly; topping up when it’s low helps with longevity.
The stand is designed to hold the trimmer and the various attachments, keeping everything on display and ready to grab. It’s tidy, but it does require a bit of counter space. If you have a compact bathroom, you might prefer to store only the essentials—say, the main trimmer, adjustable comb and foil shaver—on hand and keep the rest in a drawer. The stand’s footprint makes sense if you like everything visible and accessible, but it’s less ideal if you’re keen on a minimalist set-up.
The dream is a slimline stand that holds the core unit with a couple of favourite heads and leaves the rest in a storage pouch. Remington’s stand is secure and organised, though, and in practice it’s nice to have each attachment slotted into its place. Think of it as a grooming station—grab, trim, return—rather than a travel-friendly base.
Ergonomics and Everyday Use
Once powered on, you can hear the motor working steadily. The vibration level is moderate, and the body’s shape encourages a relaxed grip—important for maintaining control during detail work. Switch placement allows you to toggle power with your thumb without changing your hold, and the weight distribution prevents fatigue during longer sessions.
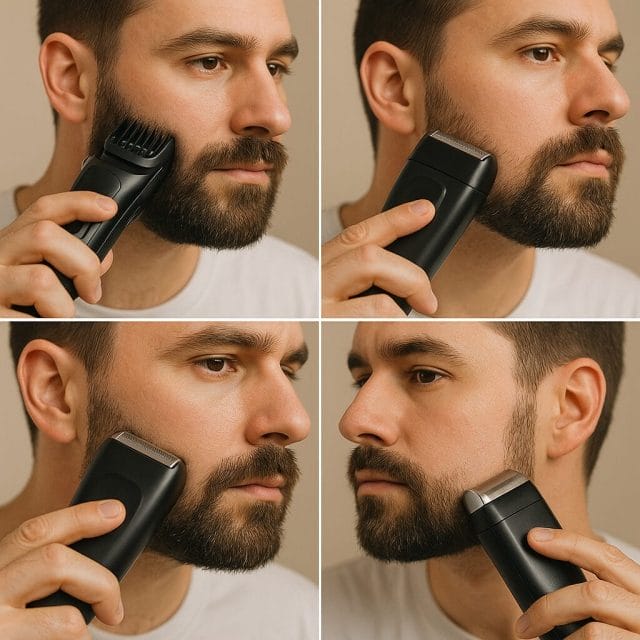
Using the trimmer without a comb attachment gives the closest trim from the standard blade, but you’ll still want to finish edges with the foil shaver for that sharp line under the cheek or around the jaw. When working on the moustache, angle the blade so the flat edge follows the curve of your lip—comfortable control reduces the risk of uneven lines.
For nose and ear trimming, always use gentle, short motions. Don’t insert the trimmer too far into the nostril or ear canal; approach from the edge and trim only what’s visibly protruding or feels bothersome. A quick mirror check under good lighting helps you spot stray hairs without overdoing it.
Building a Grooming Routine with the Kit
Beard Maintenance
Start by combing your beard to align the hairs, then use the standard blade with a chosen comb length to even out bulk. Work in the direction of hair growth for the first pass, then against growth in a controlled second pass if you want a tighter finish. Switch to the adjustable comb to taper the length along the jawline—longer on the cheeks, slightly shorter under the chin gives definition without harsh contrast.
Next, swap to the foil shaver head for refining. Outline the cheek line, neaten the neckline, and clean up strays around the lips. If you prefer a natural look, keep the foil for small details only; if you want crisp lines, take your time, use gentle pressure, and maintain a steady angle.
Sideburns and Necklines
Sideburns benefit from a fixed comb to maintain symmetry. Choose a length that suits your hairstyle and trim both sides evenly, checking from the front and profile. For the neckline, start with a longer comb to remove bulk, then gradually shorten to define the edge—think of it as sculpting rather than chopping. The foil shaver can then lock in a sharp finish along the line.
Body Hair
The body comb trimmer handles larger areas. Take slow, measured strokes to avoid irritation, and never press too hard—let the tool do the work. If you’re trimming sensitive zones, consider shorter sessions and moisturise afterwards to calm the skin. Always use clean attachments and avoid mixing facial and body trimmers without cleaning to maintain hygiene.
Nose and Ear Hair
With the dedicated nose and ear trimmer, the rule is simple: be cautious. Trim only what’s necessary, and don’t rush—these areas are sensitive. Holding a small handheld mirror while using the main bathroom mirror can improve visibility. Make short, gentle passes and clean the head immediately after to keep it hygienic.
Care, Cleaning and Maintenance
A good grooming kit will last if you treat it well. The Remington Barber’s Best kit arrives with a well-fitted set of attachments, and keeping them clean after each session helps preserve performance and hygiene.
- Cleaning after use: Brush away hair from the blade and combs with the included cleaning brush (or a soft toothbrush if you need extra reach). Avoid compacted hair in the corners of the combs.
- Lubrication: A drop of clipper oil on the blade occasionally keeps it moving smoothly and reduces friction. Wipe excess oil off with a cloth.
- Water care: Check the manual for the waterproof rating. If the heads are rinse-safe, detach them and rinse under lukewarm water, then dry thoroughly. If they aren’t rated for rinsing, stick to dry brushing.
- Storage: Return heads to the stand or a dedicated pouch to prevent damage. Don’t leave the blade exposed in a drawer where it can catch on fabric or other items.
- Battery health: Recharge before the battery is totally flat if possible, and don’t leave it on constant charge for days at a time. A weekly top-up is reasonable for regular users.
If you notice pulling or reduced performance, clean and oil the blade first—it’s often the difference between a rough trim and a smooth one. And remember: the twist-lock mechanism should feel snug but not confrontational. If an attachment doesn’t seat properly, check for trapped hair or debris around the mount before forcing it.
Portability and Travel Considerations
This kit earns points for portability. The main body is compact, and the attachments can be selected based on your travel needs. For a short trip, consider bringing just the trimmer head, adjustable comb and foil shaver—these three cover almost everything for routine maintenance. The proprietary charger is the only catch, so add it to your packing list and stow it in a small zip pouch with the trimmer.
In terms of space, the stand takes up more room than a simple dock, so travellers may skip it and store attachments in a small organiser. Wrap the body in a soft pouch to prevent scuffs, and keep combs in a zip bag so they don’t go missing in the shuffle of toiletries. If you’re hopping between outlets in different countries, pair the charger with a reliable plug adapter and avoid cheap adapters that may not deliver consistent voltage.
Performance Notes and Practical Tips
Reducing Tugging and Improving Comfort
Most discomfort during trimming comes from dull blades, improper angles or rushing. Here’s how to counter all three:
- Blade contact: Keep the blade flat against the skin surface rather than angling the edge sharply inward.
- Comb pressure: Use light pressure; pressing too hard bends hair and increases snagging.
- Hair preparation: For dense beards, a quick wash and dry before trimming helps the blade glide. Dry hair trims more predictably than damp hair.
- Direction: Start with the grain (direction of hair growth), then make a careful pass against the grain if needed for closeness.
Keeping Shapes Symmetrical
For balanced sideburns, check them with your head level and shoulders relaxed. Measure by reference points: the top of the ear or a line parallel to your eyebrows, rather than eyeballing one side at a time. With the adjustable comb, take small steps down in length rather than big jumps. This avoids uneven patches and helps maintain a cohesive shape.
Sensitive Skin Tips
If you have sensitive skin, stick to longer lengths for the first pass and reduce gradually. After trimming, rinse your face with cool water and apply a gentle moisturiser or balm to reduce irritation. Avoid strong aftershaves immediately after a close trim; those are better reserved for days when you haven’t worked the skin with a blade or foil shaver.
Pros and Cons Based on the Unboxing Experience
What Works Well
- Compact, portable main unit with a steady motor and comfortable grip.
- Comprehensive set of attachments covering beard, body, nose and ear needs.
- Twist-lock mechanism feels secure and robust once you get the hang of it.
- Adjustable beard comb offers flexibility without needing multiple separate guards.
- Lithium battery should provide reliable runtime and holds charge well.
Areas for Improvement
- Pin-hole charger instead of USB-C makes travel slightly less convenient.
- Packaging’s tabs and grooves are protective but a bit fiddly on first opening.
- Stand takes up more counter space than a minimal dock—great for display, less ideal for compact bathrooms.
- Attachment removal may feel stiff initially; clearer diagrams in the manual would help new users.
A Practical Walkthrough: From Box to First Trim
To help you get going without second-guessing, here’s a simple flow for your first session:
- Open carefully: Cut the sticker, release the tabs and lift the inner tray out gently.
- Charge first: Plug in the pin-hole charger and give the battery a top-up while you read the manual.
- Attach the standard blade: Twist-lock into place by turning clockwise until secure.
- Choose a comb: Start with a slightly longer length than you think you’ll need—it’s easier to trim shorter than to fix a cut that’s too aggressive.
- Trim in sections: Cheeks, jawline, neck. Comb the beard between passes to ensure uniformity.
- Detail work: Switch to the foil shaver for edges and outlines.
- Nose/ear tidy: Use the dedicated trimmer gently and briefly—small, careful passes.
- Clean up: Brush hair off the blade, rinse attachments if the manual supports it, and dry them thoroughly.
- Store neatly: Place heads back on the stand or pouch and coil the charger for next time.
Final Thoughts
Unboxing the Remington Barber’s Best Personal Grooming Kit reveals a well-considered, versatile set-up that’s ready for the realities of everyday grooming—beards that need shaping, lines that need refining, and stray hairs that need subtle attention. The twist-lock system might require a moment’s practice, but it quickly becomes second nature and gives a reassuringly solid fit. The assortment of heads and combs means you can tackle an array of tasks without switching to entirely different tools.
The pin-hole charger is the most obvious concession in a world moving swiftly to USB-C, and the stand’s footprint won’t be for everyone. Still, the overall experience is positive: the main clipper feels confident in the hand, the attachments cover the essentials and then some, and the battery should keep you trimming without constant recharges.
If you’re building a grooming routine from scratch, this kit offers a reliable foundation. If you’re upgrading from piecemeal tools, it consolidates everything into a single, orderly package. As with any grooming device, the proof is in the day-to-day use, and after a few rounds of trimming, you’ll find your preferred settings, attachments and sequence. Keep your blades clean, your combs organised and your battery topped up, and this kit will serve you well—at home or on the road.
We’ll put it through its paces over the coming weeks and update with long-term impressions on blade sharpness, battery endurance and attachment durability. For now, the unboxing and initial use inspire confidence—this is a practical, portable kit that feels ready for real-world grooming.

If this article helped you in any way and you want to show your appreciation, I am more than happy to receive donations through PayPal. This will help me maintain and improve this website so I can help more people out there. Thank you for your help.
HELP OTHERS AND SHARE THIS ARTICLE
LEAVE A COMMENT
I am an entrepreneur based in Sydney Australia. I was born in Vietnam, grew up in Italy and currently residing in Australia. I started my first business venture Advertise Me from a random idea and have never looked back since. My passion is in the digital space, affiliate marketing, fitness and I launched several digital products. You will find these on the portfolio page.
I’ve decided to change from a Vegetarian to a Vegan diet and started a website called Veggie Meals.
I started this blog so I could leave a digital footprint of my random thoughts, ideas and life in general.
If any of the articles helped you in any way, please donate. Thank you for your help.
Affiliate Compensated: there are some articles with links to products or services that I may receive a commission.