Wondershare Filmora has long been a favourite among editors who value speed, clarity, and accessible creativity. With version 15, there is a fresh focus on artificial intelligence features that simplify those repetitive tasks and accelerate the production of polished videos. One of the most interesting additions to this release is the AI Audio Background Generator, presented in two flavours. Version 1 offers a lightweight, rapid approach to auto generated music beds, while Version 2 promises a significant leap in quality. In practice, the comparison is more nuanced, especially when you factor in cost, credits, and workflow. In this deep dive, I will walk through both versions, explain how they work, what they cost in credits, and how they sound in real editing scenarios, with thoughts on which one to use and when.
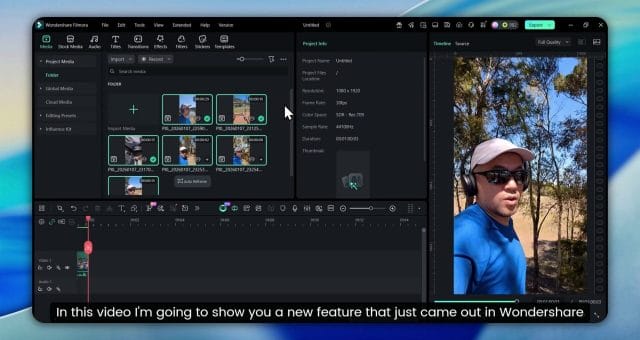
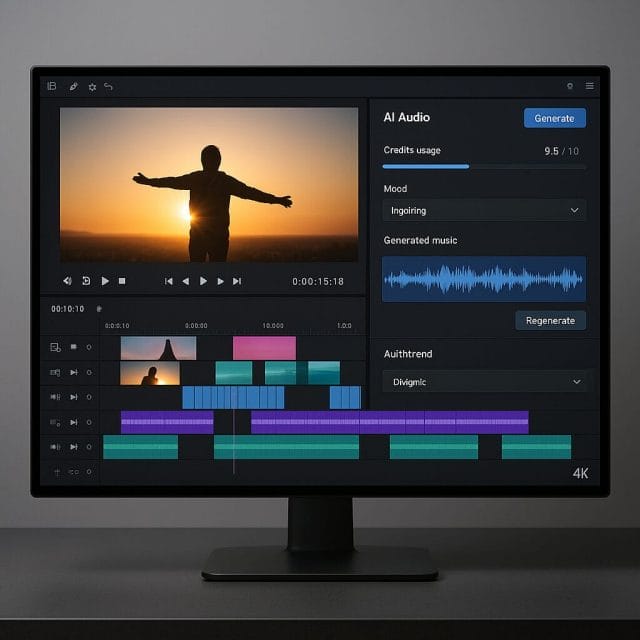
From the moment you open Filmora 15, you notice the emphasis on intelligent helpers tucked into familiar places. The AI Audio Background Generator sits right where you expect it among audio tools, and once you click the icon you are presented with two options. The interface itself is straightforward and encourages experimentation. While tools like this can be dismissed as purely novelty, the practice of having a tailor made backing track crafted to your visuals and timing has real productivity value. It removes the friction of hunting through stock libraries, dealing with licensing, or cutting and looping existing tracks to fit your sequence.
What the AI Audio Background Generator Does
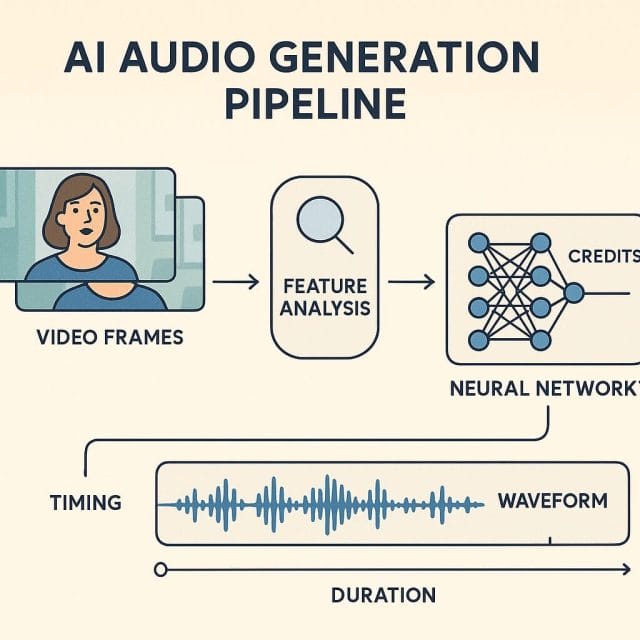
At its core, the AI Audio Background Generator analyses your footage and timing, then produces music that aims to match pace and mood. In practical terms, this means you receive a music bed that is structured to the same duration as your video, often with a sensible intro, development, and outro that avoids abrupt endings. The goal is not to replace carefully sourced music for high end productions, but rather to give you something usable very quickly for social videos, tutorials, explainers, or draft versions. Once generated, the track slots onto your timeline so you can hear it in context, adjust levels, and fine tune the mix against dialogue or sound effects.
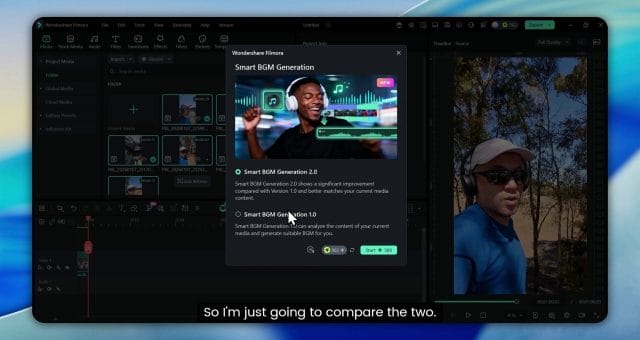
When you click the icon for background generation, Filmora 15 provides two paths. Smart Background Generation Version 2, and Version 1. The messaging suggests that Version 2 represents a notable improvement over Version 1, which sets an expectation for better musicality or more sensitive alignment with the visual rhythm. You can choose either option depending on needs and the available AI credits associated with your account.
Understanding AI Credits and Cost
This feature is cloud assisted, which makes credits a relevant consideration. In the example shown in the video, Version 2 consumes substantially more AI credits than Version 1 for a similar duration. With a clip of roughly one minute, Version 2 uses 580 credits, whereas Version 1 uses only 4 credits. That difference is striking, and it immediately raises questions about value. It also underlines why the decision between the two versions is not purely about musical quality. If you plan to generate many tracks for multiple drafts or long form content, credit consumption becomes central to your workflow planning.
The amount of credits used scales with length. A short social post might only nibble at your balance, but a long tutorial or vlog could quickly add up. The safe approach is to treat Version 2 as a premium option for final outputs or for projects where the music must carry a stronger emotional weight. Version 1 is ideal for initial assemblies, internal reviews, and quick references where you simply need a bed to define pacing and fill silence. In other words, save your premium credits for the moment when it truly matters.
While the interface does not ask you to micromanage parameters, consider that more sophisticated generation tends to require more computation, hence more credits. If you are dealing with multiple episodes or a large batch of clips, map out your credit usage just as you would plan renders. Credits become part of project management, especially if clients expect a certain number of drafts.
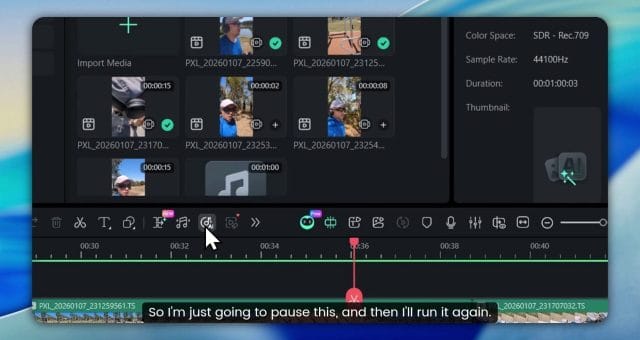
Generating the Track and Monitoring Progress
Once you initiate the process, Filmora starts the generation task and you can monitor its progress in the task list. This is a practical touch that lets you keep editing while the music is created. You can see when it is queued, converting, and completed. For a one minute clip, both versions complete fairly promptly, although Version 2 may take a bit longer due to the heavier computation implied by the credit difference. If you often work on slower systems or prefer to multitask, watching the task list lets you time your playback tests without guessing.
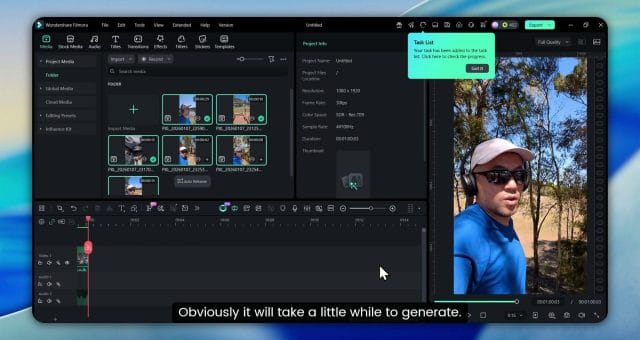
In the example test, the process begins, the status shows converting, and then the music arrives ready to drop into the edit. This is the point where you switch from generation to evaluation. The task list is more than a convenience. It helps you verify that the cloud service responded, measure typical time to completion, and identify any bottlenecks. If you notice longer waits than expected, consider whether your network is saturated or if other intensive background operations are running on your machine.
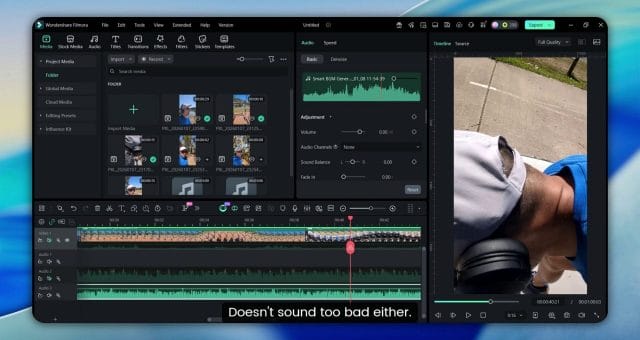
Auditioning on the Timeline
Once the generation completes, the track appears on the timeline. This is when you audition it in context. Press play and listen with the rest of your mix. Pay attention to whether the intro cues feel appropriate, whether the development maintains interest without overwhelming dialogue, and whether the ending lands cleanly on your final frame. If you plan to test both versions side by side, mute one and then the other so you can hear differences in isolation. This simple toggle approach is the most reliable way to avoid bias from layered playback.
In the demonstration, both tracks are generated, placed on separate audio layers, and played back individually. The experience is straightforward. The controls for mute, solo, and volume are all near at hand, so your test can be methodical. When you compare, listen for elements like instrument choice, rhythmic clarity, and the smoothness of transitions from section to section. You may find that Version 2 has more polish in terms of phrasing and the way it builds and resolves tension, although this will depend on the material you are editing and the stylistic assumptions the system makes.
It is also worth testing how the generated music cooperates with dialogue and voiceover. Ducking and sidechain compression are more advanced techniques not built into the generator itself, but you can still adjust levels to see if the music comfortably sits under speech without constant manual tweaking. If Version 2 consistently gives you fewer clashes with consonant spikes or sibilants in speech, that alone could justify credits for final use. If Version 1 already sits well and your audience is unlikely to notice the difference, you may prefer the budget friendly option.
Real Time Performance and System Behaviour
Playback is often where you discover constraints. In the demonstration, the computer becomes a bit laggy, and the mouse behaves erratically. This suggests the edit system is under strain, which can happen when running AI features, multiple high resolution clips, or numerous effects. If you encounter similar behaviour, consider these strategies.
- Close background applications that compete for memory or network bandwidth.
- Lower the preview resolution temporarily to free up resources while auditioning.
- Disable non essential effects during comparison playback to prevent compounded overhead.
- Ensure GPU acceleration is enabled if your graphics hardware supports it.
- Update Filmora to the latest patch to benefit from performance improvements and bug fixes.
Smooth playback matters because audio evaluation is highly sensitive to stutter and dropped frames. A slightly delayed response can skew your perception of timing, especially in segments where the music aims to accent visual changes. Whether you are testing Version 1 or Version 2, create conditions where the playback feels natural and unburdened.
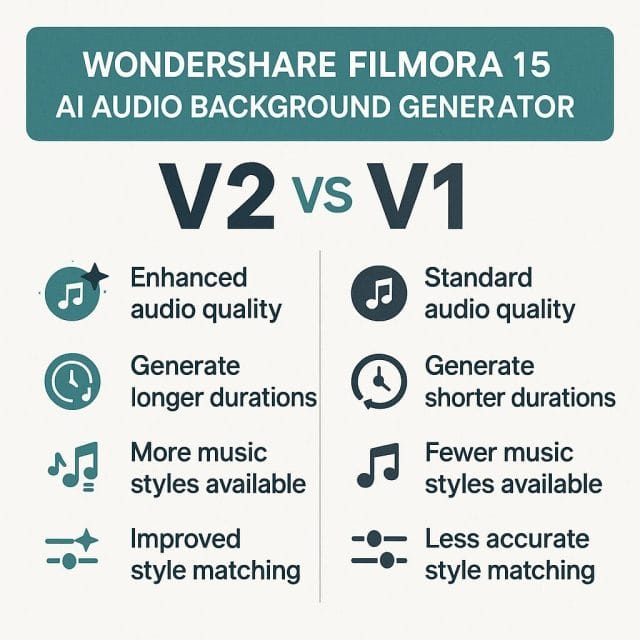
How Similar Are Version 1 and Version 2
The immediate impression from the example is that both tracks sound similar. This does not necessarily contradict the claim that Version 2 is significantly improved. Generative systems often produce differences that are subtle or that depend on specific content. If your video has a moderate pace, consistent tone, and few dramatic shifts, Version 1 may already deliver a satisfactory bed that feels very close to Version 2. However, there are several qualitative aspects to consider that may show Version 2 at its best.
- Transitions between sections. Version 2 may handle crescendos, drops, and bridging phrases with more finesse, preventing the music from feeling looped or mechanical.
- Instrumental texture. You may notice more believable instrument timbres or better layering, which helps the track feel less synthetic.
- Intro and outro shaping. Version 2 may have more thoughtful beginnings and endings, making exporting the final cut cleaner without manual fades.
- Dynamic nuance. Subtle changes in volume and emphasis can keep attention without becoming intrusive, which is ideal under narration.
If you run several tests that all sound similar, consider varying the visual material. Try a faster cut sequence and then a slower contemplative montage. If Version 2 demonstrates clearer musical storytelling in more complex edits, that is where it earns its premium. If there is little audible difference across styles, Version 1 might be enough for your production needs, particularly when your priority is cost efficiency.
Managing AI Credits With Smart Workflow
Given the dramatic credit difference in the example, it is sensible to adopt a layered approach to music generation. Draft your edits with Version 1 to establish pacing and basic mood. Use Version 2 selectively for final outputs or for segments that deserve extra care, such as intros and outros, where listeners pay the most attention. You could also generate shorter highlights with Version 2 and combine them with longer sections from Version 1, blending through crossfades to reduce total credit consumption while retaining polish where it counts.
You may also save credits by keeping a library of successful Version 1 cues for revised cuts. If your edit only changes slightly in timing, you may be able to reuse a previously generated track and adjust its endpoints rather than regenerate from scratch. Label and archive your project assets clearly so you can retrieve and reuse material efficiently.
There is value in measuring how credits map to time for your typical projects. If your work mostly consists of thirty second shorts, Version 2 might be cost effective even with a higher credit rate. If you produce longer tutorials or webinars, plan credit usage across episodes or chapters. Make a simple worksheet that pairs duration with expected credits, and track real usage to refine your planning.
Practical Tips for Better Results
Even the best generated music benefits from a little editorial care. Here are actionable suggestions to get the most from both versions.
- Set consistent loudness. Target a platform friendly level such as around minus fourteen LUFS for online content, and ensure your voiceover sits comfortably above the bed.
- Balance spectral content. If your narration is nasal or bright, avoid music with reeds or bright synths that compete in the same frequency range. Use simple EQ moves to carve space.
- Use gentle fades. Where the generator ends too abruptly, apply a short fade out at the end, and if needed add a final chord or stinger from a sound library to dignify the closing moment.
- Estimate tempo. Align cuts with musical beats when possible, even if the generator did not explicitly analyse your edit for beat mapping. This enhances perceived cohesion.
- Layer light ambience. For scenes in nature or city life, modest ambience under the music can help it feel more rooted without overwhelming the soundstage.
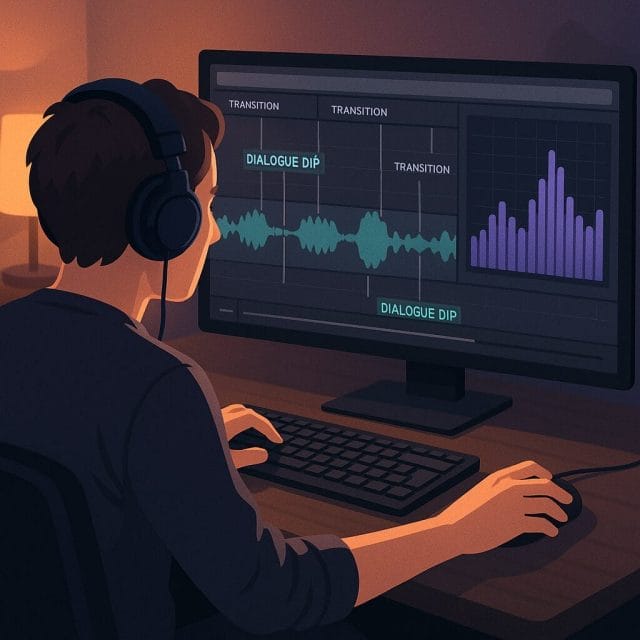
You may find that simple volume automation over dialogue makes the difference between a bed that sounds slapped on and one that feels integrated. In Filmora, adjust keyframes to dip the music slightly during dense speech and let it rise in the gaps. These touches are fast and they make even a basic track feel intentional.
When to Choose Version 1
Version 1 excels when speed and economy are the priorities. It is ideal for internal reviews, quick social clips, behind the scenes posts, or drafts that may change in timing repeatedly. Because it uses so few credits, you can generate multiple variations without concern. Use Version 1 when the music will not be the focus, when the visual content carries the narrative, and when you only need a steady, unobtrusive bed that does not distract from the message.
Version 1 is also useful if you rely on external mastering or if you plan to replace the bed later with licensed music. It acts as a placeholder that lets you build the structure of your edit while ensuring that your pacing is comfortable in the presence of music.
When to Choose Version 2
Version 2 demands more credits, so it should be reserved for moments where refinement matters. If your video has emotional beats, story arcs, or branded segments where musical identity contributes significantly to perceived production value, Version 2 may provide better transitions and more expressive phrasing. It can be worth using for title sequences, product showcases, or narrative bridges where awkward looping would be conspicuous.
It may also help in situations where your narration is dense and you need a track that gracefully vacates space around speech. A better shaped dynamic bed can reduce the effort spent on manual level control. As with any AI helper, test in context and trust your ears. If the difference is small and few viewers would perceive it, you may decide that credits are better saved for other tasks.
Task List and Troubleshooting
If your generation stalls or fails, the task list is your first diagnostic tool. Confirm that the task status updates, and if it remains stuck on converting for too long, check your network connection. Consider restarting Filmora to clear any temporary state that could interfere with cloud requests. If tasks repeatedly fail, try Version 1 as a sanity check. Success with Version 1 suggests that the service is reachable and that Version 2 may be momentarily strained.
Keep an eye on software updates. Cloud features often benefit from patch releases that address reliability. If you are mid project, it can be safer to complete your work on a stable version, then update before the next project to avoid surprises in a production timeline.
Audio Quality Expectations
Generated music has improved remarkably over recent years, but it still leans towards safe harmonic progressions and rhythm patterns that suit a wide range of videos. This is not a flaw. It is a design choice that ensures broad usability. Expect chord patterns that are familiar, tempos that match typical speech pacing, and textures that avoid extremes. Version 2 may inject more variation and better transitional material, but it will still aim to be supportive rather than dominant. If your content requires highly specific genre conventions, you might still prefer a curated track from a library.
With that in mind, train your ear to listen for the qualities that matter in background music for your context. The absence of sudden distractions, the smoothness of swells, and the ability to sit under speech at low volume without vanishing. If the generator provides these reliably, it is already meeting the core requirement for a background bed.
Integration With Other Filmora Features
Once the track is on the timeline, Filmora makes it easy to integrate with effects, titles, and transitions. Use markers to sync music transitions with visual changes. If you rely on titles with animated entrance and exit, align the peaks of the music with those moments for a cohesive impression. Consider pairing the AI generated bed with gentle sound design elements such as button clicks or swooshes at key points to reinforce visual events while keeping the bed stable and unobtrusive.
Should you choose to layer multiple music cues, keep in mind that two generated tracks can sometimes conflict if their tonal centres differ. Use EQ to carve space or reduce overlap, and watch your master bus for headroom to avoid clipping when you stack elements.
Licensing and Usage Considerations
AI generated music within Filmora is intended to be used in your projects without separate licensing hassles. Even so, it is wise to review the terms of your Filmora plan to ensure that your intended use, including commercial publishing and monetised platforms, is covered. Keep documentation of your project sources and versions. If you later decide to replace the AI bed with licensed tracks, preserve stems and mixes so that you can swap cleanly without reworking the entire audio flow.
Common Pitfalls and Solutions
Sometimes the generator may produce a track that feels repetitive, ends a little too sharply, or does not quite match the mood. These are easy to address within a normal editing process.
- Repetition fatigue. Reduce exposure by trimming a looped section or by introducing brief ambience breaks to reset the ear.
- Abrupt endings. Apply a tailored fade and, if necessary, add a short tail with a reverb effect to soften the stop.
- Mood mismatch. If the track feels too energetic or too mellow, adjust overall level and consider regenerating with a different section length or with a slightly altered edit timing.
- Frequency conflicts. Carve out mid range or high end with EQ to avoid clashes with voice frequencies.
If you find yourself repeatedly adjusting the same elements, document your preferred settings and apply them as presets to save time in future projects.
A Balanced Verdict
After testing both versions under straightforward conditions, the difference in sound can be modest. Version 1 already achieves the primary goal of providing usable background music quickly. Version 2 likely offers a more refined composition process that shows its strengths in complex sequences or in more emotionally sensitive edits. With such a dramatic credit difference in the example, the pragmatic choice is clear. Use Version 1 for drafts and general purpose background beds. Reserve Version 2 for final cuts that benefit from enhanced transitions and texture. Let your ears and your project goals guide you, rather than the optimism of feature labels.
In the end, what matters is workflow efficiency and audience experience. If your viewers perceive a smooth, polished video with music that supports without distracting, the tool has done its job. Filmora 15 provides both speed and the option to dial up quality when you need it. That flexibility is precisely what makes this feature valuable.
I would love to hear your impressions. Do you hear a meaningful difference between Version 1 and Version 2 in your edits. How do you handle credit budgeting across projects. Share your thoughts and tips so others can refine their approach as well.

If this article helped you in any way and you want to show your appreciation, I am more than happy to receive donations through PayPal. This will help me maintain and improve this website so I can help more people out there. Thank you for your help.
HELP OTHERS AND SHARE THIS ARTICLE
LEAVE A COMMENT
I am an entrepreneur based in Sydney Australia. I was born in Vietnam, grew up in Italy and currently residing in Australia. I started my first business venture Advertise Me from a random idea and have never looked back since. My passion is in the digital space, affiliate marketing, fitness and I launched several digital products. You will find these on the portfolio page.
I’ve decided to change from a Vegetarian to a Vegan diet and started a website called Veggie Meals.
I started this blog so I could leave a digital footprint of my random thoughts, ideas and life in general.
If any of the articles helped you in any way, please donate. Thank you for your help.
Affiliate Compensated: there are some articles with links to products or services that I may receive a commission.