I’ve been a WordPress user for over 10 years and it’s a highly recommended tool for basic to advanced website owners. In actual fact, this website is using WordPress as a content management system and I’ve stuck to WordPress because of the versatility and plugins available to achieve functions that I want the website to have. I have even created WordPress plugins (or hired someone to develop them which I will share in the near future) and it’s been really useful.
Now, the reason for this post was to show you how I managed to add my own content to the bottom of the blog posts. Below is a screenshot of what I managed to display at the bottom of each post, which is a short paragraph and a PayPal donation button.

I originally used a WordPress plugin to achieve this, however, I recently noticed that it affected the websites overall SEO rankings. In particular, Yoast (a popular plugin for SEO) picked up the footer content as the blog post meta description. This caused some of my blog posts to lose page rankings as I was able to confirm this by checking a popular post I published. The post was ranked 1st on certain keywords for the past month and I recently discovered it was no longer displaying on the 1st page. I decided to look into this further and eventually removed the plugin.
I was planning to create my own custom plugin (or hire a freelancer to create one for me), but after some research, I found that it may be easier to just add a function (code) to the WordPress child theme. If you are not using a child theme then I recommend you should look into this. Using child themes basically mean that when you upgrade the WordPress parent theme, any custom changes you made to the files won’t be affected. If you had something specific you changed in your WordPress site by modifying the code in the theme, then it makes sense to do this in your child theme.
THE CODE
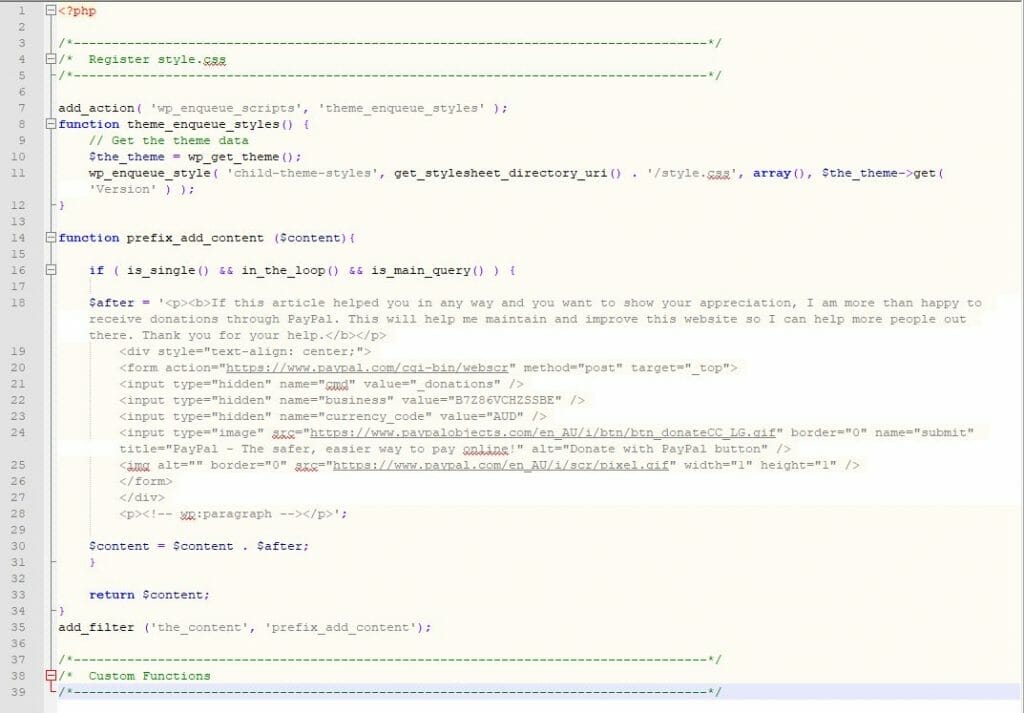
These are the changes I needed to add my unique content to the bottom of every WordPress post. You will need to edit the functions.php or create this file in your WordPress child theme and then add the following code:
function prefix_add_content ($content){

	if ( is_single() && in_the_loop() && is_main_query() ) {

    $after = '<p><b>If this article helped you in any way and you want to show your appreciation, I am more than happy to receive donations through PayPal. This will help me maintain and improve this website so I can help more people out there. Thank you for your help.</b></p>
		<div style="text-align: center;">
		<form action="https://www.paypal.com/cgi-bin/webscr" method="post" target="_top">
		<input type="hidden" name="cmd" value="_donations" />
		<input type="hidden" name="business" value="B7Z86VCHZSSBE" />
		<input type="hidden" name="currency_code" value="AUD" />
		<input type="image" src="https://www.paypalobjects.com/en_AU/i/btn/btn_donateCC_LG.gif" border="0" name="submit" title="PayPal - The safer, easier way to pay online!" alt="Donate with PayPal button" />
		<img alt="" border="0" src="https://www.paypal.com/en_AU/i/scr/pixel.gif" width="1" height="1" />
		</form>
		</div>
		<p><!-- wp:paragraph --></p>';

	$content = $content . $after;
	}

	return $content;
}
add_filter ('the_content', 'prefix_add_content');
In the above example, I added the content I wanted to display in the $after variable. Since I was using HTML code to display the PayPal button I had to use the ‘ (apostrophe) instead of the ” (inverted commas). The only caveat was to make sure the content in the variable doesn’t use ‘ e.g I originally had the word “I’m” in the paragraph so I changed that to “I am”. Otherwise, the code will interpret the ‘ as the flag to end the content of the variable. Once you save this file, refresh your blog post page and confirm that it works.

If you don’t want to display the custom content just on the blog post but on all pages, then remove the if statement. This statement basically tells the function to display the bottom content on blog posts only:
if ( is_single() && in_the_loop() && is_main_query() ) {
}
If you also want to display content at the beginning of the post, then you will need to create another variable called $before and change the $content code to:
$content = $before . $content . $after;After applying these changes, check your Yoast meta description to ensure it is displaying the correct information. I hope this helped some of you out there.

If this article helped you in any way and you want to show your appreciation, I am more than happy to receive donations through PayPal. This will help me maintain and improve this website so I can help more people out there. Thank you for your help.
HELP OTHERS AND SHARE THIS ARTICLE
LEAVE A COMMENT
I am an entrepreneur based in Sydney Australia. I was born in Vietnam, grew up in Italy and currently residing in Australia. I started my first business venture Advertise Me from a random idea and have never looked back since. My passion is in the digital space, affiliate marketing, fitness and I launched several digital products. You will find these on the portfolio page.
I’ve decided to change from a Vegetarian to a Vegan diet and started a website called Veggie Meals.
I started this blog so I could leave a digital footprint of my random thoughts, ideas and life in general.
If any of the articles helped you in any way, please donate. Thank you for your help.
Affiliate Compensated: there are some articles with links to products or services that I may receive a commission.


