Whether you’re designing a quick banner for a company announcement, producing social posts on the fly, or mocking up visuals for a pitch deck, Microsoft 365 Copilot Chat makes image generation remarkably accessible. However, anyone who has worked with AI‑generated imagery knows this: the text that appears inside those images can be messy, misspelt or just not quite what you wanted. In this guide, I’ll walk you through a practical, reliable way to edit text directly within AI‑generated images using Copilot—no need to export the image and fiddle with external graphic tools. We’ll go step-by-step, expand on the nuances and pitfalls, and highlight best practices for typography so your final visuals look polished and professional.
Why this workflow matters
AI art models have come a long way in the past few years, but the generation of embedded text is still a common weak point. You might see slight spelling errors, odd spacing, or letters that look convincingly similar but are actually wrong upon closer inspection. You might also want to tailor the messaging to different audiences, or update the text after you see the finished image. Instead of going back and forth repeatedly with prompts—hoping the model gets it right—there’s a straightforward in‑app editing approach that gives you precise control.
Getting Started: Generate an Image with Copilot Chat
Open Copilot Chat and craft a clear prompt
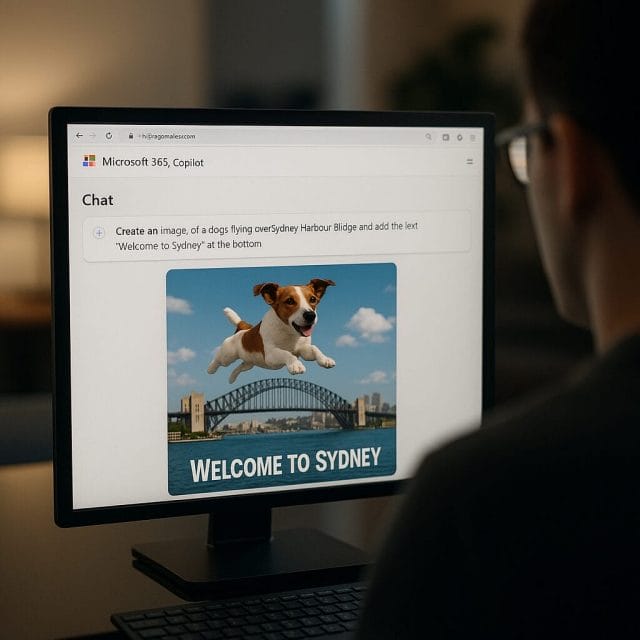
Begin in Microsoft 365 Copilot Chat. In your chat prompt, describe the visual you want and include any text you want to appear within the image. For example:
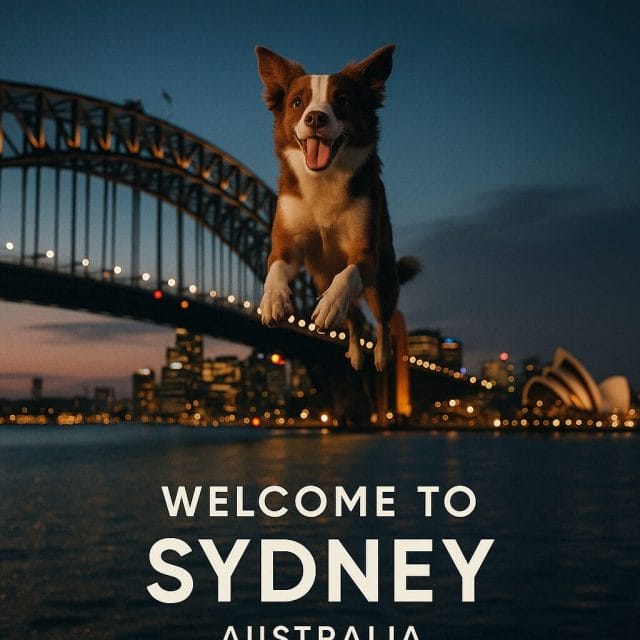
“Create an image of a dog flying over Sydney Harbour Bridge and add the text ‘Welcome to Sydney’ at the bottom.”
It’s helpful to be explicit about where the text should appear (“at the bottom”) and how prominent it should be. You can also specify style cues—for instance, “in bold white lettering”, “all capitals”, or “with a subtle drop shadow”—though keep in mind that the generation process may interpret style instructions loosely. What matters most is getting a working version of the image quickly so you can refine the text in the next steps.
Let Copilot render the image
Copilot will show status messages such as “generating the image”, “rendering”, and “adding final touches”. This typically takes a few seconds, though more complex compositions may take longer. Patience pays off—allow the tool to finish refining before you judge the result.
Review the initial output carefully
When the image appears, check two things: the overall composition (does it feature the elements you asked for?) and the text (is it legible and correctly spelt?). In our example, the dog is flying over the Sydney Harbour Bridge, and you can even spot the Opera House in the scene—a nice touch.
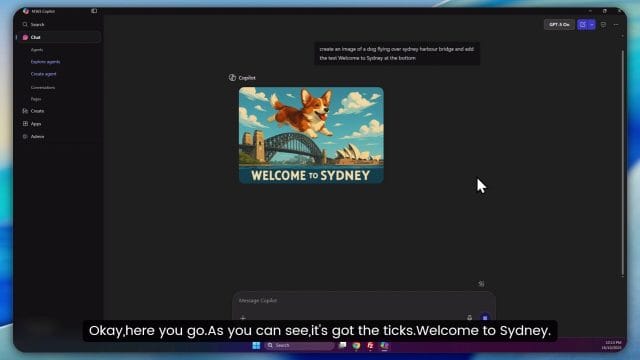
The generated text “Welcome to Sydney” sits at the bottom as requested. It looks decent, but perhaps you want to add “Australia” or adjust the typographic styling for brand consistency. It’s tempting to simply prompt again—“please add ‘Australia’ at the end”—but this can be hit‑and‑miss. Instead, we’ll use Copilot’s image editing features to adjust the embedded text directly and predictably.
Before You Edit: Why Prompting Again Is Often Unreliable
Text generation within images is fundamentally tricky
The AI is optimising for a cohesive image, not for typographic accuracy. Letters are complex visual structures, and the model may produce shapes that look like characters, not actual, consistent typography. Re‑prompting can also alter other parts of the image (background, colours, composition) when you only want to tweak the text.
Downloading and editing elsewhere is slow
Yes, you can download the image and open it in a graphics editor, but you’ll be rebuilding text overlays from scratch. This is time‑consuming, and if the background is noisy or contains gradients, your manual edits may not blend as well without extra work. Copilot provides a middle ground: keep the generated image intact, but make the text editable.
The Better Way: Edit the Text Inside the Generated Image
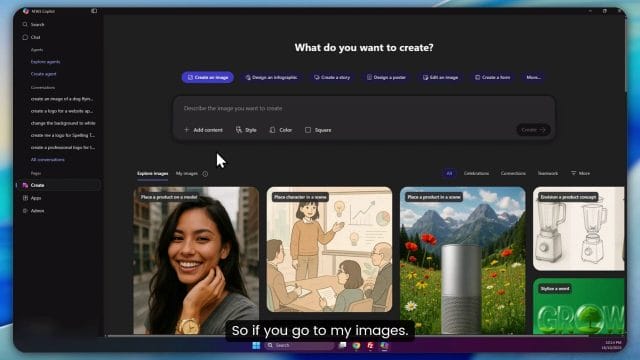
Navigate to the Create panel and your image library
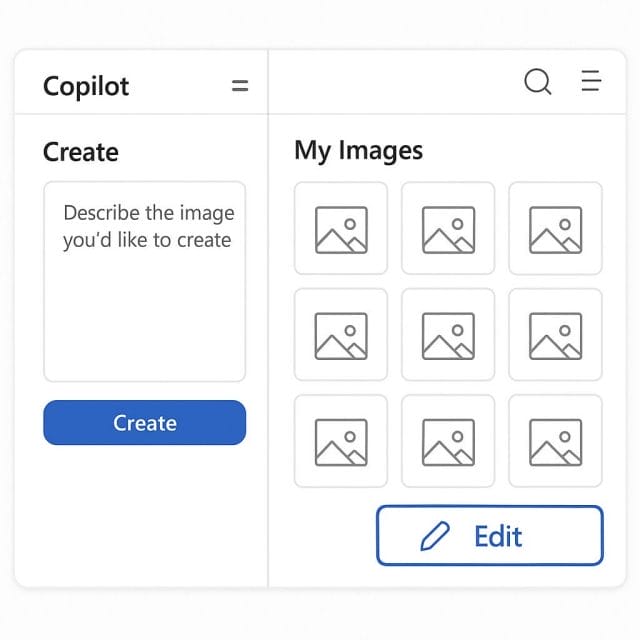
Once the image is generated in Copilot Chat, look beyond the chat pane. In the Copilot interface, there’s a “Create” section—this is where your generated assets are gathered. Open “Create”, then go to “My Images”. You should see the image you’ve just generated in the library.
Click the image to open its details. Among the options, you’ll see “Edit”. Select that. This is where Copilot unveils a very useful feature: “Make text editable”. Activate it to let Copilot scan the image, analyse the text, and convert it into editable elements. Essentially, Copilot performs an intelligent text extraction—think of it as an AI‑powered OCR (optical character recognition) blended with an understanding of the image’s layout.
How “Make text editable” works under the bonnet
When you click “Make text editable”, Copilot identifies regions of the image containing text and creates editable layers. These are overlaid on the image in a way that preserves the visual effect while letting you change the content, position and size. In many cases, Copilot will also infer font characteristics (weight, size, alignment) and give you controls to adjust them. It’s not a full‑blown design suite, but it’s perfectly suited to making precise, quick corrections or additions.
Refining the Message: Editing, Resizing and Repositioning
Change the text content
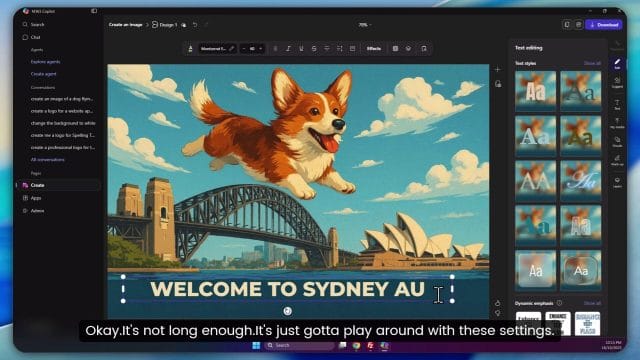
With the text now editable, click into the text box and start typing. In our scenario, you might transform “Welcome to Sydney” into “Welcome to Sydney — Australia”. If you prefer a cleaner line, you could keep “Welcome to Sydney” and add a second line beneath with “Australia”, depending on the layout you like.
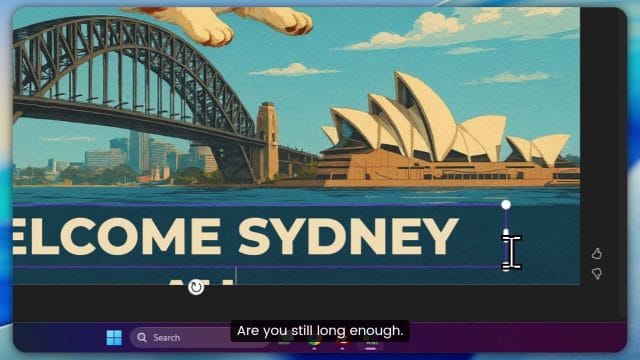
As you edit, pay attention to length and spacing. If the new wording is longer, the text may wrap or overflow, making the composition feel cramped. Use the font size controls to adjust. Try sizes like 60, then 40, to see how the text sits on the canvas. If you accidentally change only part of the text, remember to select all before resizing so everything is consistent.
Adjust the typography
Beyond size, look at alignment (left, centre, right) and styling (bold, italic, colour) if available. For images with darker backgrounds, white text with a subtle drop shadow improves readability. On lighter backgrounds, darker text with slightly increased weight can create better contrast. If Copilot offers a colour picker, match your brand colours for a cohesive look.
Reposition for balance
Once you’ve adjusted the wording and size, drag the text box to a comfortable position. You’ll often find the bottom centre works well for banners, but consider the visual weight of the rest of the image—the bridge’s arches, the dog’s position, and any skyline elements. Remember, great composition guides the viewer’s eye rather than competing with it.
Why this method beats re‑prompting
Re‑prompting can cause the model to regenerate the entire image, sometimes losing details you liked—such as the presence of the Opera House or a pleasing colour palette. Editing the text layer leaves the image untouched while giving you control over the message. It also fixes those classic AI text quirks: swapped letters, inconsistent kerning, or oddly shaped punctuation.
Typography Tips for AI‑Generated Imagery
Legibility first
- Contrast: Ensure strong contrast between text and background. If necessary, add a subtle shadow or semi‑transparent shape behind the text to lift it off the image.
- Size: Err on the side of slightly larger text for social posts, where users skim content quickly on small screens.
- Weight: Use a medium to bold weight for titles. Thin fonts can vanish against busy backgrounds.
Keep line length comfortable
Long lines of text are harder to read. If your message is lengthy, split it across two lines or consider a shorter headline paired with a descriptive caption elsewhere. For hero images, punchy, concise wording tends to work best.
Match brand guidelines where possible
If you have a brand typeface, pick a close equivalent in Copilot’s options (if provided) or at least align with the brand’s overall typographic approach—sans‑serif for modern, serif for formal, script for playful. Maintain consistent case usage (Title Case vs sentence case) across materials for a professional feel.
Troubleshooting: When Text Extraction Isn’t Perfect
Text not detected?
Occasionally, Copilot might struggle to detect text, especially if the lettering is highly stylised or blends into the background. Try the following:
- Run “Make text editable” again if the option allows.
- Increase contrast by temporarily adding a shape or background overlay behind the text (if available) and then retry extraction.
- If all else fails, add a new text layer—it won’t be the original embedded text, but it will give you precise control.
Multiple text regions
If your image contains several text areas, Copilot should provide separate editable elements. Edit them one by one, keeping visual hierarchy clear (headline larger, subtext smaller). Align elements thoughtfully—avoid accidental misalignment by using guides if they’re available, or by visually referencing prominent lines in the image (e.g., the horizon or architectural edges).
Language and special characters
For non‑English languages or special characters, verify the output carefully. AI text extraction might misinterpret accented letters or symbol spacing. If you encounter issues, manually correct the text and choose a font that supports the character set you need.
Exporting and Sharing: Make Your Image Work for You
Check resolution and format
Before downloading, review the image dimensions and format options. For social media, JPEG or PNG are common; PNG keeps text crisp with lossless compression. If you plan to overlay additional elements later, PNG may be preferable. For print, aim for higher resolution where possible to avoid pixelation.
Add alt text for accessibility
Wherever you publish, include descriptive alt text. For our example, something like: “A playful image of a dog flying over Sydney Harbour Bridge with the text ‘Welcome to Sydney — Australia’ at the bottom.” This improves accessibility and can aid SEO.
Versioning and collaboration
Use “My Images” as a simple version control system. Create variations (e.g., different text treatments or colour themes), name them clearly, and share with colleagues for feedback. Because you’re editing inside Copilot, your team can replicate the workflow quickly without relying on external design tools.
Deep Dive: Why AI Struggles with Text—and How Copilot Helps
Text in diffusion models
Most image generation systems are diffusion models that iteratively refine noisy signals into cohesive pictures. They’re brilliant at textures, lighting and composition, but textual accuracy isn’t their primary objective. Letters become shapes treated like any other visual pattern, which is why “Sydney” can turn into “Sldney” or “Welcome” looks almost right but not quite. The “Make text editable” feature compensates by applying a more deterministic layer on top, prioritising readability and correctness.
OCR plus layout understanding
Copilot’s approach marries OCR with contextual understanding—identifying where text lives and how it interacts with the rest of the scene. This means that when you edit the text, you don’t tear the image apart. Instead, you refine the message while respecting the design composition generated by the model. For busy teams, this is a huge productivity boost.
A Practical Walkthrough: From Prompt to Polished Visual
Step 1: Generate the baseline image
Prompt: “Create an image of a dog flying over Sydney Harbour Bridge and add the text ‘Welcome to Sydney’ at the bottom.” Let Copilot render. Inspect the dog’s position, the bridge, and whether the Opera House appears. Check the baseline text.
Step 2: Open the image in Create → My Images
Locate your image in “My Images”, click it, press “Edit”. Choose “Make text editable”. Wait a moment for Copilot to prepare the editable layers. This processing time is typically short.
Step 3: Edit the text content
Replace or supplement the text with “Australia”. Experiment with typography: try font sizes 60 and 40 to find a comfortable balance. If your line becomes too long, consider hyphenation or a visual separator like an en dash “—” (“Welcome to Sydney — Australia”) for clarity.
Step 4: Reposition for impact
Even small adjustments—nudging the text a few pixels or changing alignment from centre to right—can improve balance. Keep clear of busy areas in the image. If the sky is cleaner than the water, place text over the sky to avoid noise. Aim for coherent spacing from image edges.
Step 5: Final checks and export
Zoom in to ensure text edges are crisp. Confirm legibility on both desktop and mobile screens. Export to PNG for crispness or JPEG for smaller file size, depending on your distribution channel. Save a copy with layers intact if Copilot allows, so you can return and make quick tweaks later.
When the “Edit” Button Doesn’t Appear
Possible reasons and remedies
- Feature availability: Ensure your Microsoft 365 environment includes Copilot’s image creation and editing capabilities. This may depend on licence and rollout status.
- Image source: If the image wasn’t generated via Copilot’s “Create” feature, it may not support the same editable text tools.
- Refresh and re‑open: Occasionally, UI elements surface after refreshing or re‑entering the “Create” panel.
- Alternate flow: If “Edit” is unavailable, consider re‑generating with a similar prompt, then proceed again via “My Images”.
Beyond Text: Other Handy Tweaks
Colour and contrast adjustments
If Copilot offers basic colour tools, fine‑tune hues to suit your brand or improve mood. For example, a twilight blue can enhance the drama over Sydney’s skyline, making white text pop. If tools are limited, keep your tweaks minimal to avoid artefacts.
Layout variations for different platforms
Create platform‑specific versions: a square crop for Instagram, a wide banner for LinkedIn, a vertical story format for mobile. In each, reposition text to avoid critical elements being cropped by platform UI (e.g., profile icons, caption overlays).
Consistency across campaigns
Save templates: Once you’re happy with a particular look—typography sizes, line breaks, positions—reuse it as a blueprint for future images. Consistency makes campaigns recognisable and professional.
Security, Compliance and Responsible Use
Data handling within Microsoft 365
Working inside Microsoft 365 means benefiting from its enterprise‑grade security and compliance frameworks. Still, be mindful of the content you generate and share. Avoid using sensitive or private information in prompts. If your organisation has specific compliance guidelines, ensure your usage of AI‑generated imagery aligns with those policies.
Copyright and usage considerations
Check the terms for AI‑generated content in your Microsoft 365 tenancy. While AI‑generated images are typically usable in commercial contexts, your organisation may have additional guidelines about brand representation, disclaimers, and external publishing.
Real‑World Use Cases
Marketing and social media
Rapidly produce event teasers, announcements and location‑specific graphics. Edit text to tailor messages for different markets (“Welcome to Sydney — Australia” vs “Hello from London — UK”) without re‑creating the entire image every time.
Internal communications
Use approachable visuals for internal newsletters or team updates. Editing text in‑place lets you update dates, names or slogans in seconds when plans change.
Presentations and training materials
Build slide visuals that entertain and inform, especially when you want to convey a concept with a touch of whimsy—like our flying dog over the Harbour Bridge—and refine messaging directly in Copilot to keep the deck cohesive.
A Note on Quality: Striking the Right Balance
Don’t overdo it
It’s easy to keep tweaking. Aim for a clean, legible headline and a cohesive composition. If the image looks busy, reduce text length or simplify styling. Strong visuals plus concise text are often more impactful than dense copy.
Test on mobile
Most audiences encounter content on mobile first. Preview your image on a phone to ensure text remains readable and the focal point is clear. Adjust size and positioning accordingly.
Conclusion: Edit Smart, Create Fast
Microsoft 365 Copilot Chat offers a practical route to high‑quality visuals without the heavy lift of traditional design software. The key underused feature—“Make text editable”—lets you correct mistakes, refine wording and dial in typography with precision, all while keeping the original AI‑generated composition intact. In our example, we took a charming image of a dog soaring over Sydney Harbour Bridge, confirmed the Opera House in the background, and transformed the embedded caption from “Welcome to Sydney” to “Welcome to Sydney — Australia”. We adjusted the font size, repositioned the text for balance and ensured clarity across devices.
In short: generate quickly, edit intelligently, and publish confidently. With Copilot’s text editing workflow, your images can be both imaginative and impeccably readable—ready for social feeds, slides, and campaigns that need to look polished without slowing you down.

If this article helped you in any way and you want to show your appreciation, I am more than happy to receive donations through PayPal. This will help me maintain and improve this website so I can help more people out there. Thank you for your help.
HELP OTHERS AND SHARE THIS ARTICLE
LEAVE A COMMENT
I am an entrepreneur based in Sydney Australia. I was born in Vietnam, grew up in Italy and currently residing in Australia. I started my first business venture Advertise Me from a random idea and have never looked back since. My passion is in the digital space, affiliate marketing, fitness and I launched several digital products. You will find these on the portfolio page.
I’ve decided to change from a Vegetarian to a Vegan diet and started a website called Veggie Meals.
I started this blog so I could leave a digital footprint of my random thoughts, ideas and life in general.
If any of the articles helped you in any way, please donate. Thank you for your help.
Affiliate Compensated: there are some articles with links to products or services that I may receive a commission.