I’ve been using Wondershare Filmora X for a few years to create YouTube videos. There are other video tools I’ve used which I’ve shared on my TOOLS page but I tend to use Wondershare Filmora for editing any video captures that are big in file size. Uploading large GIGABYTES of data is slow and I prefer to work on these types of files locally on my computer since the video rendering will be much quicker and you also have more control as to editing the video.

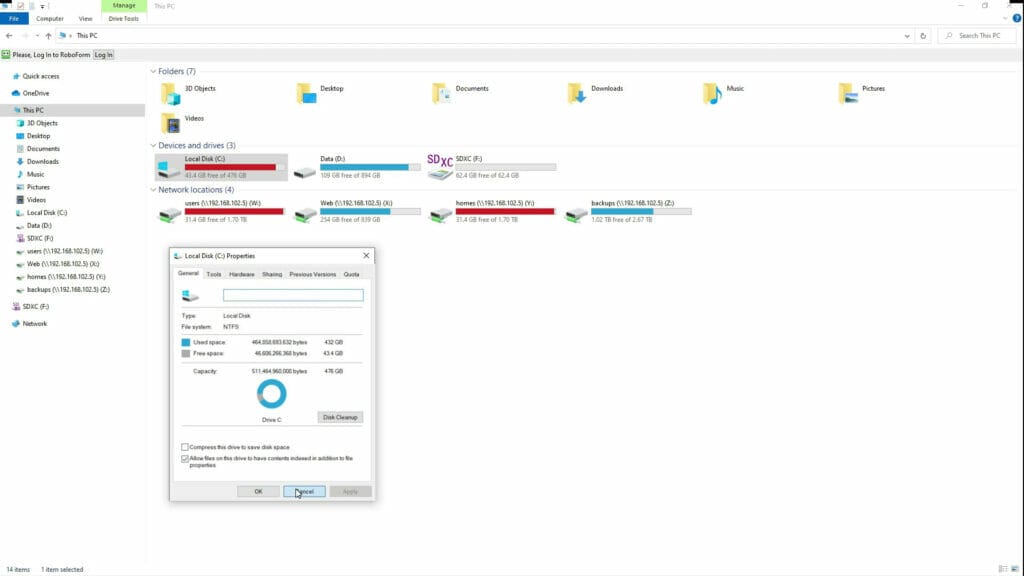
My laptop was running low on disk space and I discovered that there was about 48.3 GB of data used by Wondershare Filmora cache. There are two options you can use to delete this cache.
OPTION 1 – MANUAL
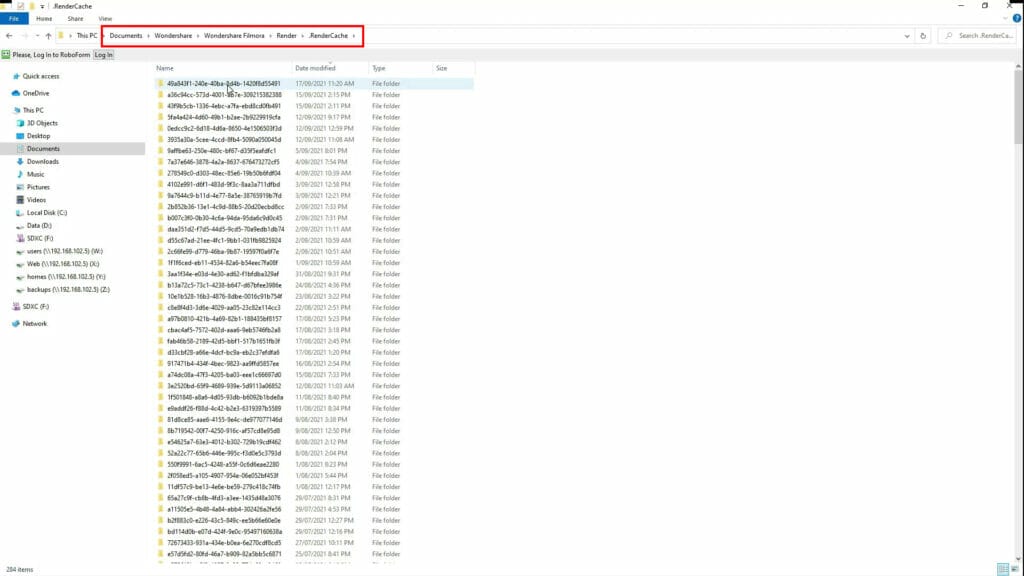
- Open Windows Explorer and go to the folder Documents\Wondershare\Wondershare Filmora\Render
- Select and delete all folders and files
- Check disk space to confirm
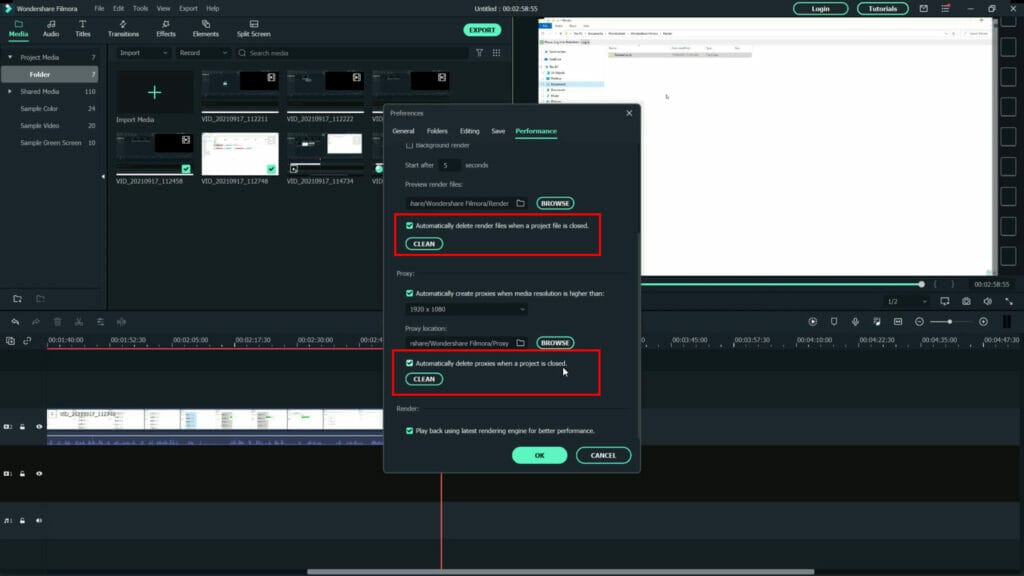
OPTION 2 – WONDERSHARE FILMORA SOFTWARE OPTIONS
- Click on File preferences
- Click on Performance
- Click on Preview render and select clean and select automatically delete
- Click on Proxy – Clean and select automatically delete
- Click on OK to save
Here’s a video of both options on HOW TO RECOVER DISK SPACE WHEN USING WONDERSHARE FILMORA
Here’s the YouTube transcription:
Hello, everybody in this video I’m going to show you how to recover some disk space that is being used by Wondershare Filmora. A couple of days ago, I was looking at my hard drive and I noticed that it was getting low on disk space.
So I went through and found out that Wondershare Filmora was using about 48 gigs of cache data, so I’m just going to show You where that is located and how you can recover some of the disk space from Wondershare Filmora. So let’s get started. [, Music, ] notice, you got to open up windows explorer, as you can see, I’ve got 44 or 43 gigabyte of free space. On my c drive. This drive is about 500 gigs, so I just wanted to recover some disk space and I found that if you go to documents, Wondershare Filmora and then, if you go to the render folder, there’s a dot render cache.
So it looks like there’s a lot of cache files here. I’ll just show you an example: that’s not a good example. Just here, there are all these 10 MB files and that obviously just adds up a lot of wasted space.
So what you can do is just delete all those files, but let me show you how much space is being used just by this render cache folder that’s 48. 3 gigs Of just cache files that are being used. So what you can do is, if you’re still thinking of using some of the projects that you’ve recently created just look at the date and see, maybe I’m going to delete these files and folders so anything before the 12th I’m going to get rid of.
So I’ve got some Folders dated back from last year, so delete these so hopefully I’ll regain about 40 gigs of disk space that was just being used by you know cache files that I wasn’t gonna reuse. There you go so, let’s see how big the render cache folder is now, So that’s yep so reduced to by about 40-45 gigs. Let’s see how much space! Now I have it on my c drive.
I’ve got 88 gigs now free. So that’s one way to recover more disk space. If you have the option that I’m gonna show you how to remove that render folder and files using Wondershare Filmora.
So if you click on a file then go to preferences and then click on the Performance tab. You see, there’s a section called preview render, and this is the same folder here – that I showed you previously, where all the render files cache were located so by default. I don’t believe this is selected to automatically delete render files when the project is closed, so you may want to select that so that when the project is closed, it would automatically Delete all those render cache files.
You also have the button here to tell it to remove all the render files. So if you click on that, yes, also in the proxy same thing, automatically delete proxies when a project is closed was not selected. So you can select that and press the clean button and remove all The proxy files and then make sure to hit ok to save the settings and that’s the two options that allow you to recover some disk space.
I hope this video helped if you did give it a like and subscribe to the channel.