Getting your runs from a Samsung Galaxy Watch into Strava without ever pressing start can feel like magic when it works well. The watch detects that you are running, records a GPS track in the background, and—if you have set things up correctly—pushes the activity straight to Strava with a map, pace, and all the essential metrics. The key to making this seamless process dependable is a precise configuration on the watch and a proper connection between Samsung Health and Strava. This guide walks you through that setup in detail, explains why each step matters, and helps you troubleshoot quirks such as slight differences in recorded distance.
What You Need Before You Start
Compatible devices and software
Auto-detected runs and third-party syncing work best on recent Galaxy Watches and modern Android phones. While experiences vary slightly by model and software version, you will be in the best position if you have:
- A Samsung Galaxy Watch running Wear OS (for example, Galaxy Watch4, Watch5, or Watch6 series). Older Tizen-based watches can detect runs too but the menus and options may differ.
- An Android phone with the latest Samsung Health app installed. Keeping both the phone and watch software current helps avoid sync glitches.
- A Strava account (free or paid).
- A stable internet connection on your phone for the final sync to Strava.
Accounts and apps to install
- Samsung Health on your phone (required). You do not need to install the Strava app on the watch for this workflow. The sync we are enabling is between Samsung Health and Strava via your phone.
- (Optional) Strava app on your phone for quick verification and editing of activities after they sync.
Permissions and settings you will enable
Auto-run detection alone is not enough. Strava relies on GPS data for outdoor runs, and Samsung Health will only record a GPS track for auto-detected workouts if you grant the right permissions and toggle the correct setting. You will enable:
- Auto-detect for running on the watch.
- Record location for auto-detected runs.
- Precise location permission for Samsung Health (and for the watch’s location service).
- The connection between Samsung Health and Strava with sharing of workouts.
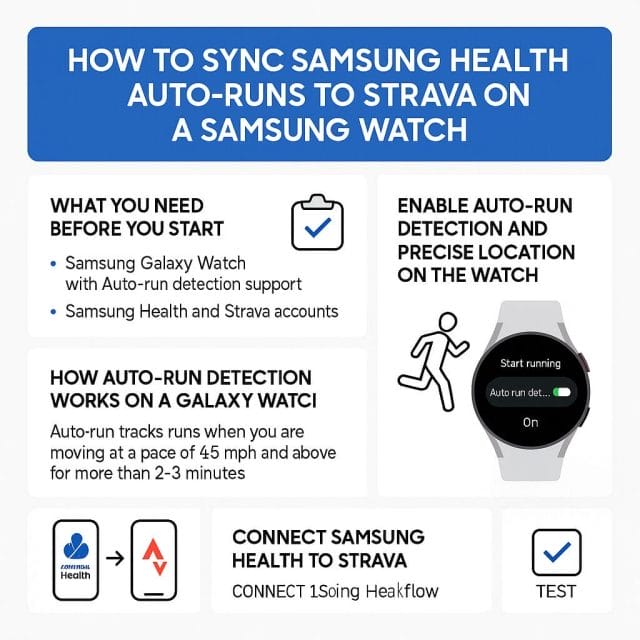
How Auto-Run Detection Works on a Galaxy Watch
Samsung’s auto-detect feature uses movement patterns, heart rate trends, and cadence hints to infer that you have started running. The watch listens passively for activity, and once certain thresholds are met (for example, consistent cadence and speed sustained for a few minutes), it flips into a “running” state without you having to press any buttons. You might notice a small banner or vibration on the watch reading “Running (auto)” when this happens; that is your confirmation that the workout has been detected and is being tracked.
Auto-detect versus manual start
When you start a run manually from the Workout app, the watch clearly records GPS (assuming location is enabled). Auto-detect is more subtle because it begins in the background, and without the correct settings, it may not record GPS. The benefit of auto-detect is convenience—you do not need to break your rhythm to tap a button. The trade-off is that the start time might be a touch late, and depending on your configuration, GPS may not be captured unless you have explicitly enabled it for auto-detected activities.
Why location recording is essential for Strava
Strava treats outdoor runs without GPS differently and may not import them reliably from Samsung Health. Even when they do import, they will not display a route or map, and key pace metrics can be limited. In practice, ensuring that Samsung Health “records location” for auto-detected runs is the switch that determines whether your auto-run shows up in Strava as a proper outdoor run with a map. Without it, the run often stays in Samsung Health only or appears in Strava in a reduced form.
Enable Auto-Run Detection and Precise Location on the Watch
The core configuration lives on your watch inside Settings under Health. You will make two important changes: enabling auto-detect for running and allowing that mode to record precise location. Follow these steps carefully:
- On your Galaxy Watch, open Settings.
- Scroll down and tap Health.
- Locate Auto-run or Auto-detect workouts (wording can vary slightly by model and software).
- Open Activities to detect and ensure Running is enabled.
- Find Record location and turn it on for auto-detected runs.
- If you see an option for precision or “Precise location,” choose precise rather than approximate.

Once enabled, the watch will record GPS automatically whenever it auto-detects a run. You will see “Running (auto)” during the workout, and a route map should be available in Samsung Health afterwards. That same GPS track is what allows Strava to accept and render the activity properly.
Understanding precise versus approximate location
Modern Android permissions distinguish between approximate and precise location. On the watch, and in Samsung Health’s permissions on your phone, make sure precise location is allowed. Approximate location can place you in a broad area, which is not adequate for a detailed GPS track. Precise location ensures the watch can acquire GPS satellites and write a clean route with distance and pace derived from actual positioning data.
Confirm location settings across watch and phone
- On the watch: Settings > Location. Ensure Location is On. If there is an Improve accuracy or similar option, enable it, but be mindful that Wi‑Fi/Bluetooth scanning can affect battery life.
- On the phone: Settings > Apps > Samsung Health > Permissions > Location. Set to Allow all the time and enable Use precise location. This helps when Samsung Health participates in the sync pipeline.
Granting “Allow all the time” for Samsung Health on your phone does not constantly share your location; it merely prevents background permission conflicts that can block GPS metadata from being saved or synced after the workout.
Connect Samsung Health to Strava
Strava does not pull data directly from your watch. It receives activities from Samsung Health through a secure connection you configure in the Samsung Health app on your phone. Without this link, your runs—auto-detected or otherwise—will remain in Samsung Health only.
Set up the connection
- Open Samsung Health on your phone.
- Tap the menu or three-dot icon and go to Settings.
- Find Connected services and select Strava.
- Sign in to your Strava account when prompted and authorise Samsung Health to upload activities on your behalf.
- Confirm that “Workouts” or “Activities” sharing is enabled in the permissions screen. If there is a “Location” or “Maps” related toggle, ensure it is on as well.
After authorisation, Samsung Health will push supported workouts to Strava shortly after they are saved. The first sync can take a few minutes, and you might see a slight delay compared with manual Strava uploads.
One-way versus two-way sync
In this workflow, the sync is largely one-way: Samsung Health uploads to Strava. Editing titles, shoes, or notes in Strava will not reflect back into Samsung Health. Keep this in mind when you decide where to maintain your training log details. Many runners keep Samsung Health as the capture tool and do all annotation in Strava to take advantage of segments, clubs, and training analysis.
Test the Entire Workflow
With auto-detect and precise location in place, and the Samsung Health–Strava connection fully authorised, you can do a simple field test to ensure everything is working. Here is a reliable way to validate the setup:
Pre-run checklist
- Watch battery at or above 30% to avoid power-saving behaviour that can limit GPS or background processing.
- Location turned on in the watch’s settings, and Record location enabled for auto-detect runs as described earlier.
- Phone connected to the internet (Wi‑Fi or mobile data) for after the run, so the sync to Strava can complete.
- Samsung Health open at least once recently on your phone. You do not need to keep it open during the run, but opening it ensures background permissions and services are awake.
What you will see during the run
Start jogging at your normal pace. Within a few minutes, the watch should recognise the activity and display a small notification such as “Running (auto).” Some models will vibrate to confirm detection. You do not need to tap anything; the watch will quietly record the workout, including GPS, as long as you enabled Record location. If you glance at the watch mid-run, you should see the running workout screen showing pace, time, and heart rate.
Finishing the run
When you stop and remain still for a short period, the watch will typically prompt you to end the session, or it will auto-end after it detects inactivity. If it asks whether to save the workout, choose Save. A brief summary should appear with duration, distance, average pace, and possibly a small route preview. The activity will now be present in Samsung Health on both the watch and the phone.
Syncing to Strava
After saving, give it a few minutes. Open Strava on your phone and refresh the feed. If all is configured correctly, you should see a new run uploaded by Samsung Health. The title might be generic at first—something like “Afternoon Run”—and you will be able to tap into it to see the map, distance, pace splits, and elevation. If you do not see it straight away, wait five to ten minutes and refresh again. Initial syncs can take a bit longer, and mobile connectivity can add delay.
Interpreting “Running (auto)” and Example Differences
It is normal for an auto-detected run to appear with a small “auto” tag on the watch and in Samsung Health. When that run reaches Strava, it looks like a standard outdoor run. One point to anticipate is minor variation between the distance on the watch and the distance that Strava displays. For example, a run recorded as 5.24 km on the watch might arrive in Strava as 5.20 km or 5.28 km. This does not mean the sync failed; rather, Strava applies its own distance calculation based on the GPS points, sometimes smoothing or recalculating the path. In the transcript scenario, the distance differed, but the activity still imported correctly with the map intact and pace metrics available.
Why do distances differ?
There are several reasons for these slight discrepancies:
- Sampling rates: Your watch records GPS at a set interval and may interpolate distance between points. Strava recalculates using its own algorithms, occasionally yielding a different total.
- Smoothing: Both Samsung Health and Strava smooth noisy GPS traces. Each platform’s smoothing can trim corners differently or remove brief signal jumps.
- Auto-pause rules: If your watch and Strava treat short stops or very slow sections differently, moving time and average pace can shift, indirectly changing the reported distance if pauses affect how distance is counted.
- Signal quality: Tall buildings, tree cover, and poor satellite geometry lead to zig-zag paths that one platform might correct more aggressively than the other.
As long as the route map is present and the run resembles what you did, a small difference is expected and not a sign of misconfiguration.
Make GPS Recording Reliable
Auto-run detection is only as good as the GPS track beneath it. To improve GPS fidelity and reduce distance discrepancies, try the following practices:
- Give the watch a brief sky view at the start: Two or three seconds with your wrist still can help it lock satellites sooner, even for an auto-detected start.
- Avoid starting under heavy cover: Dense trees or buildings can delay initial lock and introduce path drift. If possible, begin in an open area.
- Keep the watch snug: A stable fit improves heart rate readings and motion detection, both of which inform auto-detect. It also reduces wrist movement noise that can confuse the algorithm.
- Disable extreme power saving during runs: Modes that restrict sensors or background processes can degrade GPS. Standard battery saver is fine; ultra-aggressive modes can be problematic.
- Update firmware: Watch and phone updates often contain GPS and Bluetooth improvements that quietly enhance tracking and sync stability.
Deep Dive: The “Record Location” Toggle
This single setting is the lynchpin of the entire workflow. On some devices, auto-detected activities do not capture location by default, because the system aims to conserve battery when you have not explicitly asked to track a workout. Toggling Record location tells Samsung Health that when it is confident you are running, it should turn on the GPS radio and store coordinates. In other words, detection plus location equals Strava-ready runs.
Where to find it and what it looks like
As shown earlier, go to Settings on your watch, then Health, then into auto-detection or auto-run settings. You should see a switch labelled Record location or a similar phrase. If the interface also includes an accuracy option, choose precise. Once active, you might notice a tiny increase in battery consumption during auto-detected runs compared with auto-detected walks without GPS—this is normal and reflects the GPS receiver at work.
What if “Record location” is missing?
Menus can vary. If you do not see Record location inside the auto-detect section, check the general Location setting on the watch and ensure Samsung Health has location permission. On some builds, enabling Location for the watch at the system level implicitly allows auto-detected runs to record GPS. You can verify by performing a short test run and checking whether a map appears in Samsung Health afterwards. If a map is present, Strava should receive one too.
Auto-Detect Behaviour and Timings
Auto-detect often waits for a consistent pattern before it starts counting. This can be a minute or two of running, sometimes longer if your pace is inconsistent at the very beginning. When you see “Running (auto),” that is when the workout is formally created. If you are warming up with a brisk walk and only start jogging later, the watch may decide to treat the earlier part as a walk and only switch modes when you cross the running threshold.
Ending and saving automatically
Similarly, auto-detect will not end the workout the instant you stop. It looks for inactivity or a strong change in motion to make sure you are really done. Expect a short delay. If you prefer exact control over start and stop times, consider starting runs manually for races or intervals. For everyday outings, the convenience of auto-detect typically outweighs a small lead-in or tail-out in the total time.
Troubleshooting: When Auto-Runs Do Not Sync to Strava
If your run shows up in Samsung Health but not in Strava, work through this checklist:
- Was a map recorded? Open the run in Samsung Health. If there is no map, Strava may ignore it. Ensure Record location is on for auto-detected runs and repeat the test.
- Is the Samsung Health–Strava connection still authorised? In Samsung Health > Settings > Connected services > Strava, ensure the connection is active. If in doubt, disconnect and reconnect, reauthorising permissions.
- Is your phone online? The watch saves to Samsung Health locally, but the push to Strava requires the phone to upload. Connect to Wi‑Fi or mobile data and open Samsung Health once after the run.
- Did you wait long enough? Allow five to ten minutes. High server load or background restrictions on the phone can slow the initial upload.
- Are battery restrictions blocking background sync? On your phone, ensure Samsung Health is not heavily restricted in Battery or Background usage settings. Allow background activity and do not force-optimise.
Fixing “No map” in Strava
If the activity reaches Strava but shows no map, the GPS data may be missing or flagged. Confirm that Record location was enabled, repeat a short test run, and check the map in Samsung Health first. Also confirm that Location is set to precise in permissions. If the run has a map in Samsung Health but not in Strava, try revoking and re-establishing the Strava connection in Samsung Health. Occasionally the first upload after reauthorisation reinitialises the data fields Strava expects.
Avoiding duplicates
If you also use the Strava app on your watch or phone to record runs, you could end up with duplicates in Strava: one from Samsung Health and one from Strava itself. To prevent this, choose a single recorder for outdoor runs. If you want to rely on auto-detect, do not start the Strava watch app. If you prefer to use Strava directly for more control, consider turning off auto-detect for running in Samsung Health to avoid duplicate uploads.
When distance is wildly off
Minor differences are normal, but if Strava shows something far from reality, inspect the GPS trace. Look for zig-zags, straight-line jumps, or missing segments. Causes and remedies include:
- Poor satellite lock early in the run: Give the watch a moment with a clear sky view before you set off.
- Interference: Urban canyons and reflective surfaces can confuse GPS. Try a route with more open sky for testing.
- Low battery mode: Some power-saving modes reduce GPS sampling. For reliable testing, keep enough charge to avoid aggressive saving.
Privacy and Safety Considerations
Enabling precise location means your routes are recorded accurately. If you share activities publicly on Strava, consider setting Privacy Zones around your home or office so the start and end of your runs are masked. In Strava’s Settings, you can define a radius around sensitive locations. This way, you still get a full map and distance while protecting your exact doorstep.
Samsung Health’s privacy controls also allow you to manage what data is visible in the Samsung ecosystem. Even if you keep Strava activities private, it is good practice to review your privacy settings periodically, especially after software updates that might introduce new options.
Tips for Consistent Auto-Detect Performance
Auto-detect is designed to be a helpful convenience. To make it feel dependable day to day, focus on these habits:
- Run consistently for the first minute: A steady cadence makes detection faster.
- Keep the watch clean and dry: Moisture or loose fit can degrade heart-rate accuracy, which is part of the detection model.
- Restart the watch occasionally: Like any computer, the watch benefits from a restart if detection seems sluggish after many weeks of uptime.
- Update the Samsung Health app: Algorithm improvements and small bug fixes arrive regularly.
- Be patient at transitions: The watch may take a moment to decide that you have stopped; let it confirm and save.
What You Should Expect After Setup
On a typical day, you head out the door and start jogging. After a short while, the watch vibrates and shows “Running (auto).” You complete your route and stop. The watch saves the run, producing a brief summary and a map preview. Within minutes, Strava shows a new run in your feed with the route line. The distance is very close to what you saw on the watch—sometimes a few hundred metres different on a long run, often identical on short ones. You can then rename the activity, assign shoes, and share it with your club. If anything fails, you now know the places to look: Record location, precise permissions, and the Connected services link to Strava.
Example Walkthrough: From Detection to Strava
To illustrate the complete flow in a concrete scenario, imagine you enabled the settings described above and set off on a neighbourhood loop. A few minutes in, your Galaxy Watch displays “Running (auto).” You continue for just over five kilometres. After a gentle walk to cool down, you stop and look at the watch. It offers to save the run, and you confirm. The summary shows 5.24 km, average pace 5:24 per kilometre, a heart rate chart, and a small map preview of your route.
Back at your phone, you open Strava. The run is there with a generic title. You tap it and see a familiar orange route line. Strava lists the distance as 5.20 km. This slight difference surprises you initially, but the route shape is identical and the pace chart looks reasonable. You rename the run to “Evening Loop” and add a quick note about a stiff headwind on the final kilometre. The experience is smooth end to end; you did not have to start or stop anything manually, and the data landed in the app where your friends can give you kudos.
Fine-Tuning for Power Users
If you want to take the setup further, consider these additional refinements:
- Auto-pause preferences: In the Samsung Health running settings, choose whether you want auto-pause. Strava has its own notion of moving time; aligning behaviour can yield closer pace metrics.
- Cadence sensors: If you run with a footpod or external sensor, check compatibility. Auto-detect will still work, but sensor input may change how distance is computed in Samsung Health versus Strava.
- Data fields: Configure the run screen to show the stats you care about—pace, lap pace, heart rate. While this does not change the Strava sync, it makes it easier to confirm mid-run that tracking is active.
- Workout categories: Ensure the detected activity is classified as Running rather than Walking. If the watch occasionally misclassifies, you can edit the category in Samsung Health before it syncs.
Common Questions
Do I need the Strava app on my watch?
No. This workflow relies on Samsung Health detecting and recording the run, then uploading to Strava via the phone app connection. Installing the Strava watch app is optional and mainly useful if you prefer to record directly with Strava or want live segment features.
Will indoor runs or treadmill sessions sync?
Indoor runs without GPS may not sync to Strava from Samsung Health reliably, and even if they do, they will not include a map. This guide focuses on outdoor runs where Record location is the key to getting full data into Strava.
What if I prefer manual control sometimes?
You can leave auto-detect on for everyday runs and still start a run manually for races or interval sessions. When you start manually, GPS is recorded automatically, and the sync to Strava will still occur through the same connection.
Will this affect battery life significantly?
Recording GPS always uses more power than not recording it, but because auto-detect only turns on GPS when it is confident you are running, the incremental battery impact is modest. Expect a few percentage points per hour of running, depending on your watch model and conditions.
Recap of the Essential Steps
- On your watch: Settings > Health > Auto-runs or Auto-detect workouts > Enable Running > Turn on Record location and set to precise.
- On your watch: Settings > Location > On.
- On your phone: Samsung Health > Settings > Connected services > Strava > Authorise and enable workout sharing.
- On your phone: Settings > Apps > Samsung Health > Permissions > Location > Allow all the time and use precise location.
- Test with a short outdoor run and verify the map appears in Samsung Health, then confirm it syncs to Strava.
With these configurations in place, your Samsung Galaxy Watch becomes a near-effortless capture device for your running. It detects when you move, records a precise GPS trace, and hands off the full activity to Strava, where it can join your training log, contribute to weekly totals, and collect kudos—all without a single manual tap to start or stop. If a test shows “Running (auto)” and a map in Samsung Health, you are set; the rest is simply a matter of putting one foot in front of the other.
What exactly syncs to Strava and how Strava interprets it
Once your watch and phone are configured correctly, Samsung Health sends a rich set of run data to Strava. Understanding what fields are included, how Strava interprets them, and why they sometimes differ helps you spot and fix anomalies quickly.
- GPS route: A series of latitude/longitude points that form your map. Missing route data is the most common cause of a “run without a map” on Strava. If the map is absent in Samsung Health, it won’t appear in Strava.
- Elapsed vs moving time: Samsung Health records the total duration and applies auto-pause (if enabled). Strava recalculates moving time based on its own logic, which can differ slightly, especially with brief stops or low-speed sections.
- Distance: Derived from the GPS trace (and sometimes refined against motion sensors). Strava may apply light smoothing, leading to small variations from Samsung Health’s distance.
- Pace and splits: Computed from distance and time. In Strava, splits might not perfectly match Samsung Health if each platform rounds kilometre markers differently.
- Heart rate: Provided your watch captured HR and the Samsung Health → Strava link includes workout data, HR syncs to Strava. If HR is missing in Strava, check permissions and ensure the watch fit is snug.
- Cadence: Typically included for outdoor runs; displayed in Strava under analysis. If not present, ensure “Allow all the time” location permission and motion sensors are functioning normally.
- Elevation: Galaxy Watches use a barometric sensor plus GPS. Strava may optionally apply “Elevation Correction,” replacing your recorded elevation with its terrain model. This can improve total ascent in flat areas but sometimes over/underestimates in urban canyons.
- Calories: Samsung Health sends an estimate; Strava may recompute using your profile data. Expect minor variance.
- Device metadata: Strava often recognises the device model (e.g., “Samsung Galaxy Watch6”) and uses that to decide whether to trust onboard elevation.
Key takeaway: small differences are normal. If the map is captured and the start/end times look right, your run is in good health. Prioritise a clean GPS trace and stable HR over perfect agreement on per-kilometre splits.
Elevation specifics and when to use Strava Elevation Correction
Elevation is notoriously fickle. Barometers drift with pressure changes, and GPS altitude has greater error than horizontal position. Strava’s “Elevation Correction” can help, but should be used judiciously.
- Hilly routes with open sky: The barometer’s relative changes are usually accurate. Leave correction off unless your ascent looks wildly inflated or deflated.
- Urban canyons or tunnels: Correction can improve total ascent because GPS altitude and barometer may be upset by pressure shifts or signal bounce.
- Flat routes: Differences are small either way; choose whichever produces a stable total ascent over multiple runs.
- Track runs: Cumulative ascent should be near zero. If it isn’t, try elevation correction for that activity or calibrate the watch’s barometer.
To toggle Elevation Correction, open the activity in Strava, tap the three dots (More), and look for Elevation Correction. Availability may vary by device recognition.
Health Connect, connected services, and avoiding duplicate uploads
On modern Android, you may encounter two possible pathways for sending workouts to Strava:
- Samsung Health connected service to Strava (the one you set up earlier). This is the most direct and reliable for Galaxy Watch runs.
- Health Connect, a system-level data hub on Android 13/14+. Samsung Health can write workouts to Health Connect; Strava can read workouts from Health Connect.
If both pathways are active, you risk duplicates. To keep things tidy:
- Prefer the built-in Samsung Health → Strava connection for Galaxy Watch runs.
- If you also use Health Connect for other apps, review Strava’s Health Connect permissions and disable “workout import” there if Samsung Health already uploads directly. Keep HR, sleep, or body metrics syncing via Health Connect if you need them; just avoid double-ingesting workouts.
- If duplicates do appear, delete one copy in Strava (keep the one that has HR and the complete GPS map).
Note: The Samsung Health → Strava link doesn’t depend on Strava’s Health Connect integration. It will work even if Health Connect is off.
Running without your phone: LTE, Wi‑Fi, and sync timing
Auto-detected runs recorded on the watch will sync to Strava as soon as the data flows from the watch to Samsung Health on your phone and the phone can reach Strava. Consider the following scenarios:
- Watch + phone together outdoors: The watch records the run; it syncs to the phone soon after you save; the phone uploads to Strava. Expect a few minutes’ delay.
- Watch without phone, then back home: The watch stores the run locally. When it reconnects to your phone (Bluetooth/Wi‑Fi), it syncs to Samsung Health on the phone, which then uploads to Strava.
- Watch with LTE but no phone: Even with LTE, the Strava upload still typically goes via the phone’s Samsung Health app. The watch may back up to your Samsung account, but the direct Strava “send” happens when the phone syncs. Keep this in mind on trips—connect your watch to your phone whenever convenient to flush the queue.
Bottom line: If you don’t immediately see the run on Strava after going phone-free, don’t panic. Open Samsung Health on your phone when you’re reconnected; give it a minute on Wi‑Fi or mobile data; the upload should complete.
Reducing delay and preventing stuck uploads
Most uploads happen within a couple of minutes after saving the run. If a run lingers in Samsung Health but not in Strava, try this quick routine:
- Open Samsung Health on your phone and leave it on the Exercise history screen.
- Check your phone’s connectivity (Wi‑Fi or mobile data) and disable any data saver or VPN that could block outbound connections.
- Open the run detail page for 5–10 seconds, then back out—this often nudges the app’s sync worker.
- Lock and unlock the phone, then reopen Samsung Health. Check Strava again after a minute.
If the run still doesn’t appear on Strava:
- Reauthorise the Samsung Health ↔ Strava link in Samsung Health > Settings > Connected services > Strava. Sign out and back in if needed; ensure workout data sharing is enabled.
- Temporarily disable battery optimisations for Samsung Health and Strava (see below).
- Restart your phone and watch; then reopen Samsung Health and wait on the history page for a minute.
As a last resort, export the workout file (GPX/TCX) from Samsung Health and upload it to Strava manually (see the “GPX rescue” section below).
Battery and background settings that affect auto-sync
Android’s battery management can be overzealous. A few small tweaks keep auto-detect and auto-sync running smoothly:
- On your phone: Settings > Apps > Samsung Health > Battery > choose Unrestricted (or “Not optimised”) so it can run sync jobs in the background.
- Repeat for Strava if you use the app on your phone (optional but recommended).
- Settings > Connections > Data usage > allow background data for Samsung Health and Strava.
- If you use a system data saver or app-level data saver, whitelist Samsung Health and Strava.
- On the watch: Avoid Ultra power saving during runs. Standard power saving can be okay, but ensure Location remains on and “Record location” for auto-detect stays enabled.
These changes improve reliability without a big battery penalty. If you’re concerned, monitor battery over a few runs and adjust as needed.
Auto-detect limitations and when to go manual
Auto-detect is brilliant for everyday runs; it’s less ideal for time-critical efforts where you care about the exact start/finish timestamp. Consider manual control in these cases:
- Races and parkrun: You want the moment the horn goes, not the moment algorithmic confidence crosses a threshold. Manual start avoids missing early metres of important segments.
- Track intervals: Corners and pace changes can be misinterpreted; use the watch’s Track Run or standard Run mode with manual lap controls for precise splits.
- Short sprints or hill reps: Auto-detect might not trigger if bursts are too brief or interspersed with walking.
- Complicated multi-stop routes: If you’re popping into shops or chatting mid-run, manual control makes pausing/ending clear and reduces classification confusion.
There’s no penalty for mixing modes. Use auto-detect for casual mileage and manual start for key workouts.
Edge cases: treadmill, indoor track, trail, and walk‑run
Treadmill and indoor track
Auto-detect may classify sustained indoor running, but there’s no GPS route. Strava will accept the workout and show pace/distance based on sensors, but mapping and outdoor segments won’t apply. To improve distance accuracy indoors:
- Use the Treadmill profile on your watch when possible and calibrate distance occasionally by comparing to the treadmill’s display.
- Consider a Bluetooth footpod if you do lots of indoor running; some models pair with Wear OS for better cadence/pace.
Trail running
Auto-detect is generally fine for trail, but canopy and terrain can challenge GPS. Tips:
- Give the watch a few seconds of sky view before you start downhill or into dense forest.
- Don’t worry if pace bounces under trees—that’s expected. The overall distance on Strava should still be reasonable.
- If elevation spikes or drops unrealistically, try Strava Elevation Correction on that activity.
Walk‑run and run‑commute
Walk-run intervals might start as “Walking” then switch to “Running (auto)” or vice versa. This won’t break sync, but you may prefer a manual Run start to keep a single clean activity. On commutes with frequent crossings, allow the watch a second or two after each stop; sharp starts/stops can confuse auto-pause and moving time.
Segments, achievements, and pacing nuances
Once your map and timing are sound, Strava’s segments and achievements will work as expected. Keep in mind:
- Segment starts are literal. If auto-detect kicks in 100 metres into your run, you’ll miss a segment that started at your door. For segment-chasing, use a manual start before approaching the segment.
- Auto-pause affects moving time and can affect segment detection if your pace dips below Strava’s moving threshold. If you don’t want auto-pause to play a role, disable it in your watch’s Run settings.
- Titles and gear: Strava auto-titles based on route context; you can rename runs and assign shoes. Samsung Health’s gear doesn’t sync to Strava automatically.
- Relative Effort and HR zones: Strava computes these from your HR if present; ensure your HR zones are set correctly in Strava for meaningful metrics.
Data correction and GPX/TCX rescue (manual upload)
If a workout refuses to upload to Strava, you can export it from Samsung Health and upload it manually:
- Open Samsung Health on your phone and go to Exercise > History.
- Select the run and tap the menu (three dots). Look for Export or Share as GPX/TCX. On some versions you’ll find “Save as file” then select GPX or TCX.
- Save the file locally or share it to a cloud service.
- In Strava (web or app), choose Upload > File and select the GPX/TCX. Confirm the activity type is Running.
If your app version doesn’t show an export option, check for updates, or use Samsung’s “Share” option to send the activity to email/cloud as a file. Manual upload preserves the map, time, and HR as recorded—ideal when a single activity is stuck.
When classification is wrong and how to fix it
Occasionally auto-detect records a run as a walk or other activity. Here’s how to correct it:
- In Samsung Health: Edit the workout type to Running before the Strava sync occurs. This keeps both platforms consistent.
- If it’s already in Strava, open the activity and change the sport type to Run. The map and stats remain intact.
- Reduce future misclassification by ensuring a steady cadence for the first minute and wearing the watch snugly.
Frequently overlooked settings that impact reliability
If you’ve followed the core setup and still have issues, double-check these often-missed switches:
- Phone Location: Settings > Location > On. Tap App permissions > Samsung Health > Allow all the time + Precise.
- Google Location Accuracy (phone): Settings > Location > Location services > Google Location Accuracy > On. This helps with quicker fixes when the phone assists the watch.
- Watch Location: Settings > Location > On. Confirm “Improve accuracy” options (Wi‑Fi/Bluetooth scanning) are enabled if available on your model.
- Samsung Health notifications: Allow notifications so you see any prompts about permissions or background activity restrictions.
- Background limits (phone): Settings > Battery > Background usage limits > Never sleeping apps: add Samsung Health (and Strava if used).
Problem scenarios, symptoms, and proven fixes
Run appears in Samsung Health but not in Strava
- Symptom: Activity visible with a map in Samsung Health; nothing in Strava after 15 minutes.
- Fixes:
- Open Samsung Health > Settings > Connected services > Strava and reauthorise.
- Disable any VPN and ensure background data is allowed.
- Temporarily set Samsung Health battery to Unrestricted and retry.
- Export GPX/TCX and upload manually if urgent.
Run syncs to Strava but map is missing
- Symptom: Distance and time appear in Strava; no map or a straight line.
- Fixes:
- On the watch, confirm Auto-detect Running has “Record location” enabled.
- Ensure watch Location is On during the run.
- On the phone, grant Samsung Health Precise Location “Allow all the time.”
- Test outdoors with clear sky; wait a few seconds before breaking into pace.
Auto-detect never starts, or starts very late
- Symptom: You ran for 10+ minutes without a “Running (auto)” prompt or it started halfway through.
- Fixes:
- Wear the watch snugly above the wrist bone; clean the sensor.
- Keep a steady pace for 2–3 minutes at the start; avoid prolonged warm-up walking if you want the run detected quickly.
- Restart the watch; update firmware and Samsung Health.
- For short runs or intervals, use manual start instead.
Distance is wildly off
- Symptom: Samsung Health shows 6.2 km, Strava shows 4.9 km (or vice versa).
- Fixes:
- Inspect the map in both apps. Gaps, zigzags, or straight lines indicate GPS dropouts—environment or battery mode likely at fault.
- Disable Ultra power saving during runs; ensure Location remains on.
- Run in more open areas for your next test to isolate environmental causes.
- Give the watch 10–20 seconds in open sky before setting off on key runs.
Heart rate missing in Strava
- Symptom: Pace and map present; no HR in Strava.
- Fixes:
- Ensure the watch recorded HR (visible in Samsung Health). If HR is missing there, adjust fit and sensor contact.
- Reauthorise the Samsung Health ↔ Strava connection to ensure HR permission is included.
- Avoid recording simultaneously with a third-party app that might monopolise the sensor.
Duplicate activities appear in Strava
- Symptom: Two versions of the same run, sometimes with slightly different metrics.
- Fixes:
- Don’t run Samsung Health and Strava (or another app) on the watch at the same time.
- Check if Strava is importing workouts via Health Connect and also via Samsung Health’s connected service. Disable one pathway.
- Delete the duplicate with the poorer map/HR.
Reauthorising Strava: what you should see
When you revisit Samsung Health > Settings > Connected services > Strava, you’ll be asked to sign in and approve data sharing. Confirm that “workouts” or “activities” are included in the scope. If you’re unsure whether the permission took effect, unlink, force-close Samsung Health, reopen, and link again.
If the connection page shows as linked but uploads still fail, toggle the link off and on, then save a very short test run and wait a couple of minutes. This often resets the pipeline.
Improving GPS and sensor accuracy: practical habits
You don’t need to baby the watch, but a few habits deliver consistently better maps and metrics:
- Sky view start: Before you surge off, give the watch a few seconds outdoors with clear sky. This primes GNSS and reduces early wobble.
- Stable first minute: Auto-detect locks on quicker when cadence and arm swing are consistent. Avoid faffing with keys/straps while moving.
- Snug fit: Aim for a tight but comfortable strap; the watch should not slide. This keeps HR clean and reduces motion artefacts.
- Periodic restarts: A weekly reboot of both watch and phone clears stale caches.
- Keep updated: Firmware and Samsung Health updates often include GNSS and sensor improvements.
- Avoid magnets: Strong magnetic closures near the watch can upset the barometer and compass, indirectly affecting route smoothing.
Barometer calibration and weather effects
Sudden pressure changes can nudge altitude readings. If your vertical gain looks odd on otherwise clean GPS days:
- Open the Barometer app on the watch (if available) and let it refresh while stationary.
- Ensure the watch’s vents aren’t blocked by sweat, sunscreen, or debris; gently rinse and dry.
- Compare multiple runs on the same route; if ascent drifts over time, consider using Strava Elevation Correction for that route.
Field guide: what you should see at each step
- Before the run:
- Watch Location On; Auto-detect Running On; Record location On (Precise).
- Phone Location On; Samsung Health has Precise Location “Allow all the time.”
- During the run:
- Watch shows “Running (auto)” within a minute or two of steady running.
- No Ultra power saving icons; HR icon present; GPS icon (if your watch face shows it) stabilised.
- End of run:
- Auto-detect ends shortly after you stop; confirm and save.
- Samsung Health activity shows a route map in its summary.
- Sync:
- Within a few minutes, the run appears in Strava with a map, HR, and splits.
- If delayed, open Samsung Health on the phone and wait on the history screen for a minute.
Migrating phones or resetting your watch
When you change phones or reset the watch, a few things need redoing:
- Reinstall Samsung Health on the new phone and sign into the same Samsung account.
- Re-link Samsung Health to Strava in Settings > Connected services.
- Grant Samsung Health “Allow all the time” + Precise Location on the phone.
- On the watch, re-enable Auto-detect Running and the “Record location” toggle for auto-detected workouts.
- Run a short outdoor test to confirm a map appears in Samsung Health and then in Strava.
If you rely on Health Connect for other apps, also review its permissions on the new phone to avoid duplicates.
Questions you might still have
Do I need the Strava app on my watch?
No. The Samsung Health → Strava connection on your phone is sufficient. The Strava watch app is optional if you prefer manual starts with Strava or want live segment features.
Can I see live pace and splits during an auto-detected run?
Auto-detect doesn’t usually show full on-run metrics panels like manual workouts do. If you need live data and lap controls, start a manual Run on the watch.
Will indoor runs upload to Strava?
Yes, but without a GPS map. Strava will show pace/distance if provided by the watch sensors. Label the activity appropriately (e.g., Treadmill) in Strava for clear logging.
Can I use an external HR strap?
Many Bluetooth HR straps pair with Galaxy Watch. If paired, HR from the strap will be recorded in Samsung Health and forwarded to Strava. This can improve HR quality during intervals or in cold weather.
Why is my pace choppy in tree cover?
Under canopy or near tall buildings, instantaneous GPS pace fluctuates. Strava smooths pace in analysis, but expect variations. Focus on overall distance/time and feel, or use manual laps for steady pacing.
Does the watch support multi‑band GNSS and will that help?
Some Galaxy Watch models support multiple constellations concurrently. Enabling high-accuracy modes can help in challenging environments, at a modest battery cost. Check your model’s Location settings for GNSS options and test what works best in your area.
Performance and battery tips for frequent runners
- Use Always On Display sparingly during runs to conserve battery; raise-to-wake is often enough.
- If you run daily, charge briefly after showers to keep the watch between 40–80%, which is healthy for long-term battery life.
- Keep only essential watch apps installed; fewer background processes means more consistent sensor behaviour.
- If you enable LTE, prefer Wi‑Fi when at home for faster sync and charging efficiency.
Confidence checks for race week
Before a race where accuracy and timing matter:
- Decide manual vs auto-detect. For races, manual start/stop is recommended.
- Verify Location On; disable Ultra power saving; ensure enough battery for race + cool down.
- If chasing segments, preview the route so you know where key segments start; start your manual recording a minute early.
- Post‑race, open Samsung Health on your phone as soon as practical to kick off the Strava upload.
A note on privacy and start/finish masking
Even with auto-detect, your start or end might be at home or work. Use Strava’s Privacy Zones to mask these locations. In addition:
- Set default activity visibility to Followers or Only You if you prefer to vet uploads before sharing.
- Crop the activity in Strava if auto-detect began or ended a little late and you want to trim the warm-up/cool-down near home.
- Review Samsung Health’s privacy controls for broader data types (HR, sleep, body metrics).
Putting it all together: the dependable automation loop
Here’s the loop you’re aiming for:
- Wear the watch snugly and head out. After a minute of steady pace, the watch switches to “Running (auto).”
- GPS is recorded because “Record location” for auto-detected runs is enabled.
- You finish; the watch auto-ends and saves. The activity in Samsung Health shows a map and HR.
- Your phone is online; Samsung Health uploads the run to Strava within a few minutes.
- In Strava, you see the route, pace splits, HR, and elevation. You rename it, assign shoes, and check segments.
If any step breaks, use the targeted fixes above rather than reinstalling everything. Most issues have a single root cause: a missing permission, background restriction, or a one-off signal quirk.
Quick diagnostic checklist (pin this)
- Map missing in Samsung Health? The issue is on the watch: re-enable Record location for auto-detect and confirm watch Location On.
- Map present in Samsung Health, missing in Strava? Reauthorise the Strava connection; check phone connectivity and app battery restrictions.
- Duplicate in Strava? Disable double pathways (Health Connect vs Connected services) and don’t run two recorder apps simultaneously.
- HR missing? Improve watch fit; confirm HR is visible in Samsung Health; re-link to Strava.
- Late starts? Use manual recording for critical efforts or brighten the first minute’s cadence for quicker detection.
Final tips for a smooth, set‑and‑forget experience
- After any system update (watch or phone), run a short outdoor test to ensure the auto-detect and sync pipeline still works.
- When changing phones, recreate the key settings: Samsung Health Precise Location “Allow all the time,” Connected services re-link, watch Record location toggle.
- For regular indoor runs, set a habit: manual Treadmill profile and a post‑run note in Strava to keep your log clear.
- If you’re chasing PBs on known segments, use manual start for those sessions. For everything else, enjoy the freedom of auto-detect.
- Reboot weekly, keep apps updated, and don’t overthink small distance differences—consistency beats perfection.
Conclusion
With the right toggles enabled and a few smart habits, your Galaxy Watch will detect your runs automatically, record clean GPS routes, and deliver them to Strava with the metrics that matter. The goal isn’t just convenience—it’s confidence: you get a faithful record of your training without babysitting start/stop buttons. Set it up once, test it with a short run, and then let the automation do its thing while you focus on running.

If this article helped you in any way and you want to show your appreciation, I am more than happy to receive donations through PayPal. This will help me maintain and improve this website so I can help more people out there. Thank you for your help.
HELP OTHERS AND SHARE THIS ARTICLE
LEAVE A COMMENT
I am an entrepreneur based in Sydney Australia. I was born in Vietnam, grew up in Italy and currently residing in Australia. I started my first business venture Advertise Me from a random idea and have never looked back since. My passion is in the digital space, affiliate marketing, fitness and I launched several digital products. You will find these on the portfolio page.
I’ve decided to change from a Vegetarian to a Vegan diet and started a website called Veggie Meals.
I started this blog so I could leave a digital footprint of my random thoughts, ideas and life in general.
If any of the articles helped you in any way, please donate. Thank you for your help.
Affiliate Compensated: there are some articles with links to products or services that I may receive a commission.