When I first dabbled in video editing, I never imagined that artificial intelligence could become such a powerful ally. Making videos used to involve countless hours of manual work, from scouring for the perfect soundtracks to editing voiceovers. Little did I know that my editing process would take a massive leap forward with the latest iteration of Wondershare Filmora – version 14. I’m going to share with you the latest Wondershare Filmora 14 features I have been using and some of these are exciting AI features that can transform your creativity and productivity, while making video creation feel a lot less daunting and a lot more fun! Here’s a video showcasing some of the features I use in Wondershare Filmora 14:
Getting Started with AI Tools in Filmora 14
Wondershare Filmora has come a long way. Since its early days, it has continually evolved, transforming into a sought-after video editing software. Now, with the release of Filmora 14, we see the introduction of new powerful AI tools that change the way we edit videos. But what does this mean for us as video editors?
Wondershare Filmora started as a straightforward editing tool.
Over time, it integrated advanced features, attracting professionals.
Now, with AI, it simplifies complex tasks and boosts creativity.
The evolution of AI tools enhances the editing experience dramatically. But why are these features game-changers? Let’s dive into that.
Why AI Tools are Game Changers
Think about it! AI tools help us save time and improve creativity in ways we never expected. For example, the AI music generation allows me to create custom background tracks with minimal effort. I can generate multiple samples and tailor them to fit my project and theme. This ease of access lets me focus on storytelling rather than getting stuck in the audio jungle.
A Quick Setup Guide
Open Filmora 14.
Navigate to the AI tools section from the main menu.
Select the tool you want to use—be it AI sound effects or voice enhancers.
Follow the straightforward prompts to customise your options.
Setting up these features is generally smooth. The user interface has been refined, making it easier than ever to find and use the AI tools. This is a significant upgrade compared to previous versions.
Learning Curve and Usability
I’ll be honest. While AI tools are user-friendly, there is still a bit of a learning curve. However, the intuitive design minimises frustration. A quick exploration of the tools, and you’ll find your rhythm. The fun part is experimenting! Don’t hesitate to play around with the voice changer or AI translation feature—they’re not just practical; they’re entertaining.
As you get familiar with Filmora 14, you’ll appreciate how AI elevates your editing process. With a little patience and practice, you’ll create stunning videos with ease.
Creating the Perfect Background Music with AI
Creating the right background music can transform your video. It sets the mood and engages your audience. With AI music generators, like Filmora’s, you can find the perfect track tailored to your needs. Let’s dive into how we can achieve this!
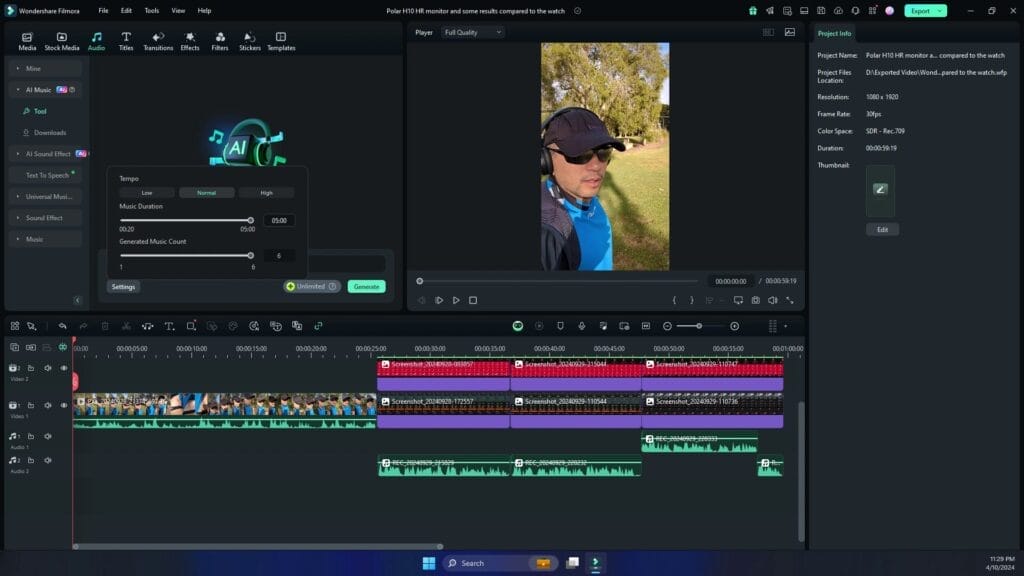
Step-by-Step Guide to Generating AI Music
Open the AI music generator. Go to the audio section of Filmora.
Select Your Mood: Choose a mood. Feel like something happy? Great! It’s essential to pick a vibe that matches your video content.
Generate Samples: Adjust the settings. For instance, I often raise the generation count to five. This gives plenty of options to choose from.
Download the Clips: Once samples are generated, click on download. Remember, if you don’t save them, they’ll be lost!
Integrate into Your Video: Drag and drop your chosen clip into your timeline. It’s like having a personal composer at your fingertips!
How to Select Music Mood and Tempo
The mood and tempo are crucial! Do you want a fast-paced track for an exciting scene? Or something slower for a sensitive moment? Adjust the tempo accordingly. For many videos, a normal tempo fits best. But don’t be afraid to experiment with higher tempos, especially for energetic content.
Tips on Downloading and Implementing Tracks Properly
Save Regularly: Download tracks as soon as you create them to avoid losing your work.
Label Your Tracks: Use clear names so you can find them later.
Test Before Finalising: Play the music with your video to ensure it fits well. Sometimes, a perfect track feels off during playback.
Using Multiple Audio Clips to Enhance Video Storytelling
Utilising different tracks can enrich the narrative. By layering clips, I can highlight contrasting moments in the story. For instance, softer music during emotional scenes and upbeat tracks during action-packed segments. This blend enhances engagement and keeps viewers connected.
The Role of Background Music
Background music is more than just sound it’s the video’s heartbeat. Good music evokes feelings, guiding the audience’s emotional journey. Many users, including myself, find AI-generated music offers new pathways to explore creativity. With just a few clicks, the audacious can harness the power of AI to craft unique soundscapes.
Every video I create is a blend of personal touch and technology. The new capabilities within tools like Filmora allow us to tell stories like never before.
Exploring Sound Effects and Voice Enhancement Features
How to Create Custom Sound Effects Using AI
Creating custom sound effects is easier than ever, thanks to artificial intelligence. With just a few clicks, you can generate unique audio clips that suit your project perfectly. I often start by selecting the desired sound type from a library or typing what I need into a search bar. Want a bell ringing or a thunderstorm? Just type it in, and voila! AI does the heavy lifting.
Once you’ve found the sound, it’s crucial to select and fine-tune the outputs. You can usually adjust parameters like duration and pitch. This customisation ensures the sound effects fit seamlessly into your video or podcast. It’s like tailoring a suit; a little adjustment makes all the difference.
Selecting and Fine-Tuning Sound Outputs
Start by generating multiple samples.
Listen to them all; pick your favourite.
Adjust settings if they’re not just right—this might include volume, pitch, or effects like reverb.
Trust me, taking the time to fine-tune will elevate your project significantly.
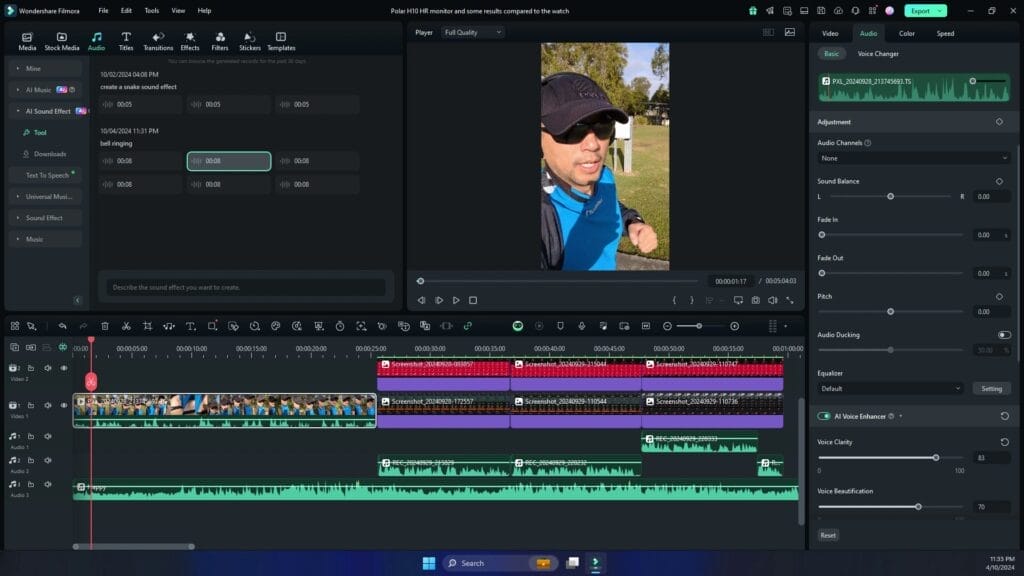
Enhancing Voice Recordings
Have you ever listened to a podcast and thought, “Wow, that sounds professional!”? Most times, it’s due to voice enhancement tools. With simple AI features, you can turn your home recordings into studio-quality audio.
By using the AI voice enhancer, I noticed an immediate improvement in the clarity and richness of my voice recordings. The difference is staggering; it’s like comparing a raw diamond to a polished one.
“With the right sound, you can take your audience on a journey!”
Comparative Analysis of Raw Audio Versus Enhanced Audio
To truly appreciate the power of enhancement, I often conduct a side-by-side comparison. I play the raw audio first, and then the enhanced version. The increase in quality is usually evident. Enhanced audio can remove background noise and even adjust tonal quality.
So, whether you’re producing a podcast or creating video content, never underestimate the power of sound. High-quality audio keeps your audience hooked. Give it a go, and enjoy the journey of sound creation!
Translating and Subtitling Audio with AI
Have you ever wondered how to make your video content accessible to everyone, no matter the language? It’s a game-changer, I promise! Using AI tools, like those in Filmora 14, we can translate and subtitle our audio clips with ease. Let me share how this works and why it’s vital.
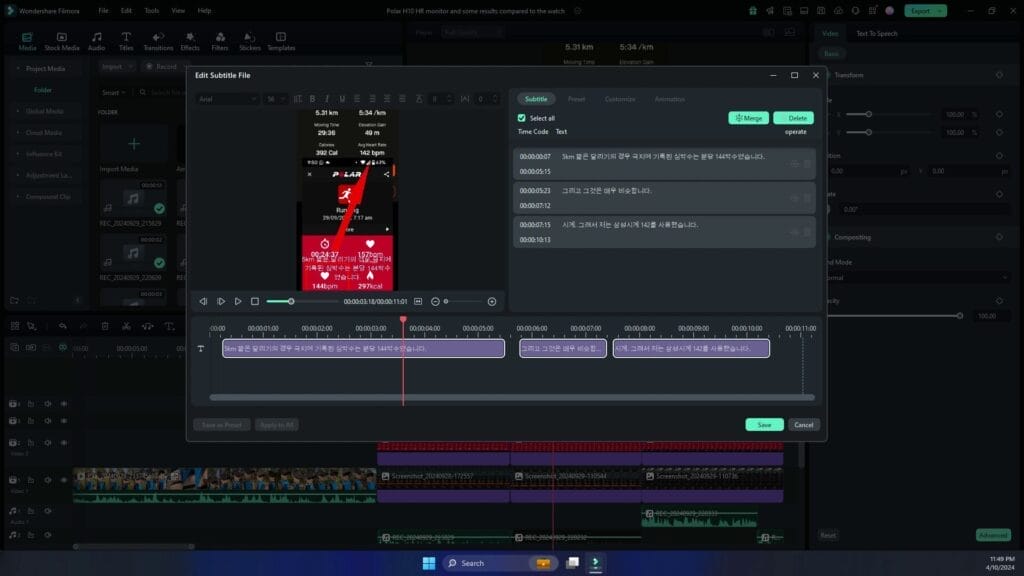
1. Demonstrating the Translation Function for Audio Clips
When I right-click on an audio clip in Filmora, I see the option to translate it into another language. It’s as straightforward as picking a target language—say, Korean—and clicking translate. In moments, I have a new audio file featuring the translated voice and text on my screen. It’s almost like magic!
2. Expanding Your Audience Reach
AI-generated subtitles can help widen your viewership. By making your content available in multiple languages, you’re not just targeting local audiences anymore. You’re reaching global communities.
3. Tips for Adjusting Subtitle Appearance
Keep sentences short. This improves readability.
Choose contrasting colours for the text and background to enhance visibility.
Position subtitles correctly – usually at the bottom centre works best but in some cases the top may be more suitable
I find these adjustments help the audience follow along seamlessly. It’s all about creating an enjoyable viewing experience.
4. Best Practices for Using Translations in Video Marketing
Use high-quality translations. Automated systems are useful, but manual checks ensure accuracy.
Engage with diverse cultural elements related to your translated content.
Monitor your analytics to see which languages resonate with your audiences.
These practices keep your marketing efforts meaningful and relevant.
Importance of Accessibility in Video Content
Making our videos accessible isn’t just nice; it’s essential. Think of how many potential viewers out there could benefit from subtitles. They create an inclusive environment and ensure everyone can enjoy and understand your message.
Some of the Languages Supported for AI Translation
Language
Language Code
English
EN
Spanish
ES
French
FR
Korean
KO
German
DE
Italian
IT
Portuguese
PT
Japanese
JA
Russian
RU
Dutch
NL
Arabic
AR
Polish
PL
Indonesia
ID
Hindi
HI
This is just a glimpse at why translating and subtitling with AI is so brilliant. With things like the AI translation features in Filmora 14, we can step into new territories and connect with audiences far and wide!
Future of AI in Video Editing
As I reflect on my own journey with video editing, I can’t help but marvel at how AI has transformed the process. Once upon a time, creating footage and audio clips felt daunting. Now, with tools like Wondershare Filmora 14, AI helps streamline those tasks. Tasks that once took hours can now be accomplished in a fraction of the time.
Future Developments to Anticipate
Looking ahead, several exciting developments are on the horizon. For instance, imagine a world where AI can predict the best content structure for your videos based on trends! What if software could recommend editing styles that best fit your audience? With AI becoming more integrated into creative processes, the possibilities are endless.
Encouraging Content Creators
It’s essential to encourage more content creators to leverage these tools. AI isn’t just for the pros—it’s for anyone eager to enhance their video editing skills. Plus, the more we experiment, the better we become. Think of AI as your assistant: guiding you, suggesting, and making the creative journey smoother.
AI voice cloning is a fascinating technology. It uses deep learning to replicate someone’s voice. But how does it actually work? First, the AI learns the unique vocal characteristics of a person’s speech. This is done by processing recordings of the person’s voice. Think of it as teaching a parrot to talk like you—only much more advanced.
Here’s a video I created showcasing this feature:
The Importance of Custom Voices
So, why would you want a custom voice for your video project? Here are several reasons:
Uniqueness: A custom voice sets your content apart.
Branding: It helps in establishing a personal brand.
Consistency: You can maintain a steady tone and style throughout your videos.
As the saying goes, “AI voice cloning allows creators to maintain authenticity even while altering audio outputs.” This ensures that viewers connect with the content on a personal level.
Practical Applications
Voice cloning can be applied in various video genres:
Education: Custom voices can make online courses more engaging.
Marketing: Tailor the audio to resonate with your audience.
Storytelling: Create unique audio experiences when narrating stories.
Imagine using your own voice to narrate a tale about a monkey, a lion, and a rabbit—just like I did in my video! It adds a personal touch that audiences love.
Step-by-Step Guide to Using AI Voice Cloning
Setting Up Wondershare Filmora
When diving into AI voice cloning, the first step is setting up Wondershare Filmora. It’s important to ensure you’re using the latest version for all the updated features. Open the software and create a new project. You can start by importing any initial clips you wish to edit.
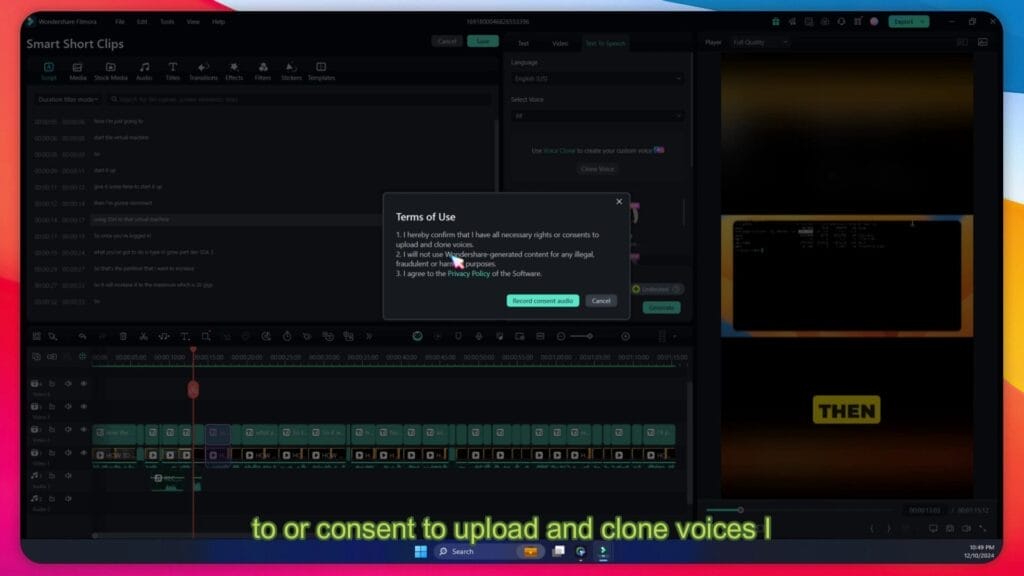
Recording and Uploading Your Voice for Cloning
Next, let’s get into the recording. To clone your voice, you’ll need to read a short script. Don’t sweat it, though! This is where the magic happens. I recommend picking something fun—like a humorous story or a personal anecdote. Once you’ve recorded your piece, upload it into Wondershare Filmora. Remember: you must accept the terms to confirm you have rights to use your voice.
Experimenting with Voice Options
Here, we get to the fun part: experimenting with voice options. Wondershare Filmora allows you to choose from various AI-generated voices. This can drastically change the tone of your video. It’s like trying on different outfits before a big event—how do you want your audience to feel? You may start with the available presets, or take it a step further and use your cloned voice to bring a personal touch.
As I mentioned in the video,
“Always be cautious with AI technology to ensure authenticity and ethical use.”
It may be tempting to dive into using multiple voices, but consider how your choices impact clarity and engagement.
And remember, you need a recorded script ready to extract those vocal tones and nuances. This planning ensures you get the best results when using AI voice cloning.
Creative Uses for AI Voices in Your Videos
Are you struggling to find the right voice for your video projects? Well, AI voices might just be the solution. They offer an innovative way to enhance storytelling and broaden your audience. Let’s explore how we can creatively use AI voices!
1. Enhancing Storytelling Through Character Voices
Imagine watching a video where characters come to life with unique voices. The power of a voice can transform a simple video into a compelling narrative. Using diverse character voices adds depth and drama to your storytelling. Don’t you think a funny monkey should sound different from a wise lion?
2. Using AI Voices for Multilingual Content
In our global world, reaching diverse audiences is crucial. With AI voices, you can create content in multiple languages effortlessly. Just think: the same engaging story can resonate with people in different countries! It’s a fantastic way to break language barriers and connect authentically.
3. Tips on Integrating Voice Cloning into Your Editing
So, how do we make the most of voice cloning? Here are three tips:
Start with a text transcription. It’s the key to entering the voice cloning world.
Experiment with different voices. Play around with character personas until you find the right fit.
Use your own voice to add a personal touch. This can create a stronger bond with your audience!
Voice cloning opens exciting avenues in video editing. We’ve mentioned the emotional impact of a character’s voice. Now, we can use AI-generated voices to enhance our projects. The technology allows us to narrate stories quickly and effectively, providing new perspectives.
Navigating Ethical Considerations with AI Technology
As I delve into the world of AI voice cloning, I can’t help but reflect on its profound implications. Voice cloning technology allows creators to generate synthetic voices from text, but what happens when we misuse this power? Understanding the implications of this technology is crucial for all of us. It can enhance storytelling but also poses ethical dilemmas.
Consent and Usage Rights
When we voice clone, we need to think about consent. It’s vital to have rights to clone someone’s voice. Think about it: would you want someone else imitating your voice without permission? That’s why I always stress the importance of obtaining consent before proceeding. It’s not just ethical; it’s a legal necessity.
Best Practices for Responsible Content Creation
So, how do we ensure we’re using AI responsibly? Here are some best practices:
Always disclose when you use a cloned voice in your content.
Focus on transparency with your audience—let them know what they’re hearing.
Prioritise ethical use over creative convenience.
Embracing AI voice cloning can revolutionise content creation, but we must stay vigilant. Are we ready to uphold ethical standards in our creations? Let’s ensure that exciting possibilities don’t lead us astray. By remaining committed to ethical practices, we can navigate the evolving landscape of AI technology responsibly.
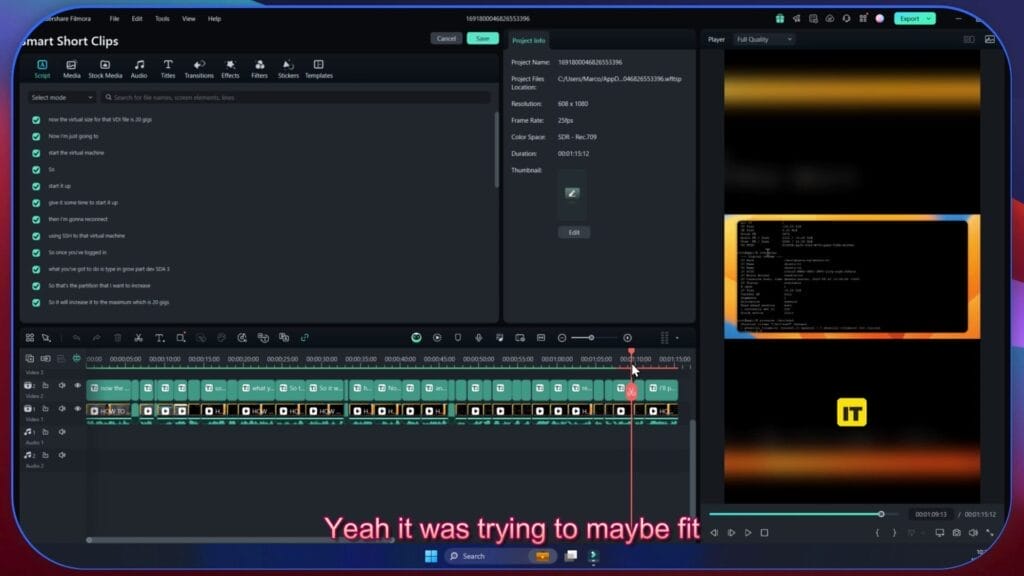
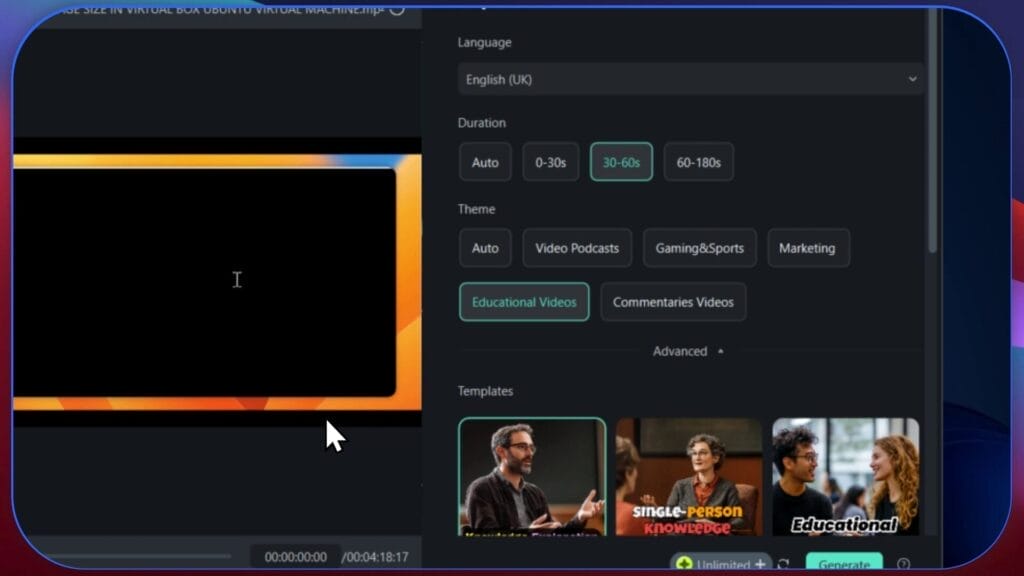
Understanding Smart Short Clips
What Are Smart Short Clips?
Smart Short Clips are designed to help us transform lengthy videos into condensed, engaging snippets. They’re perfect for platforms like Instagram or TikTok, where attention spans are short. The primary goal? To capture the viewer’s attention in a matter of seconds.
Integration with Existing Content
This feature elegantly integrates with our existing video content. Picture this: you have a 30-minute tutorial. With Smart Short Clips, you can drag and drop that entire video into the app. After selecting your preferred language and the right theme, you’ll be creating 30 to 60-second highlights in no time.
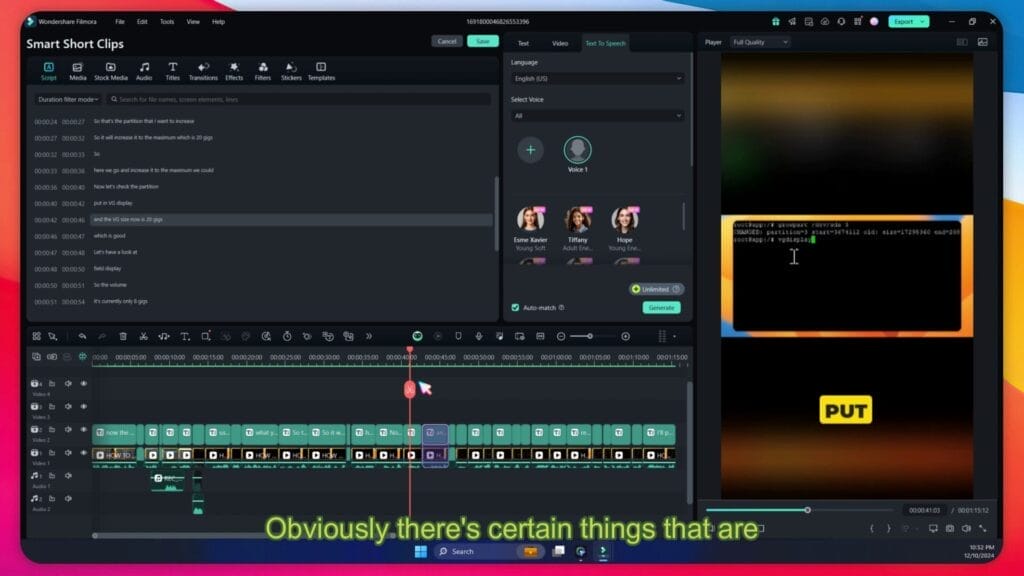
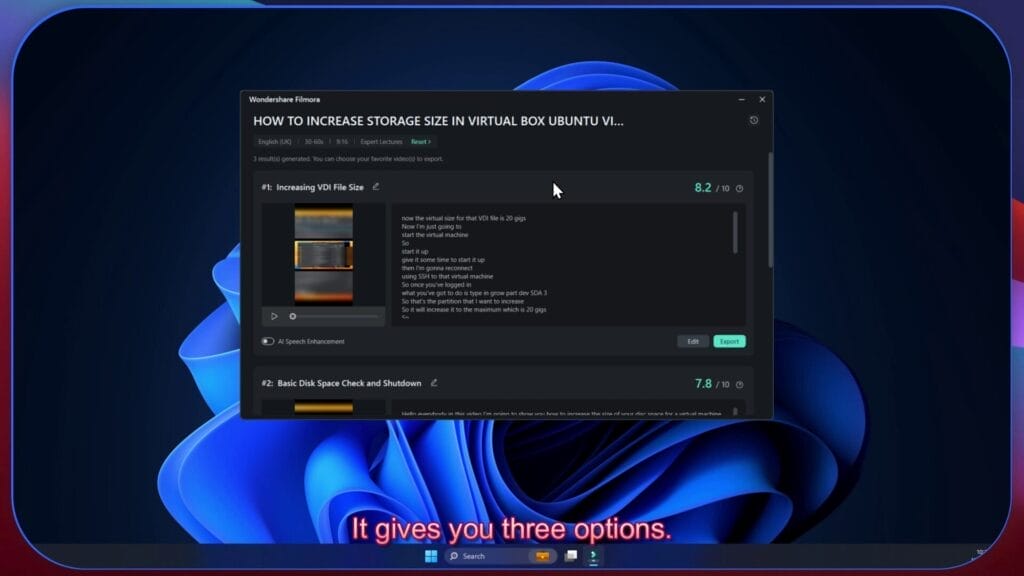
Navigating the Interface
The user interface is a breeze. It’s intuitive; everything from selecting clip duration to choosing templates is seamless. After generating clips, you’ll get a score indicating their quality. As I found out, it’s important to check your AI credits before hitting generate.
Input your long video.
Choose language and clip duration.
Select a template that fits.
Review generated clips and edit as needed.
Keeping your audience in mind while creating these clips is crucial for success.
Lastly, while generating these clips may take a few minutes, the outcome is worth the wait. You’ll have concise, informative snippets that attract viewers and boost engagement, perfect for today’s fast-paced digital landscape. Here’s a video showcasing how to create these Smart Short Clips:
Step-by-step Guide to Creating Clips
1. Choosing the Right Video
When creating clips, the first step is choosing the right video to convert. What’s your best content? Ideally, you should pick videos that have strong visual or instructional elements. Think about what captures your attention! Choose something engaging and interesting. For education, how-to videos work wonders.
2. Adjusting Language and Duration Settings
Next, it’s time to adjust the language and duration settings. I often set my videos to English UK, which resonates well with my audience. Duration is another crucial factor; the ideal length for Instagram Reels is 15 seconds, while YouTube Shorts can stretch to 60 seconds. Find the sweet spot that keeps your viewers hooked!
3. Selecting Templates
Don’t underestimate the power of templates. They can set the mood for your content. Be creative—mix styles! Use one that complements your video’s theme. Keep your audience in mind. Which template aligns with your target viewers?
4. Final Thoughts
Before hitting that generate button, double-check your selections. Choose an educational theme and stay mindful of duration limits. This will help you maximize viewer engagement. After generating your clips, review the options. Always pick the one that resonates most. It may surprise you!
Maximising Engagement with Your Clips
Best Practices for Uploading and Sharing Short Clips
Let’s face it: in today’s fast-paced world, short videos reign supreme. Research shows that 87% of viewers prefer brevity over long formats. So how do we maximise engagement? First, ensure your clips are well-edited, with a clear message. Think about your audience: what do they want to see? Use catchy titles and engaging thumbnails for a strong first impression.
Decide on the ideal clip length: 30 to 60 seconds works best.
Select a theme or style that matches your content.
Use tools like Wers Shave Humora’s Smart Shortclips for easy editing.
Analyzing Viewer Feedback and Video Performance Metrics
Once you’ve uploaded your video, it’s time to play detective! Pay attention to likes, comments, and shares. These numbers tell you what clicks with your audience. When I first started, I was amazed at how much feedback could guide my next moves.
Iterating Based on Audience Engagement: A Personal Journey
As I dived deeper into video creation, I learned that engagement goes beyond editing. It’s about understanding my audience. Early on, I noticed certain styles resonated more than others. I made it a habit to experiment, trying different formats and topics.
This journey is ongoing. When I launched my short clips, I found that well-edited content led to a 50% increase in engagement rates. I invite you to join me in this journey — test, observe, and adjust!
In conclusion, engagement is a two-way street. I encourage you to interact through comments. Your feedback is invaluable in shaping my future content!
Troubleshooting Common Issues and FAQs
Using Smart Short Clips can sometimes lead to a few hurdles. But don’t worry, we’ve all been there. Whether you’re new or have been creating content for a while, you might face some familiar dilemmas. Let’s dive into what to expect and how to overcome these challenges.
Common Dilemmas
Many users find themselves struggling with:
Generating clips that exceed the time limit, like my own experience where a clip ran for 3 minutes and 26 seconds.
Choosing the right template or theme to match your video content.
Managing AI credits effectively to avoid running low during a crucial moment.
Quick Fixes and Tips
From my experience, here are some handy tips:
Before generating clips, select the desired length, ideally between 30 to 60 seconds.
Review generated options carefully, and always opt for the highest-scoring clip to maximise viewer engagement.
If you encounter issues like typos, don’t hesitate to ask the community for help. They often have great suggestions.
Remember, trial and error is part of this learning journey. It’s a way for us to get better. Let me know if you run into any issues and remember you can use the free trial in addition, there is a FimoraGO mobile app which I’ve started using and will share some more videos in a future post. Happy creating!
If this article helped you in any way and you want to show your appreciation, I am more than happy to receive donations through PayPal. This will help me maintain and improve this website so I can help more people out there. Thank you for your help.
I am an entrepreneur based in Sydney Australia. I was born in Vietnam, grew up in Italy and currently residing in Australia. I started my first business venture Advertise Me from a random idea and have never looked back since. My passion is in the digital space, affiliate marketing, fitness and I launched several digital products. You will find these on the portfolio page.
I’ve decided to change from a Vegetarian to a Vegan diet and started a website called Veggie Meals.
I started this blog so I could leave a digital footprint of my random thoughts, ideas and life in general.
If any of the articles helped you in any way, please donate. Thank you for your help.
Affiliate Compensated: there are some articles with links to products or services that I may receive a commission.